Steps to Setup Plan Purchase Form

How to Setup Configured Plan and Signup Form with ARMember Pro plugin.
This document provides a guide to setting up the Configure Plan Signup Page. It helps integrate membership plans, registration forms, and payment gateways. The guide covers setup, plan selection, layout, styling, coupons, and payment options. Whether you’re setting up a standard page or a pop-up form, this guide ensures a fully functional system.
Create/Add New Configure Plan Signup Page Setup
To create this, go to the WordPress Panel ⇾ ARMember ⇾ Configure Plan + Signup Page. Click the button on the top right labeled + Add New Setup to create a new setup form for your site.

Step 1: Let’s Start

- Setup Name: First, enter a name for your Configure Plan Signup Page. This is also called the Plan Purchase Form or Setup form. Choose a name according to your site’s needs.
- Setup Type: ARMember offers 3 setup types:
- Membership Plan Setup
- Paid Post Setup (only if Pay Per Post Addon is active)
- Gift Setup (only if Gift Membership Addon is active)
- Select Plans: Choose the membership plans you’d like to include. The drpdown will include all your created plans found on the Manage Plans page. Select the plans that best suit your needs. Also with the link
Add New Planyou can create a new plan too.
Select the Membership Plan Setup option to create a setup for purchasing or subscribing to a membership plan.
Step 2: Payment Gateways
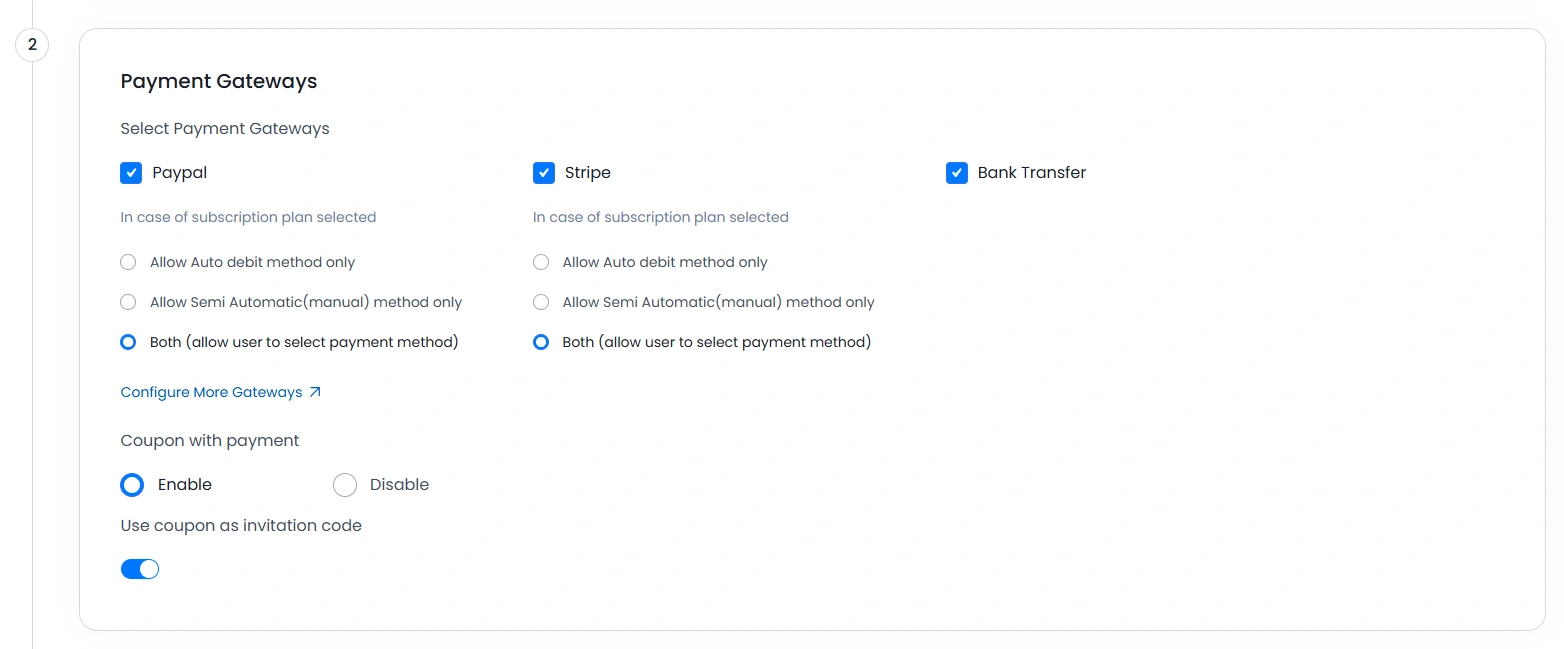
- Select Payment Gateway: Choose payment gateways from those activated in the Payment Gateways Tab at General Settings. These gateways will be used for payments related to the plans.
- Mode of Subscription
- Allow Auto Debit only
- Allow Semi-Automatic (manual) method only
- Both (users can select the payment method)
- Enable Coupon with Payment: This section offers a radio button for the selecting whether to display the Apply Coupon section on the front-end or not. If this option is enabled, then the user will get an option to add a Coupon Code at time of payment in front side. And this will be optional, which means that the members who have a coupon code can apply the coupon, else others can skip it. It’s better to know more regarding the coupon code management.
- Use coupon as invitation code: Enable this option to make the coupon code field compulsory during payment. This is useful if you want to set up a registration system with invitation codes. Learn more about invitation codes.

Each payment method works separately. It’s a good idea to learn more about payment methods.
Make sure that this option will be visible if ARMember Coupon Management Addon is activated.
Step 3: Forms

- Select Signup/Registration Form: Once plans and payment gateways are selected, the next step is to choose the registration form from the dropdown. This list will show forms from the Manage Forms page. Note that if the user is already logged in, the form won’t display, but other sections like membership plans, payment gateways, and payment summaries will still be visible.
- Form Inputs: Set custom labels for the front-end. This includes labels for the submit button, payment section title, payment mode, and payment summaries. You can also add
HTML Contentto customize the summary to fit your site’s needs.
List of Tags for Payment Summary
[PLAN_NAME]– Displays the selected plan’s title.[PLAN_CYCLE_NAME]– Displays the selected payment cycle title.[PLAN_AMOUNT]– Displays the selected plan’s amount.[DISCOUNT_AMOUNT]– Displays the coupon amount (if a coupon is applied).[PAYABLE_AMOUNT]– Displays the final amount payable.[TRIAL_AMOUNT]– Displays the trial period amount.[TAX_PERCENTAGE]– Displays the tax percentage (if Tax Addon is enabled).[TAX_AMOUNT]– Displays the tax amount.[PRO_RATA_AMOUNT]– Displays the Pro Rata amount (if Pro rata Addon is enabled).[SELECTED_CHILD]– Displays the total of selected child users (if Group/Umbrella Membership Addon is enabled).
Step 4: Signup Steps

- Enable Two Steps Sign-up: ARMember does provide a facility through which you can divide the form in two part one will be the plan selection and the other will be registration and the payment summary and payment gateways.
- Next Button Label: Change the label for the ‘Next’ button when two-step registration is enabled.
- Previous Button Label: Change the label for the ‘Previous’ button during two-step registration.
If enabled, the form will display in two steps as below

Step 5: Styling & Formatting
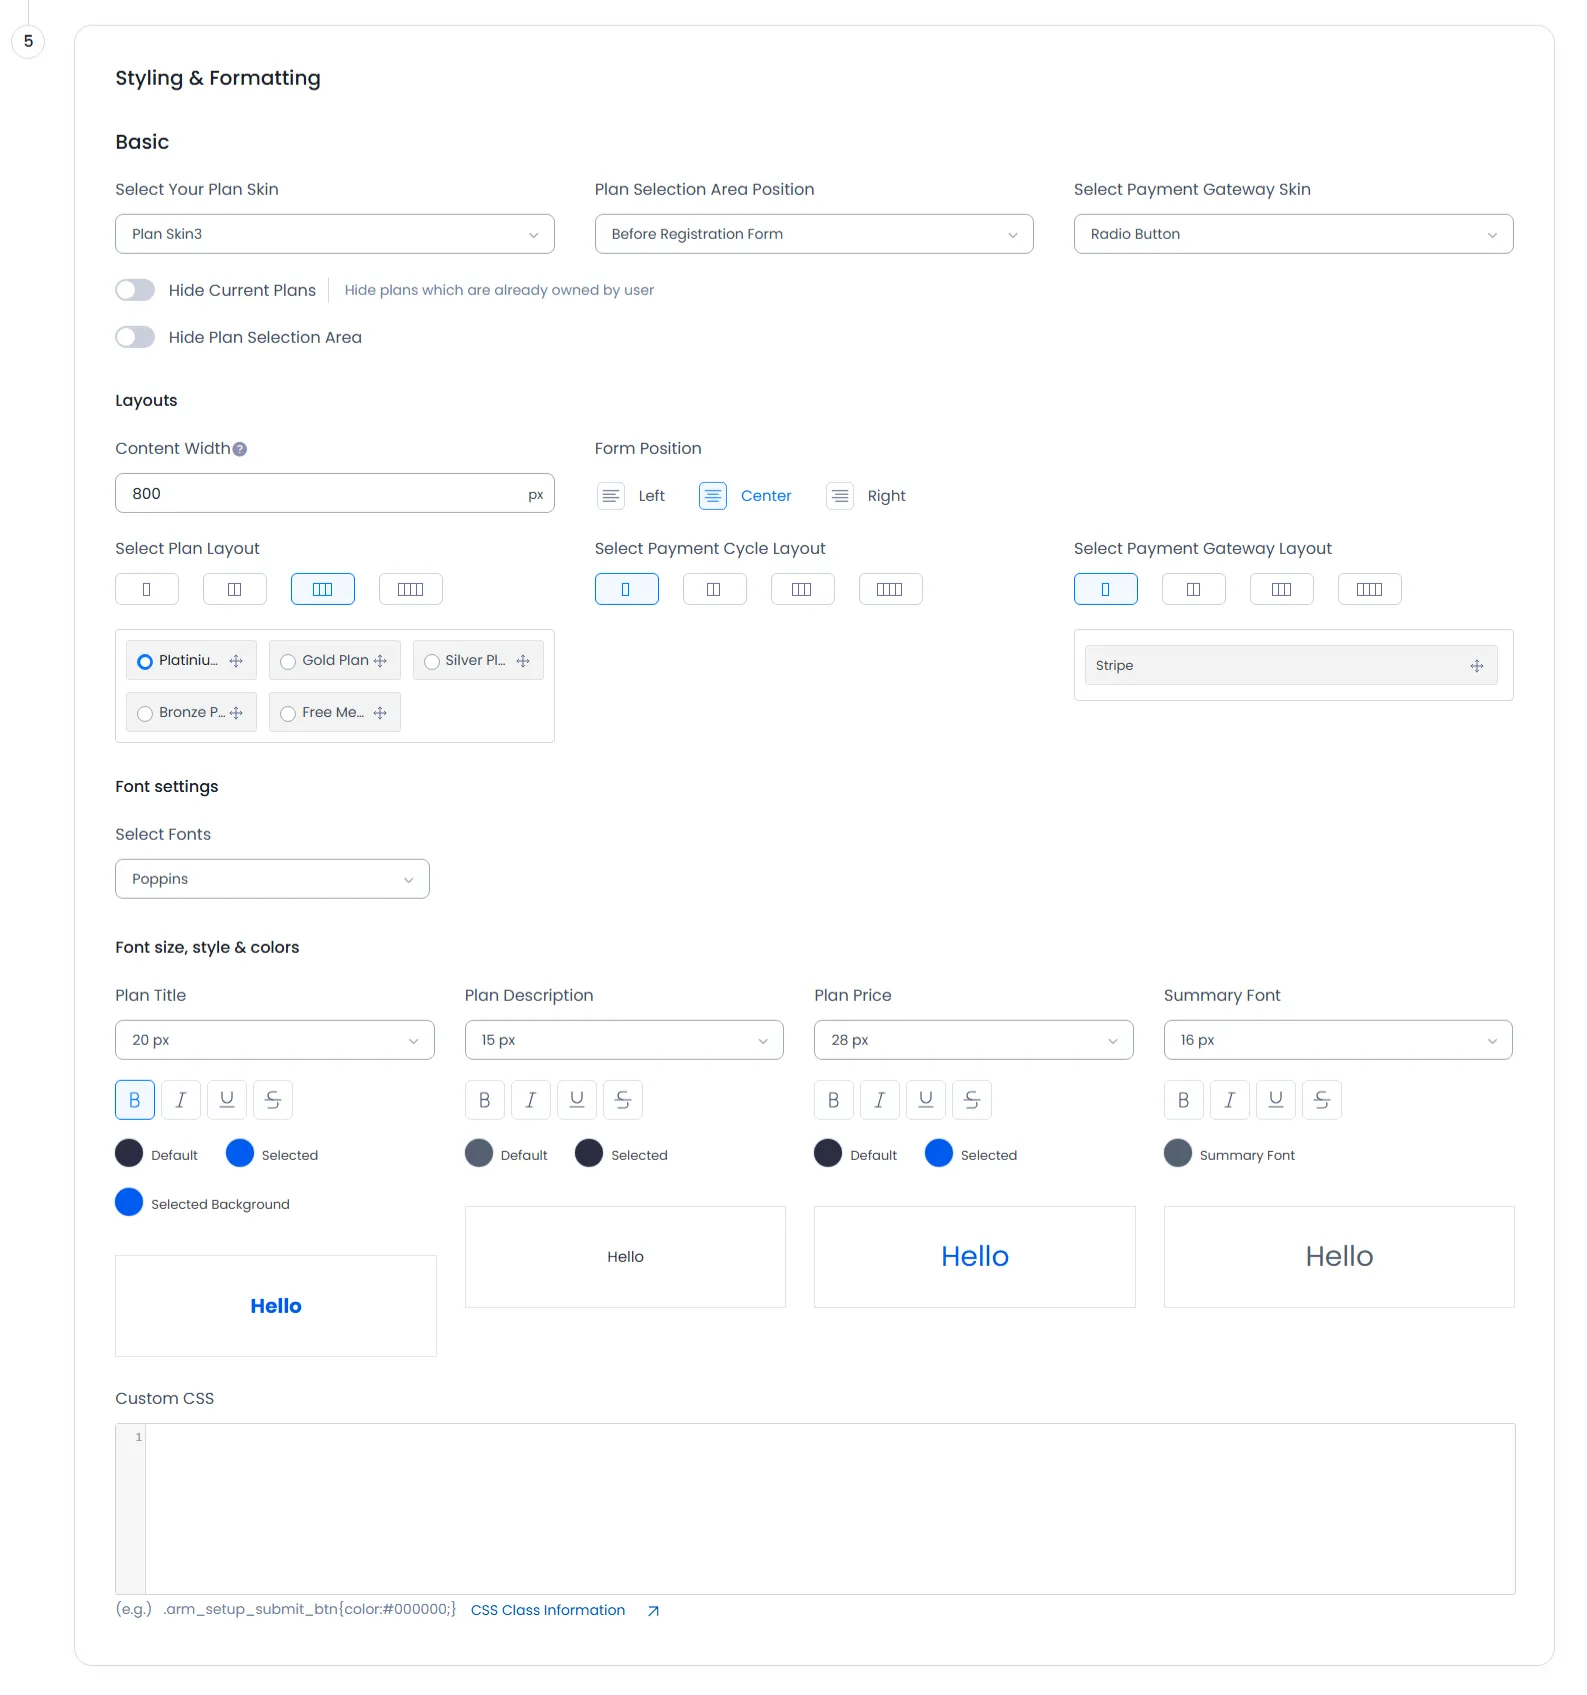
- Select Your Plan Skin: ARMember provides various skin options for membership setup. Select your desired plan skin and check its
Previewto get more idea how your setup will look like at the front side. Different kind of skin layouts are available withdifferent heading,different background,dropdown formatetc. - Plan Selection Area Position: Choose the position of the plan selection area:
Before Registration FormorAfter Registration Form. - Select Payment Gateway Skin: Choose how the payment gateway selection will be displayed, either as radio buttons or a dropdown. You can also adjust content width and form position.
- Hide Current Plans: This hides the current plans from the plan selection area when the user is logged in.
- Hide Plan Selection Area: If enabled, the plan selection section will be hidden. The default plan, selected in the admin setup, will be assigned automatically.
- Content Width: Set the form width in pixels as per your requirements.
- Select Plan Layout: From here, you can select one plan, which is shown as selected plan by default in front end. You can also set the position of Plans and Payment Gateways as those are
sortable. - Select Payment Cycle/Gateway Layout: Here you can select the number of columns you wish to show the payment gateway and payment cycles in.
- Select Fonts: You are able to change fonts settings which apply to content of plans and payment gateways. You have the following font options.
- Bold
- Italic
- Underline
- Line-through
- Color Options: Set Color Scheme related to your theme according to requirement.
- Custom CSS: If you wish to make more modifications other then the above provided option then ARMember offers section to add your desired modifications. Additionally ARMember also provides multiple class information through which you get an clear idea about the class and you can add the CSS accordingly.
- How to hide the title of the setup form?
- How to convert the string name “Your Current Membership”?
Important Note: When the plan skin is changed, the font and color settings will automatically reset to their default values for each skin. If you have customized font and color settings for the Plan + Signup page, please reconfigure these settings accordingly before saving the form.
If this option is enabled and the user has the only plan available, the setup form won’t show up.
| Options | Description |
|---|---|
| Font Family | Change Font from given list of fonts, where google fonts are also supported. |
| Font Size | Change font size from here, which is in px. |
| Font Style | You are able to apply font styles from here. You have the following font styles.
|
| Options | Description |
|---|---|
| Font Color Options | Change color for Plan Title Font, Plan Description Font, Price Font, Summary Font. |
| Active State Color Options | Change color for Selected Plan Background, Selected Plan Title Font, Selected Plan Description Font, Selected Price Font. |
Setup Form as Popup
To add the shortcode for the having the setup form as popup, navigate to Admin Panel ⇾ Pages ⇾ Add/Edit Page, here you can search for Membership Block and select the option Membership Setup Wizard and then add the shortcode as per your requirements, kindly check the below provide screenshot.

Example
[arm_setup id="{SETUP_ID}" hide_title="false" popup="true" link_type="link" link_title="Click here to open Form" overlay="0.6" modal_bgcolor="#000000" popup_height="auto" popup_width="800" link_css="" link_hover_css=""]Replace the {SETUP_ID} with the ID you have at your site for the create setup forms, you can check this out from ARMember ⇾ Configure Plan + Signup Form. In order to add the setup as popup directly into the menu, you can click here
Pre Populate Fields Support
Often a form will contain several generic fields that many respondents will answer in the same way. Rather than making users fill in these fields, which can be repetitive and time-consuming, you can pre-populate them with the correct information so that, when users open the form, these fields will already be filled in. To do so, you will need the form’s URL and the variable names associated with the fields they want to fill in.
Field values can be passed into a form by appending them to the form’s URL using the following structure:
baseURL?variable1=value
Replace base URL with the form’s URL, variable1 with the name attribute associated with the field to be filled in, and value with the appropriate plan's ID value. To fill in multiple fields, insert the ampersand symbol (&) before any additional variables:
baseURL?variable1=value&variable2=value
For Example:
http://your_site_url/membership-setup-page/?subscription_plan=2The result of above example will be like – the plan with plan ID value 2 get selected.
FAQs
ARMember does provide a paramenter to directly hide the title of the form at the shortcode, here you can find information on how to hide the title.
This string appear when the member is logged in and also holds a plan, then at the time of accessing the setup form in the top they will be able to check their current plan with the string name “Your current Membership:”.
In order to change it you can add the your_current_membership_text parameter and add the string name as per your requirements.
Example
[arm_setup id="{SETUP_ID}" your_current_membership_text="Membership Owned"]Replace the {SETUP_ID} with the ID you have at your site for the create setup forms, you can check this out from ARMember ⇾ Configure Plan + Signup Form