Stripe Payment Gateway

How to integrate Stripe Payment Gateway with ARMember Plugin
Choose Your Currency
The very first step is to select your desired currency of your choice. To set the currency navigate to the ARMember ⇾ General Settings page and here check option for Default currency and select the currency that works for you. ARMember provides a wide range of currencies to choose from, however if you feel to add your desired currency then you can add the custom currency too.
Setup ARMember Stripe Integration Payment Gateway
To enable the Stripe Payment Gateway, navigate to ARMember ⇾ General Settings ⇾ Payment Gateways page and here enable the switch for the payment gateway.
Important Note: While uninstalling ARMember, if any user has auto recurring subscription then that will be canceled from payment gateways.
How to get API keys?
To activate ARMember Stripe Integration, you must require Secret Key & Publishable Key. Find your API keys in your Stripe account at account settings. Follow below steps to get API Keys:

How to get a Stripe key & set Webhook to configure the Stripe Payment Gateway in the ARMember Pro plugin
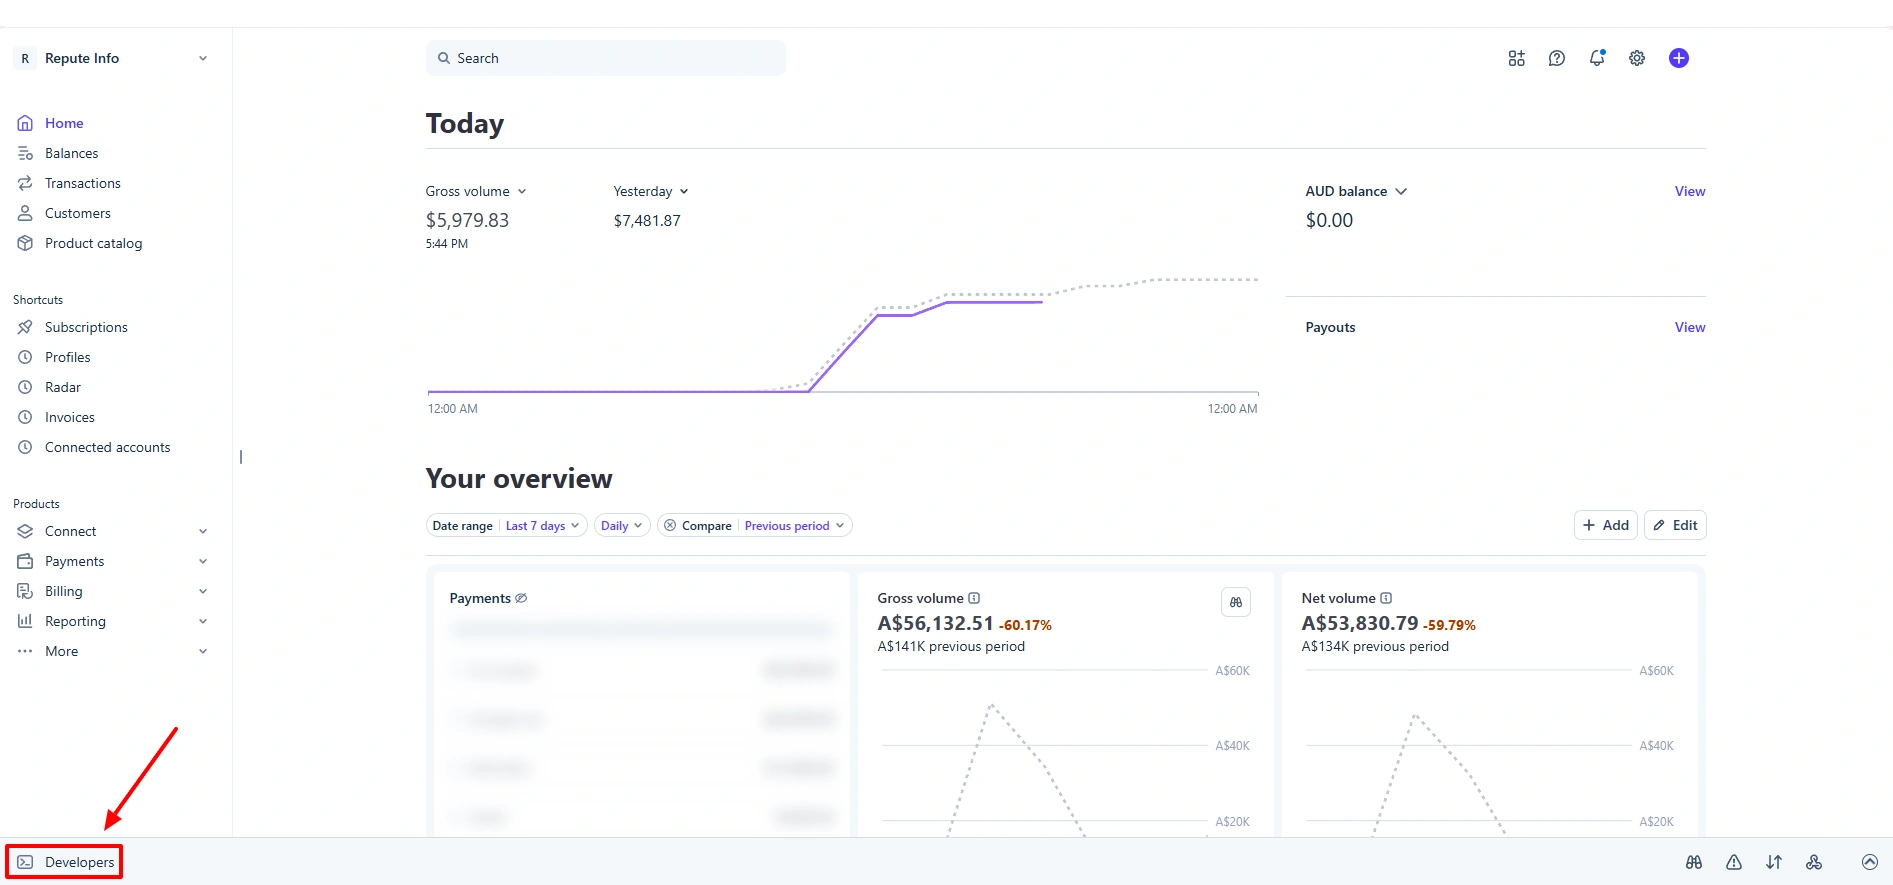
- Log in to your Stripe account, and once you have successfully signed in to your dashboard, look toward the bottom-left corner of the screen where you will find a menu item labeled Developers, which provides access to additional tools and settings.
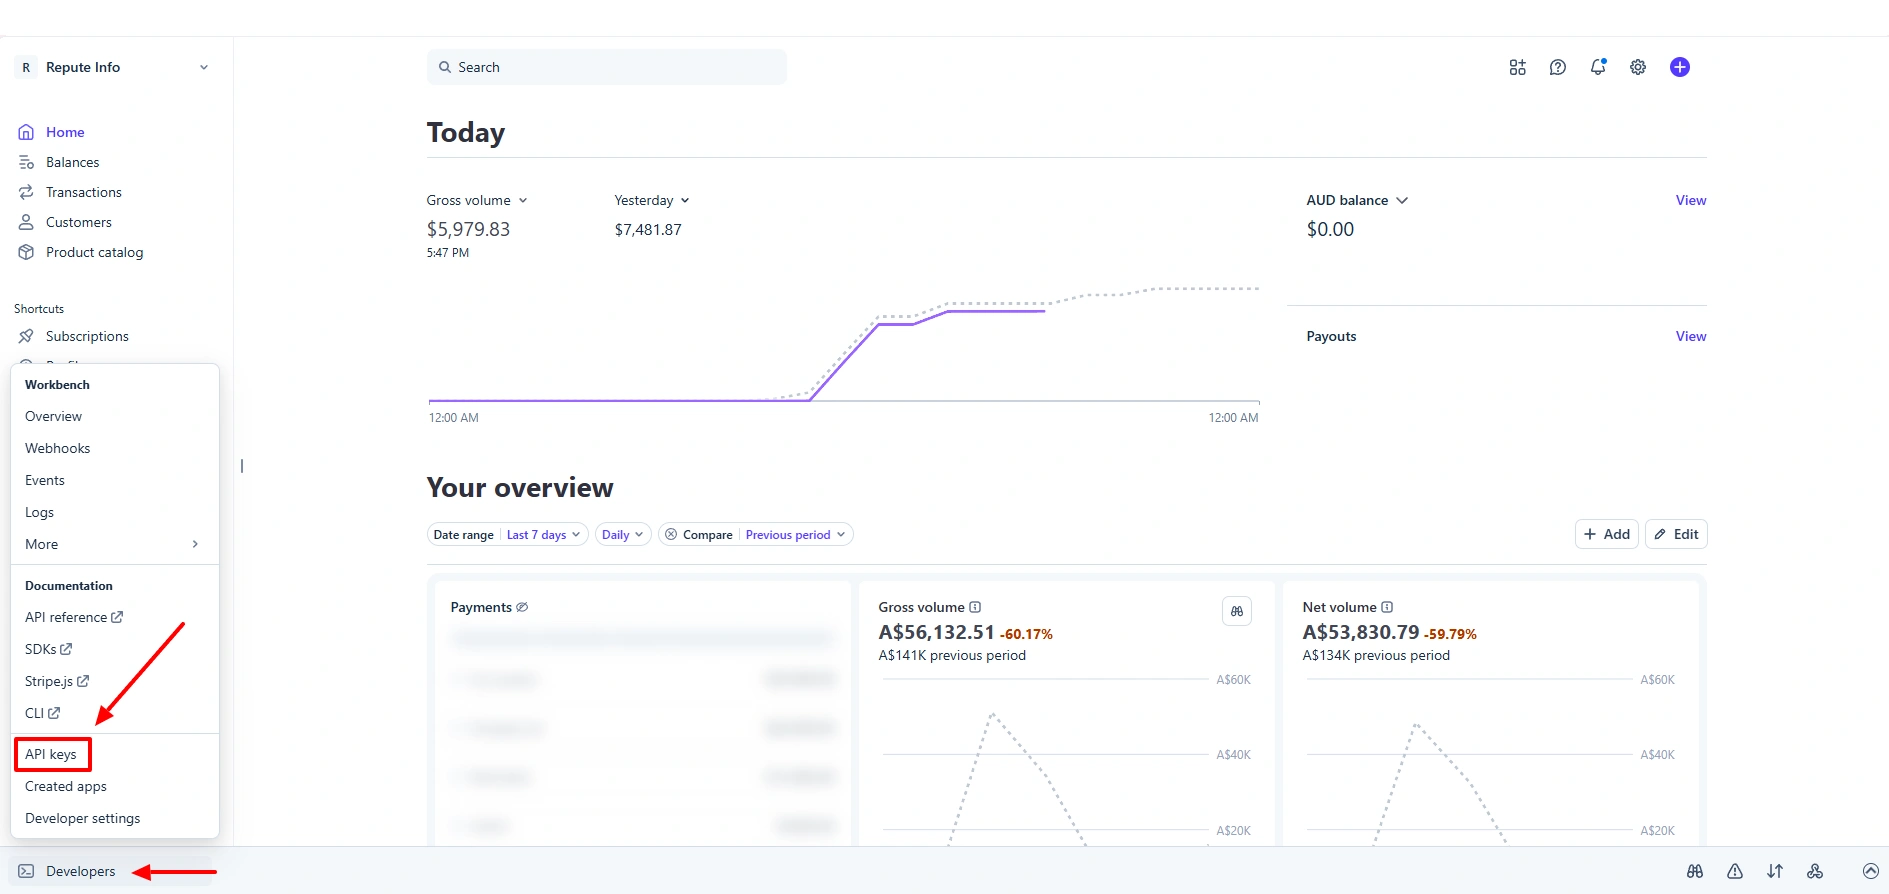
- Click on the Developers option to open its submenu, and once the list of options appears, navigate through it and select API Keys, which will take you to the section where you can view and manage your API credentials.
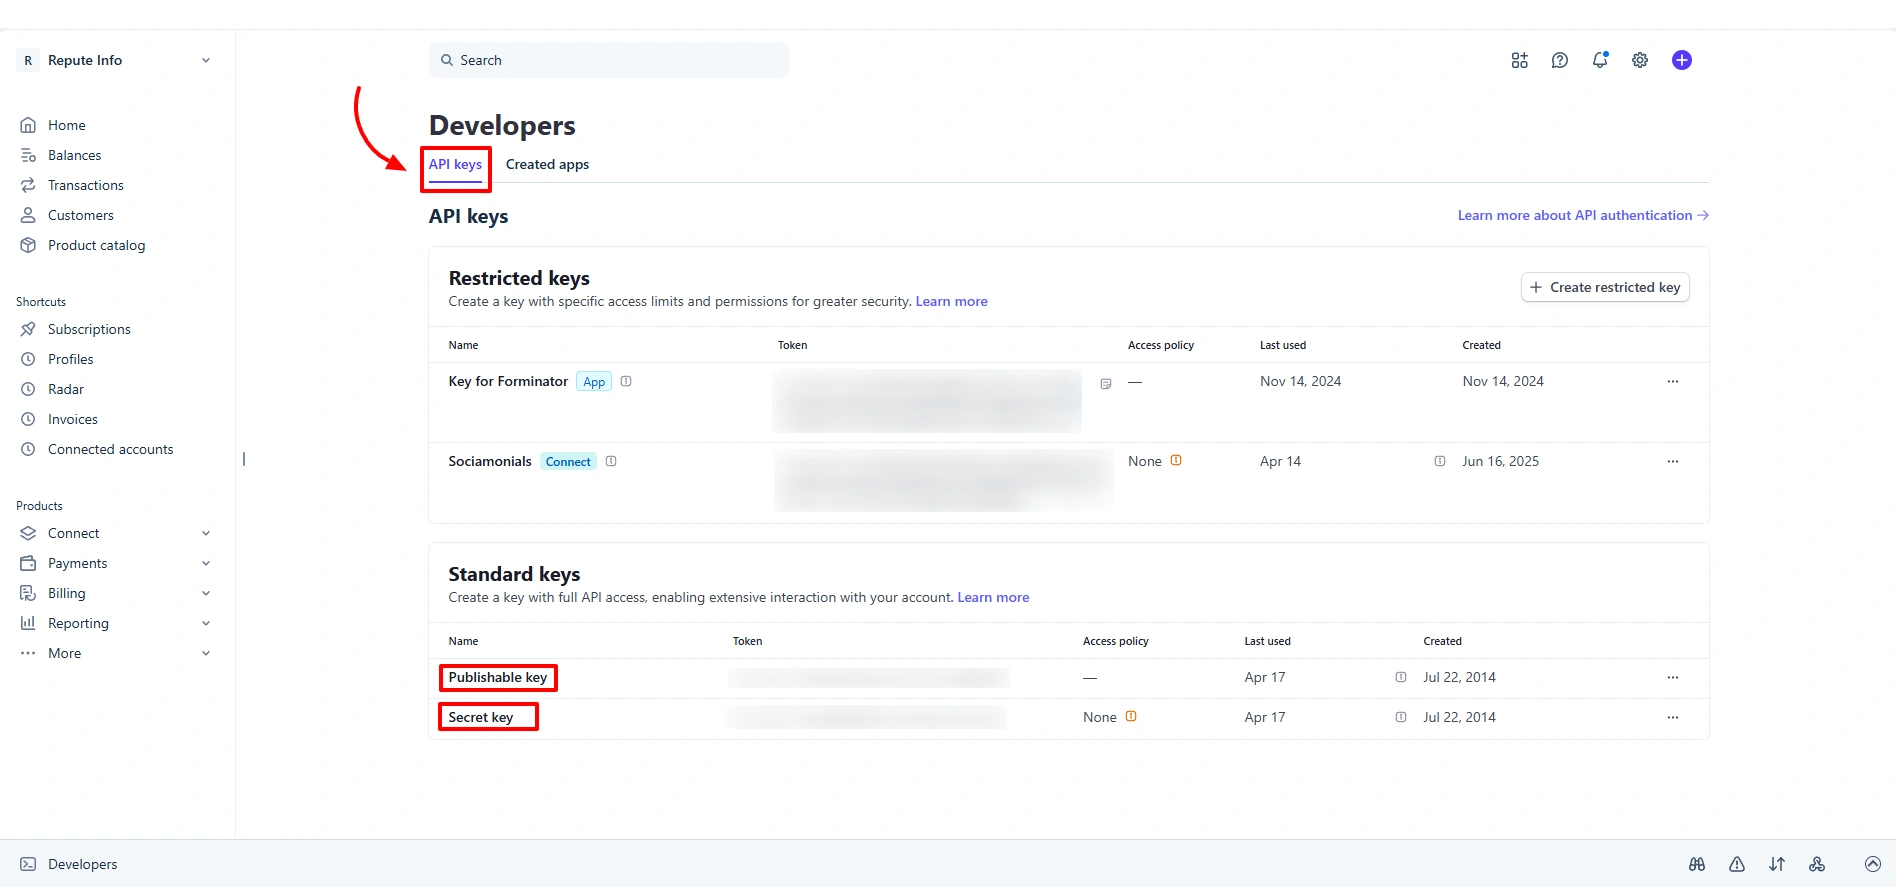
- On this page, you will find two important keys: the
Publishable Keyand theSecret Key, which are essential for integrating Stripe with your application, enabling secure communication, and managing API requests effectively.
Stripe Built-In Form Fields
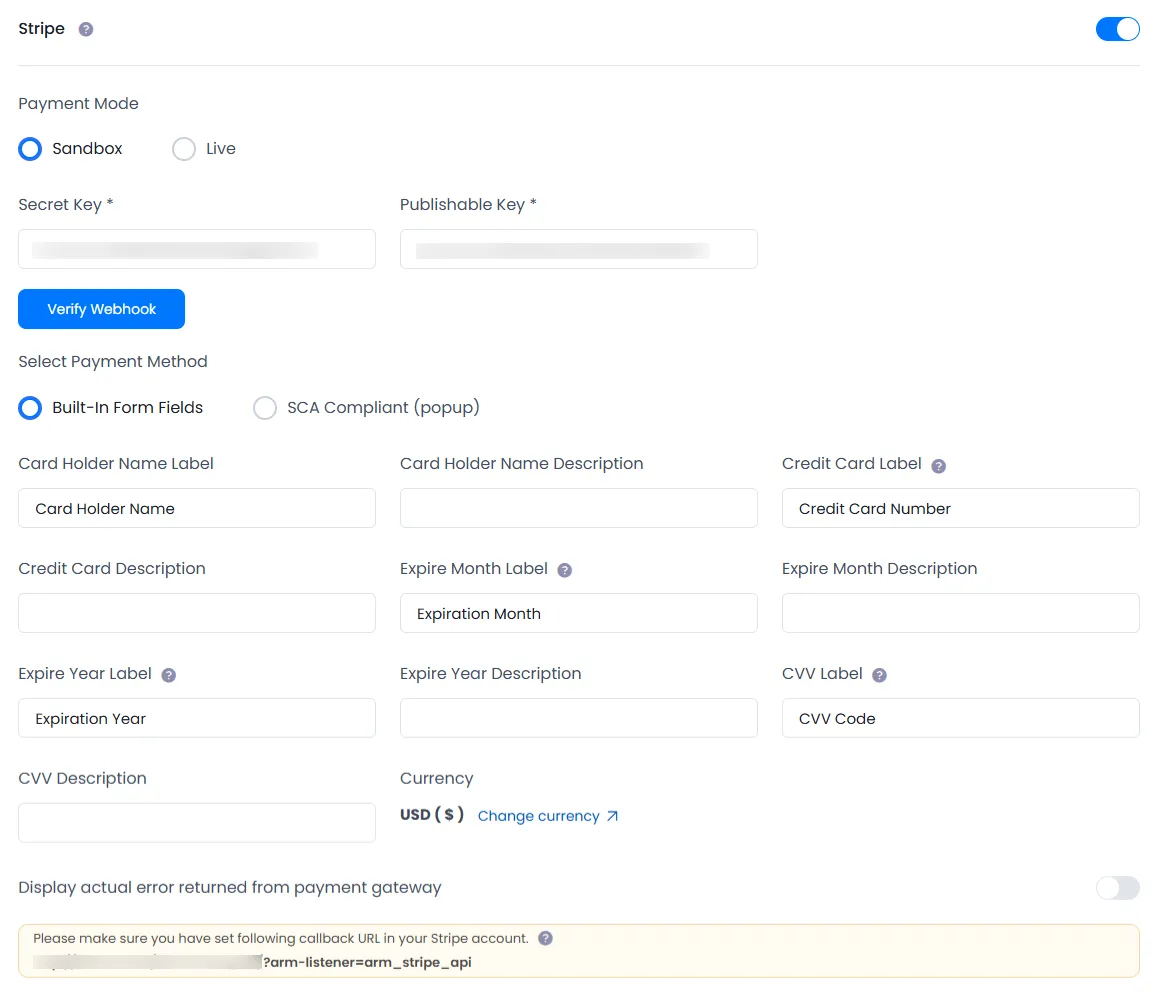
At the Stripe Payment Gateway you have 2 different Payment Methods. One is Built-in Form fields and other is SCA Complaint(popup). The Built-in Form Fields allows to charge the members on the site itself via a form that is added to the setup form itself for the payment. One can select this option if they need this.
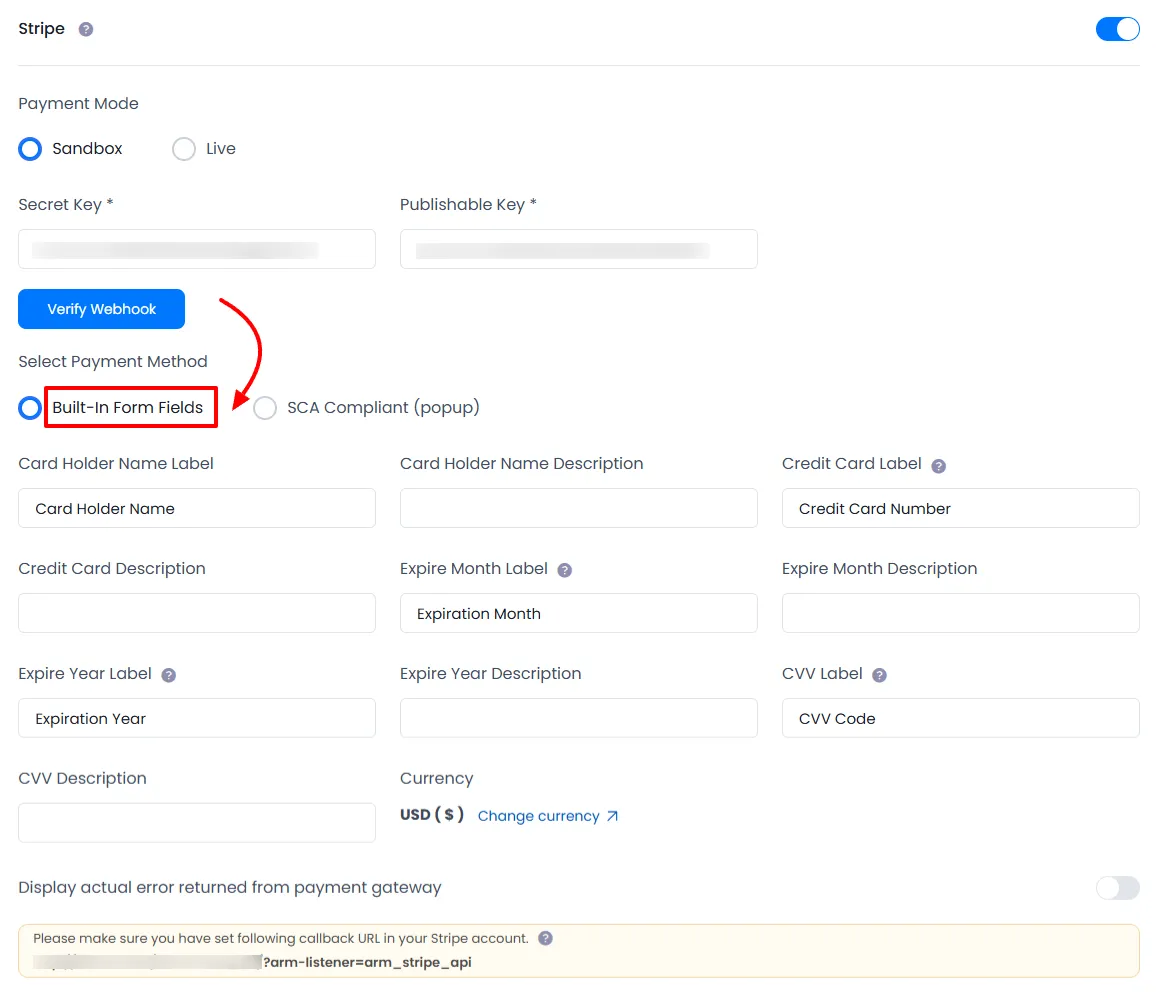
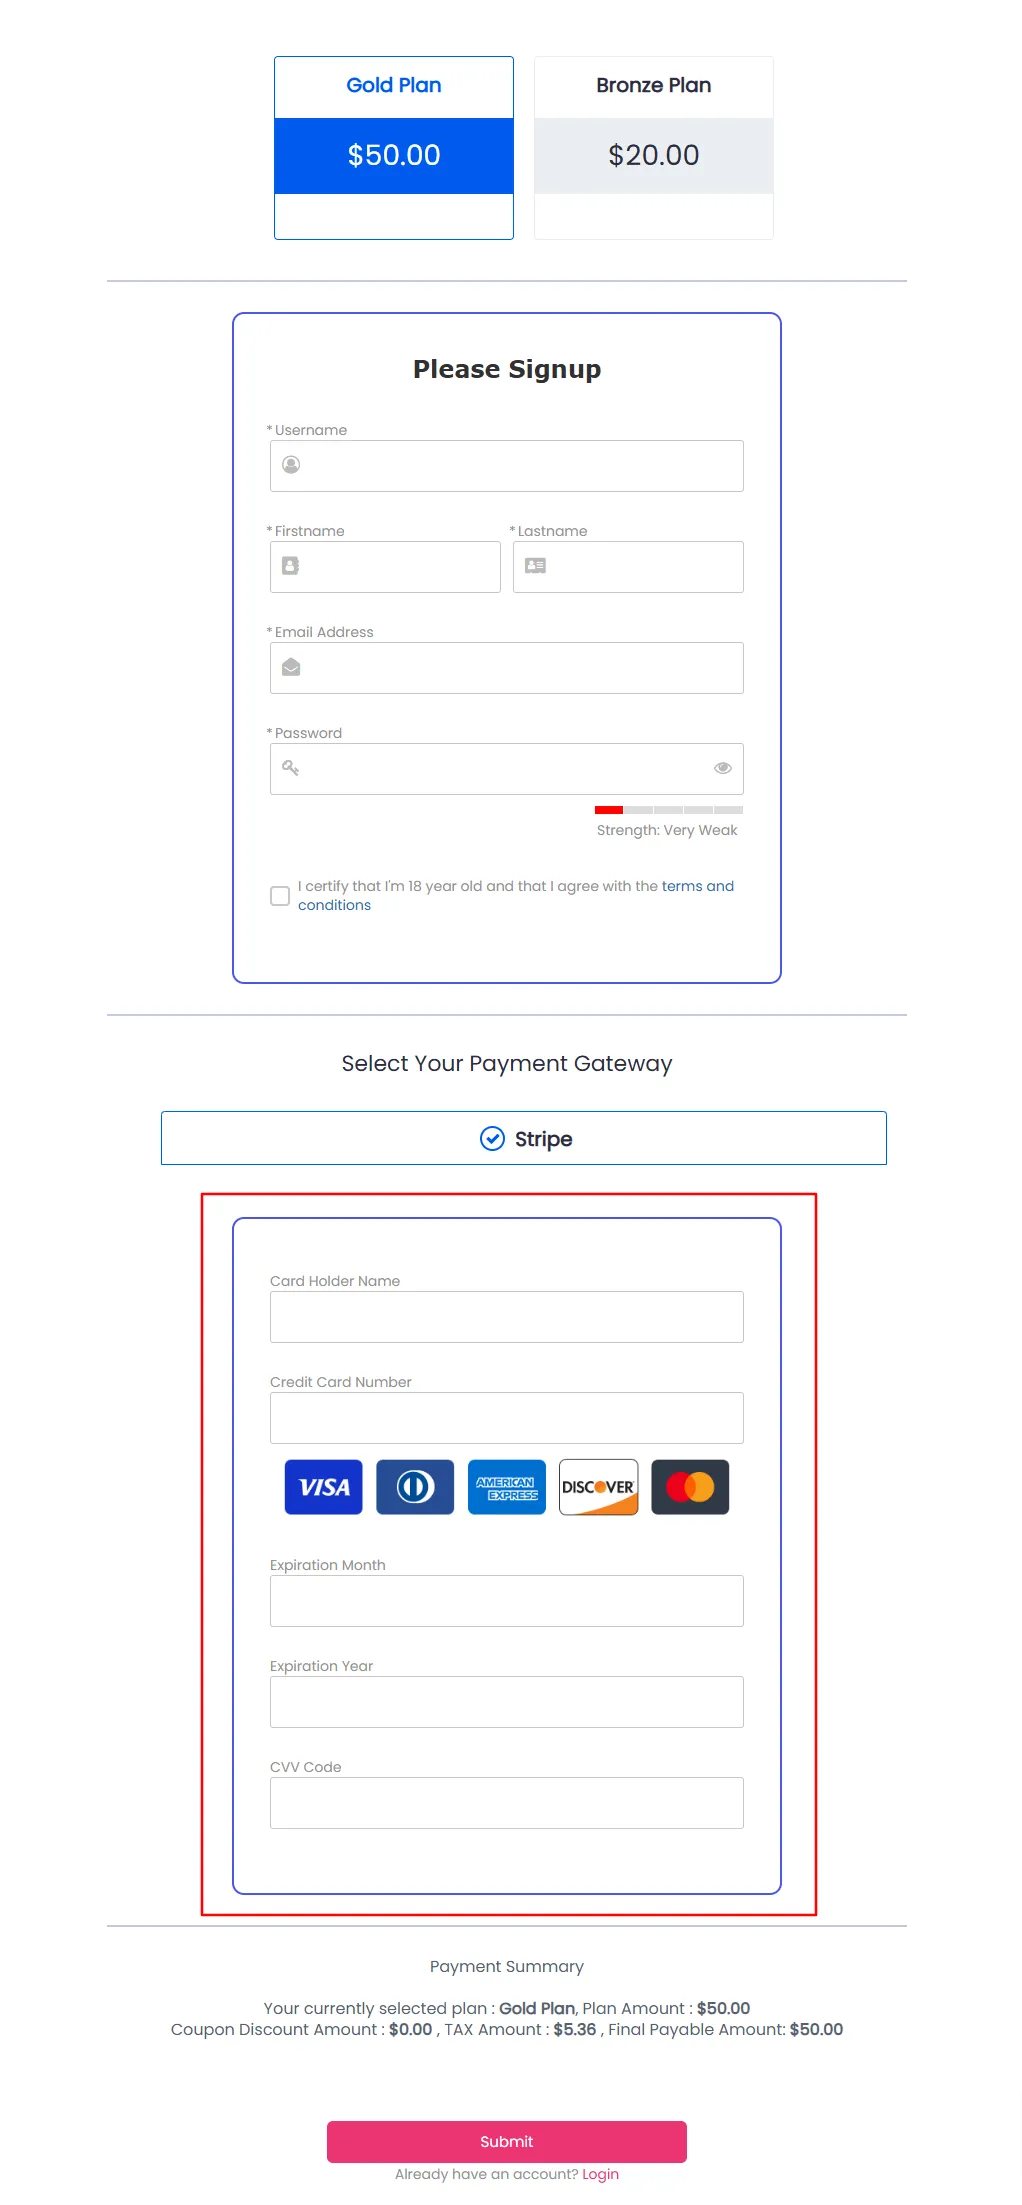
For Built-in Form Fields, ARMember allows to change the label of credit card fields, like Card Holder Name Label, Credit Card Label, Expire Month Label, etc. which the form displays during submission. Below screenshot shows the preview of how the Built-In Form Fields will look like on the front-end.
Stripe SCA Compliant (popup)

How to integrate Stripe SCA Method Payment Gateway with ARMember Plugin
The second method is SCA Complaint(popup). Upon selection of this method from the ARMember ⇾ General Settings ⇾ Payment Gateways allows you to have a popup through which the members can fill up the card details.
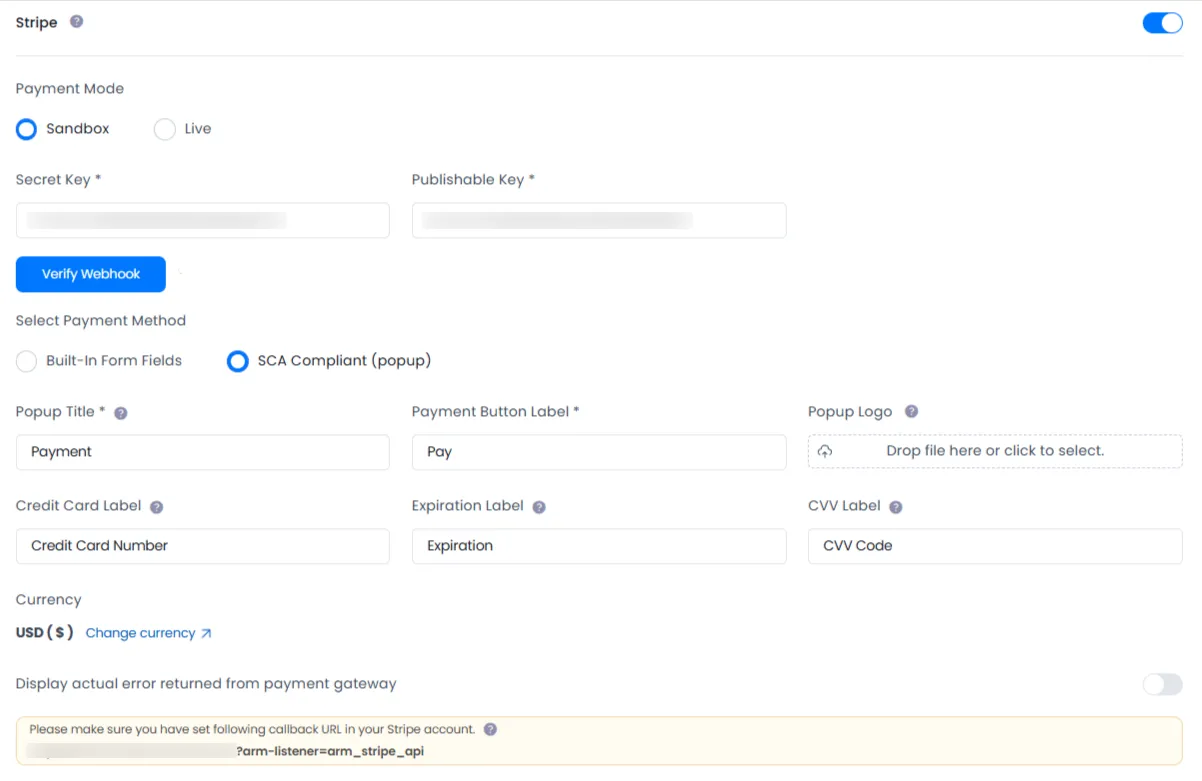
For SCA Complaint (popup) Method, you can change the title, pay now button label and also can upload a logo to display in the Stripe Popup. You can use {arm_selected_plan_title} shortcode in the Popup Title to display Selected Plan Name instead of any Static Title
Important Note: Logo should have 70px height and 70px width. Logo with other size will not be uploaded
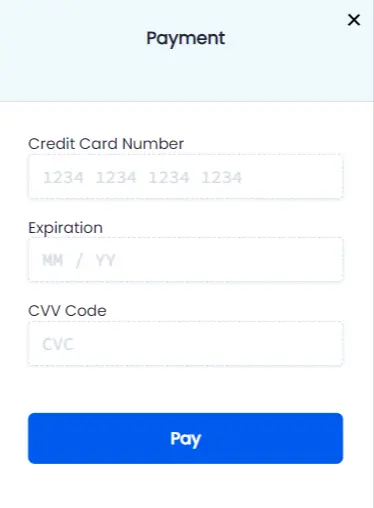
In SCA Complaint Method, all the transactions are 3D secure and if the card requires any further authentication, it’ll display a popup box to confirm the payment and reduce the Payment Fraud Disputes.
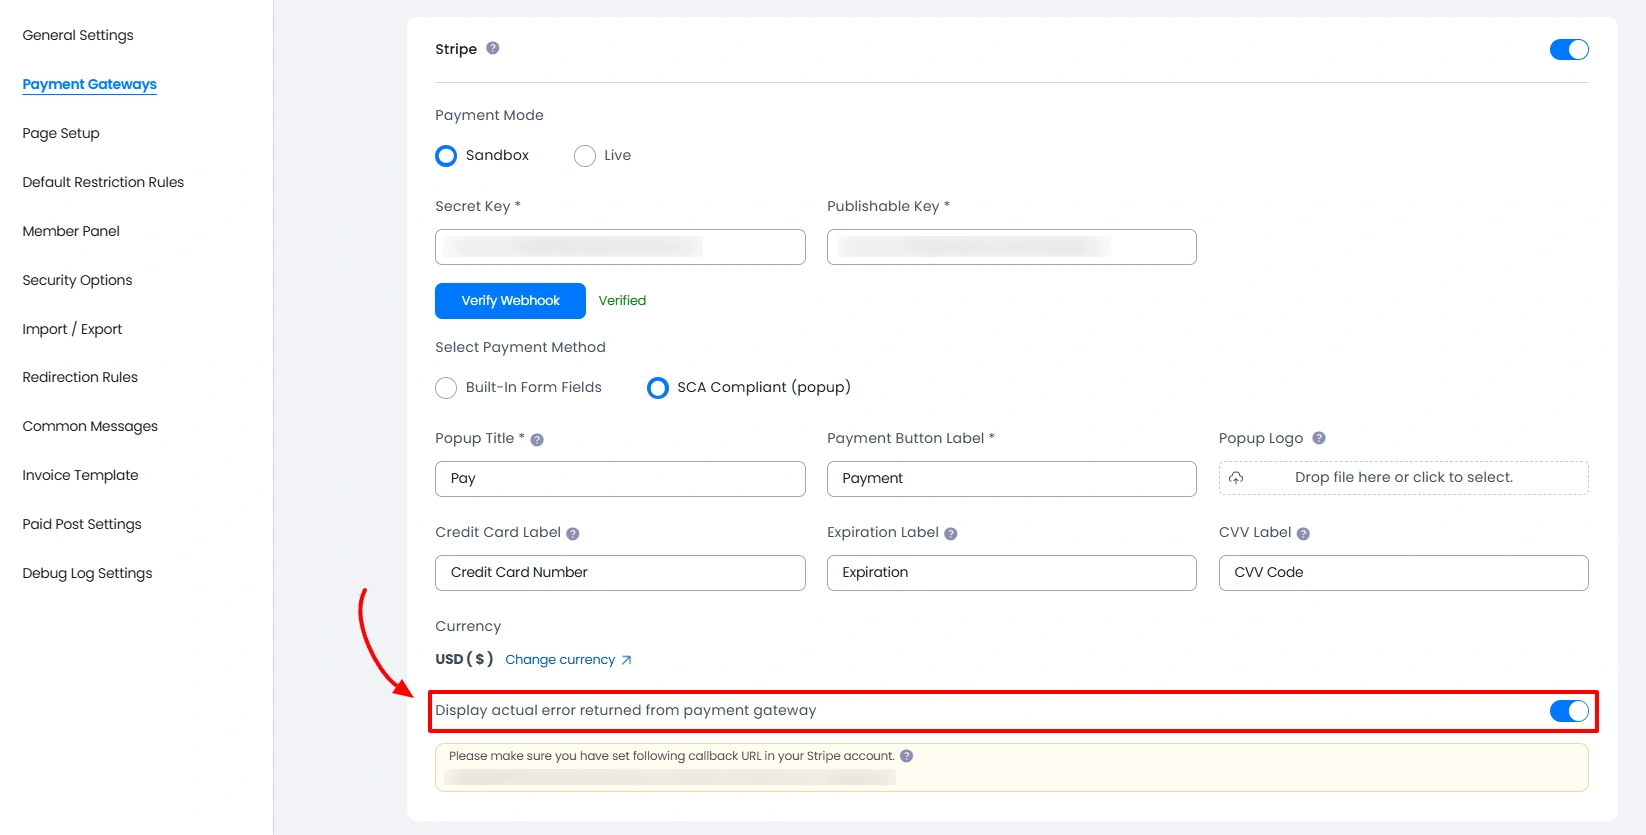
How to Display Actual Error returned from Gateway?
In case of any error at setup form, ARMember allows you to display actual error returned from Stripe payment gateway. In order to display this you can navigate to the ARMember ⇾ General Settings ⇾ Payment Gateways and here at the Stripe enable Display actual error returned from payment gateway switch as you can see in screen-shot. And save the changes.
Stripe Supported Currencies
Although ARMember offers a comprehensive list of the all the currencies, it is very important to verify the currencies supported by the Stripe Payment Gateway.
Stripe frequently updates its list of supported currencies, so it’s a good idea to check their official website or help resources for the most current information regarding supported currencies and any specific limitations or conditions that may apply. Checkout this reference article.
AEDAFNAMDANGAOAARSAUDAWGAZNBAMBBDBDTBGNBIFBMDBNDBOBBRLBSDBWPBYNBZDCADCDFCHFCLPCNYCOPCRCCVECZKDJFDKKDOPDZDEGPETBEURFJDFKPGBPGELGIPGMDGNFGTQGYDHKDHNLHTGHUFIDRILSINRISKJMDJPYKESKGSKHRKMFKRWKYDKZTLAKLBPLKRLRDGNFLSLMADMDLMGAMKDMMKMNTMOPMURMVRMWKMXNMYRMZNNADNGNNIONOKNPRNZDPABPENPGKPHPPKRPLNPYGQARRONRSDRUBRWFSARSBDSCRSEKSGDSHPSLESOSSRDSTDSZLTHBTJSTOPTRYTTDTWDTZSUSDUAHUGXUYUUZSVNDVUVWSTXAFXCDXOFXPFYERZARZMW
How to configure Webhook?
You must need to setup webhooks URL for recurring billing. Please follow below steps to configure webhooks.

How to Add Webhooks in Stripe Payment Gateway with ARMember Plugin
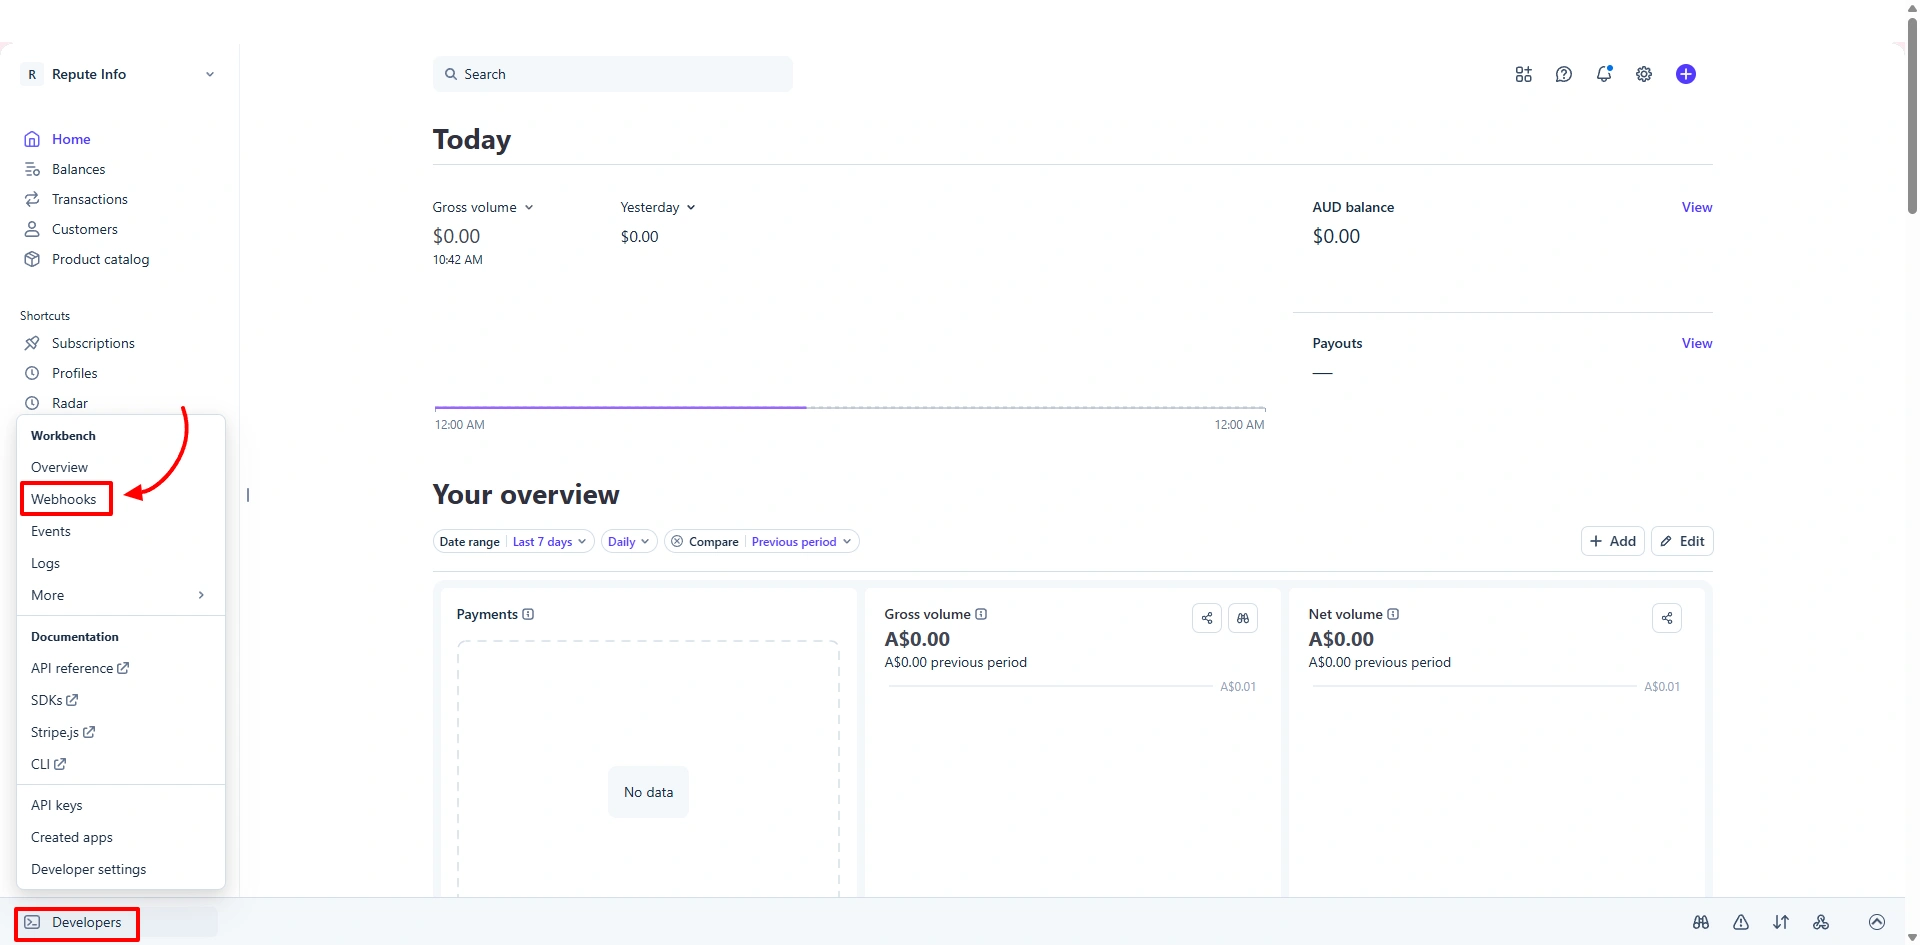
- The very first step in order to configure your Webhook is to login to your Stripe Account. Go to
Your Account ⇾ Developers. - At the
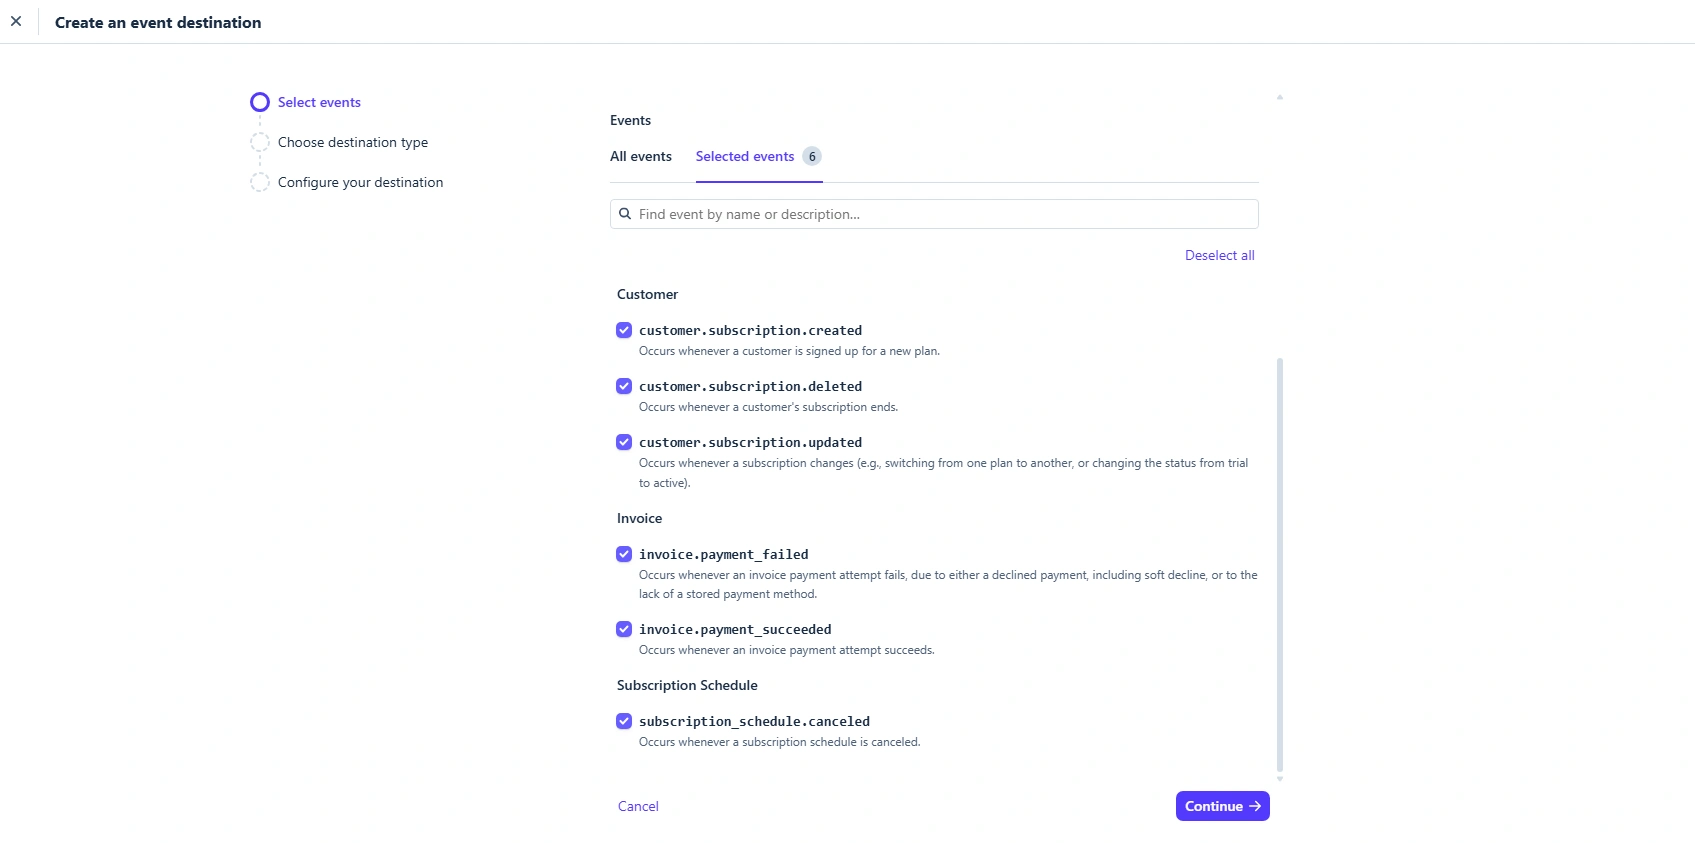
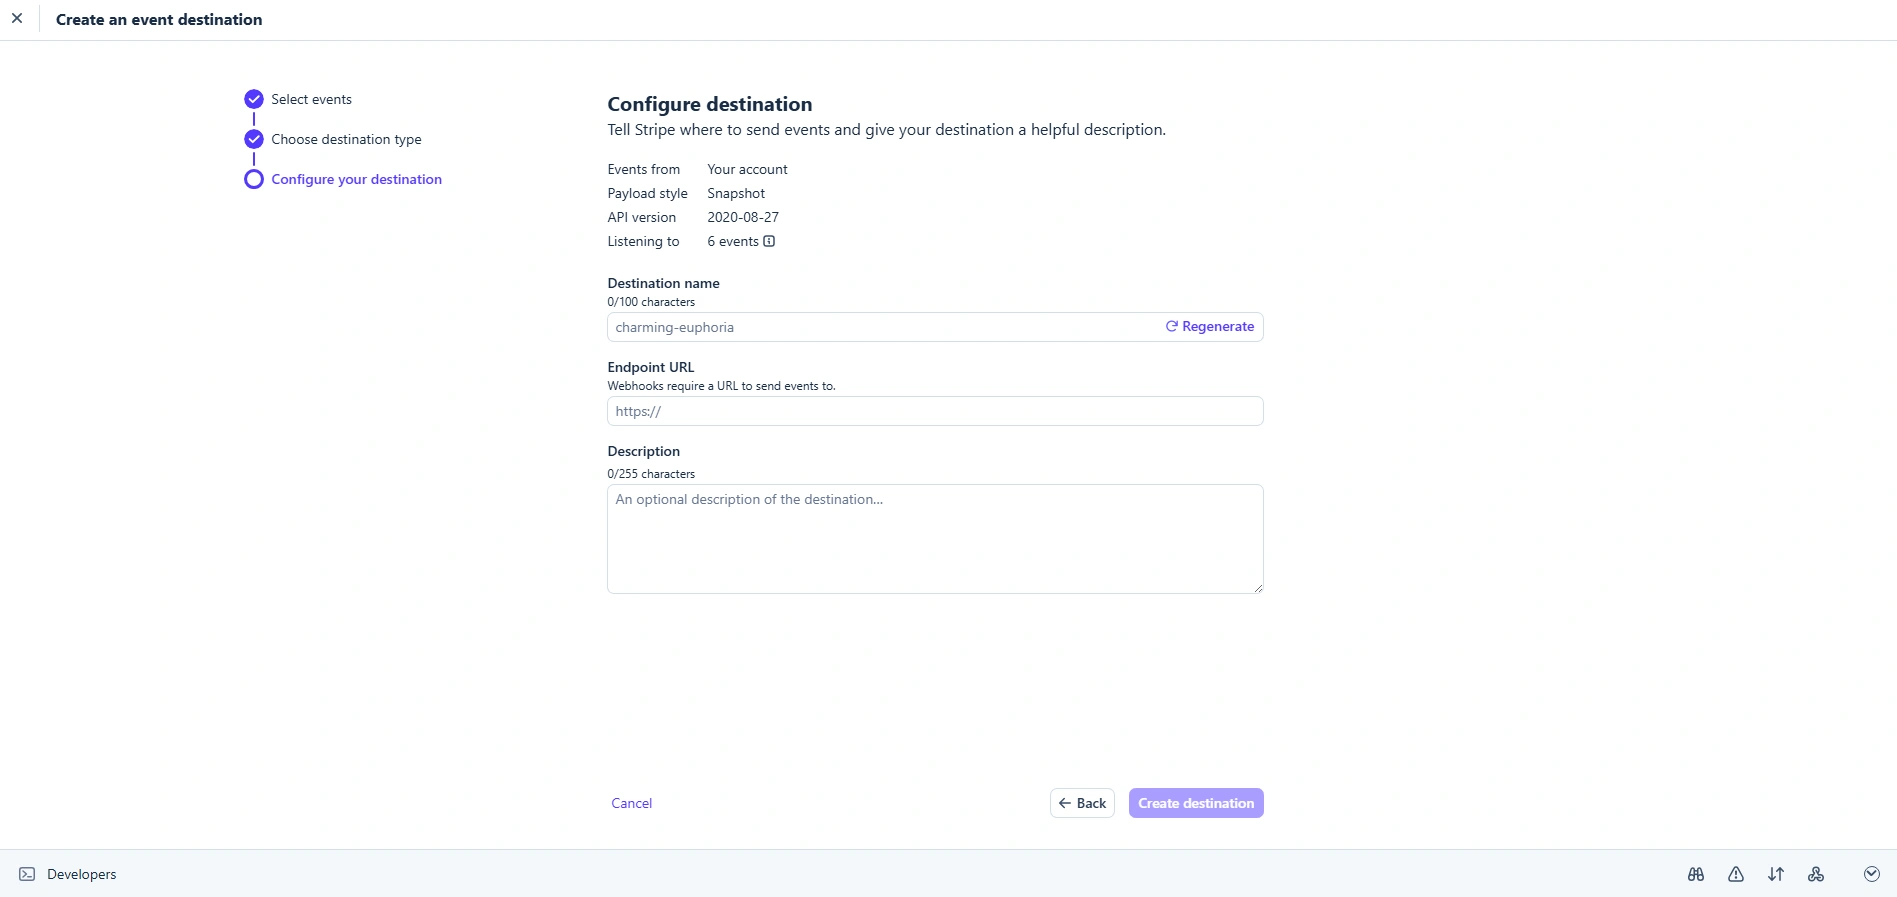
Developersmenu you will be able to bring up sub menu and select theWebhooks. - Click on “+ Add destination” button to add webhook URL. Select all Events to send. You need to add below given Webhook Events for subscription payment work properly with ARMember Stripe Integration:
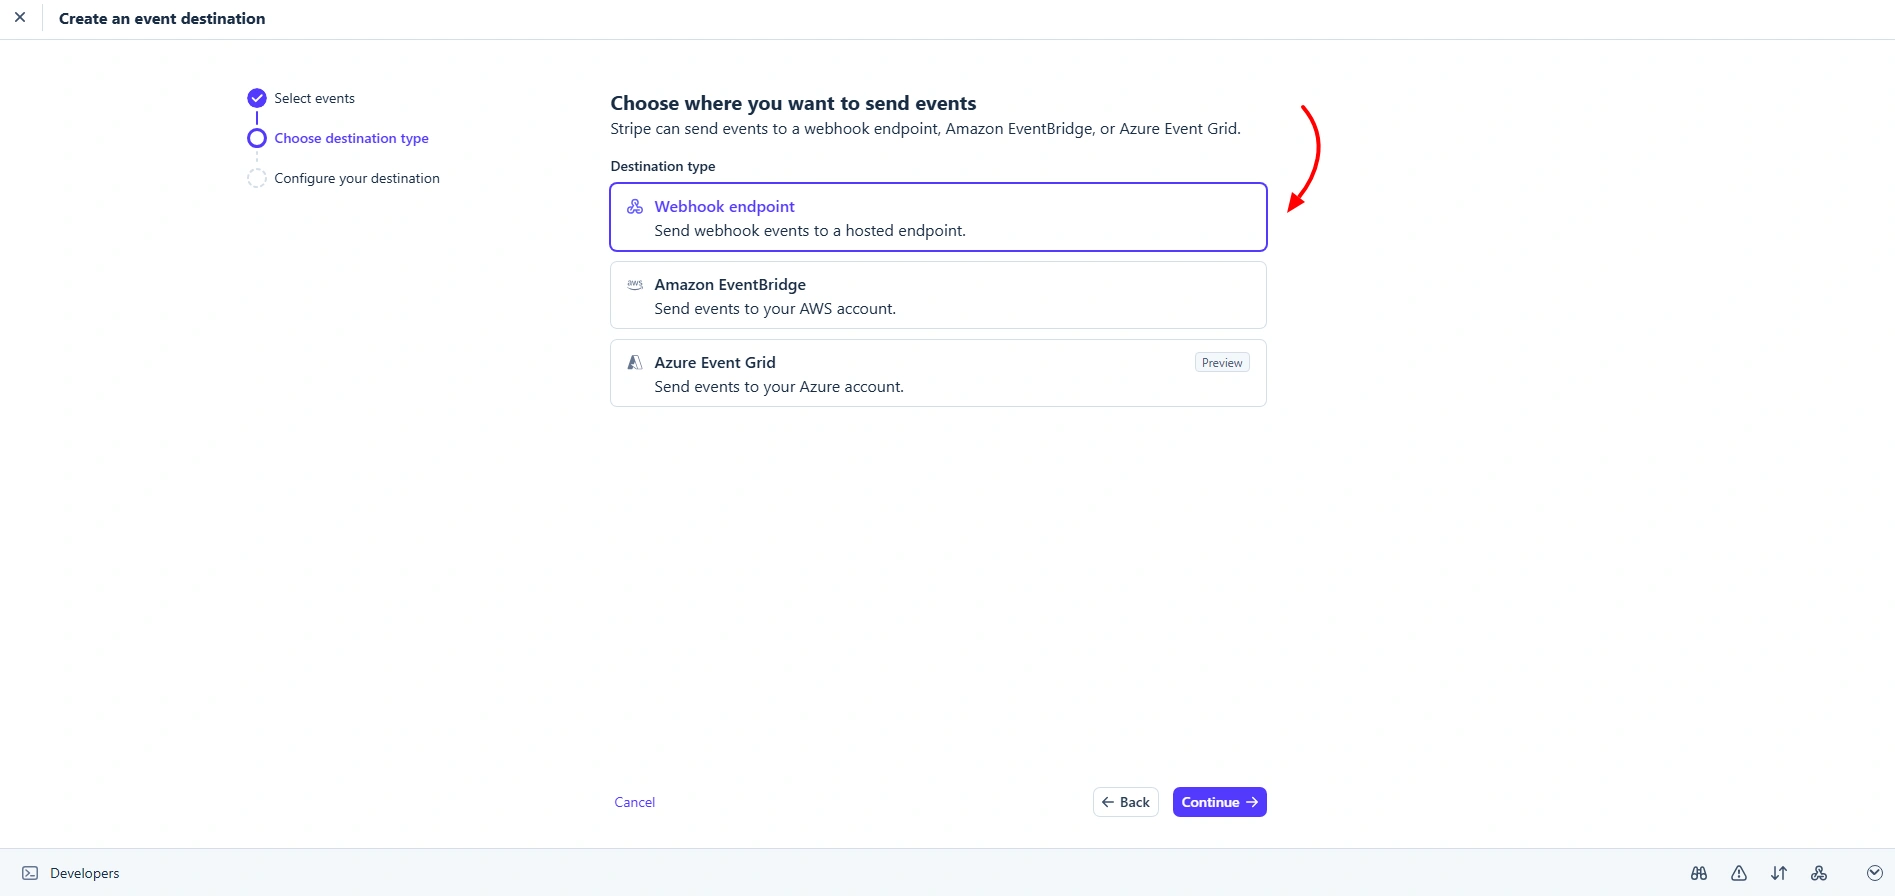
invoice.payment_succeededcustomer.subscription.updatedcustomer.subscription.deletedinvoice.payment_failedcustomer.subscription.createdsubscription_schedule.canceled- Furthermore, click one continue button and the next step will be to choose Choose Destination Type. On this page select the option Webhook Endpoint. And then click on Continue button.
- Now, add
https://yoursite.com/?arm-listener=arm_stripe_apiinto URL input.
Important Notes
-
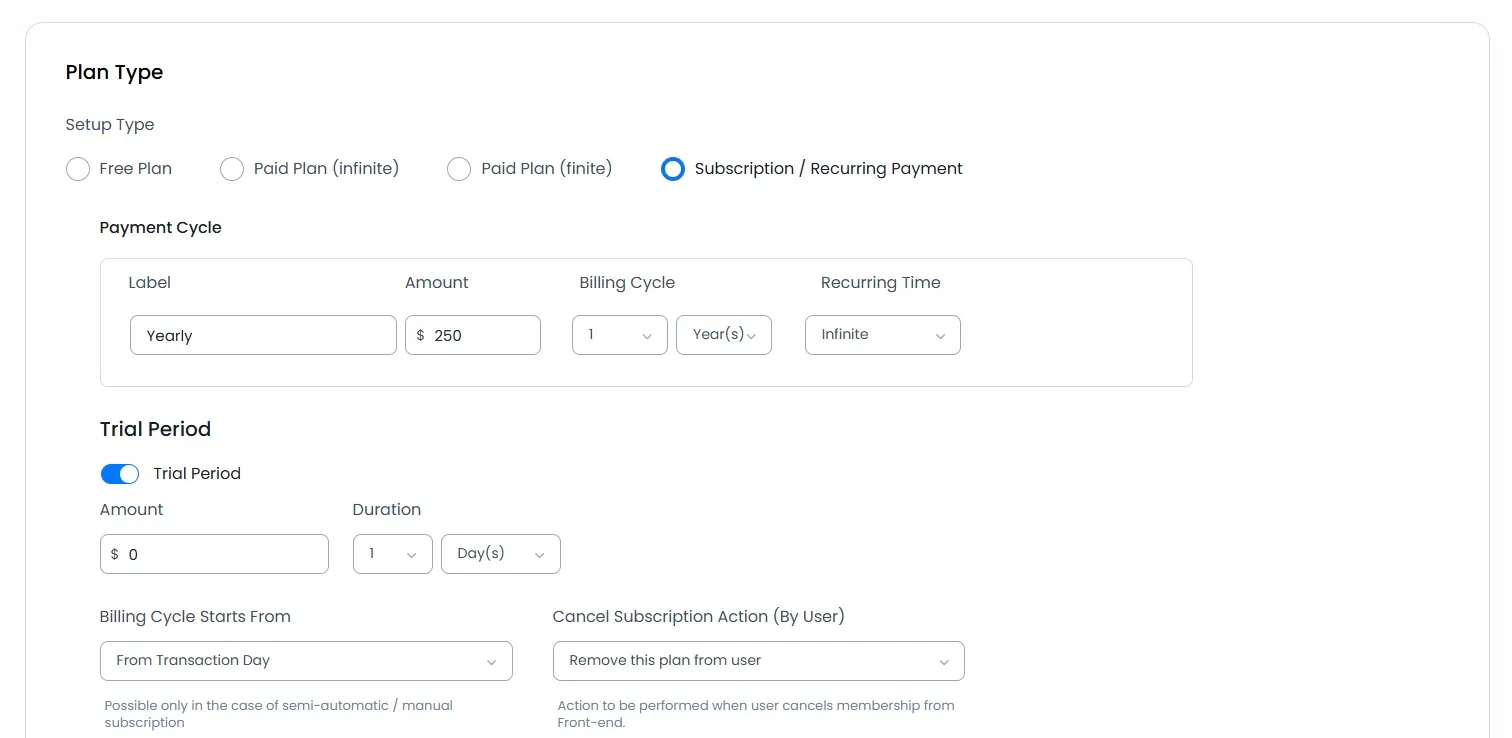
You must need to set Trial Period duration in
DAYS. - Paid Trial is
notsupported with recurring plan in Stripe. But you can manage such cases in ARMember by following the steps given below:For ex. If you want to add $5 for trial period of 7 Day in a recurring plan for which billing amount is $20 every month. So, you have to create a subscription plan with 7 Day trial period from your Stripe account. When someone buys this plan, he/she will be charged $5 as one time charge and also $20 as a subscription charge for the first time only. After that he will be charged $20 only every month.
-
Stripe allows
coupon codesthat contain Alphabetical, Numeric, Underscore(_), and dash(-) only.
Please note that if your plan created in Stripe API has different trial period the first priority of trial period will be considered from ARMember plan.
Adding Payment Gateway for Front-End View
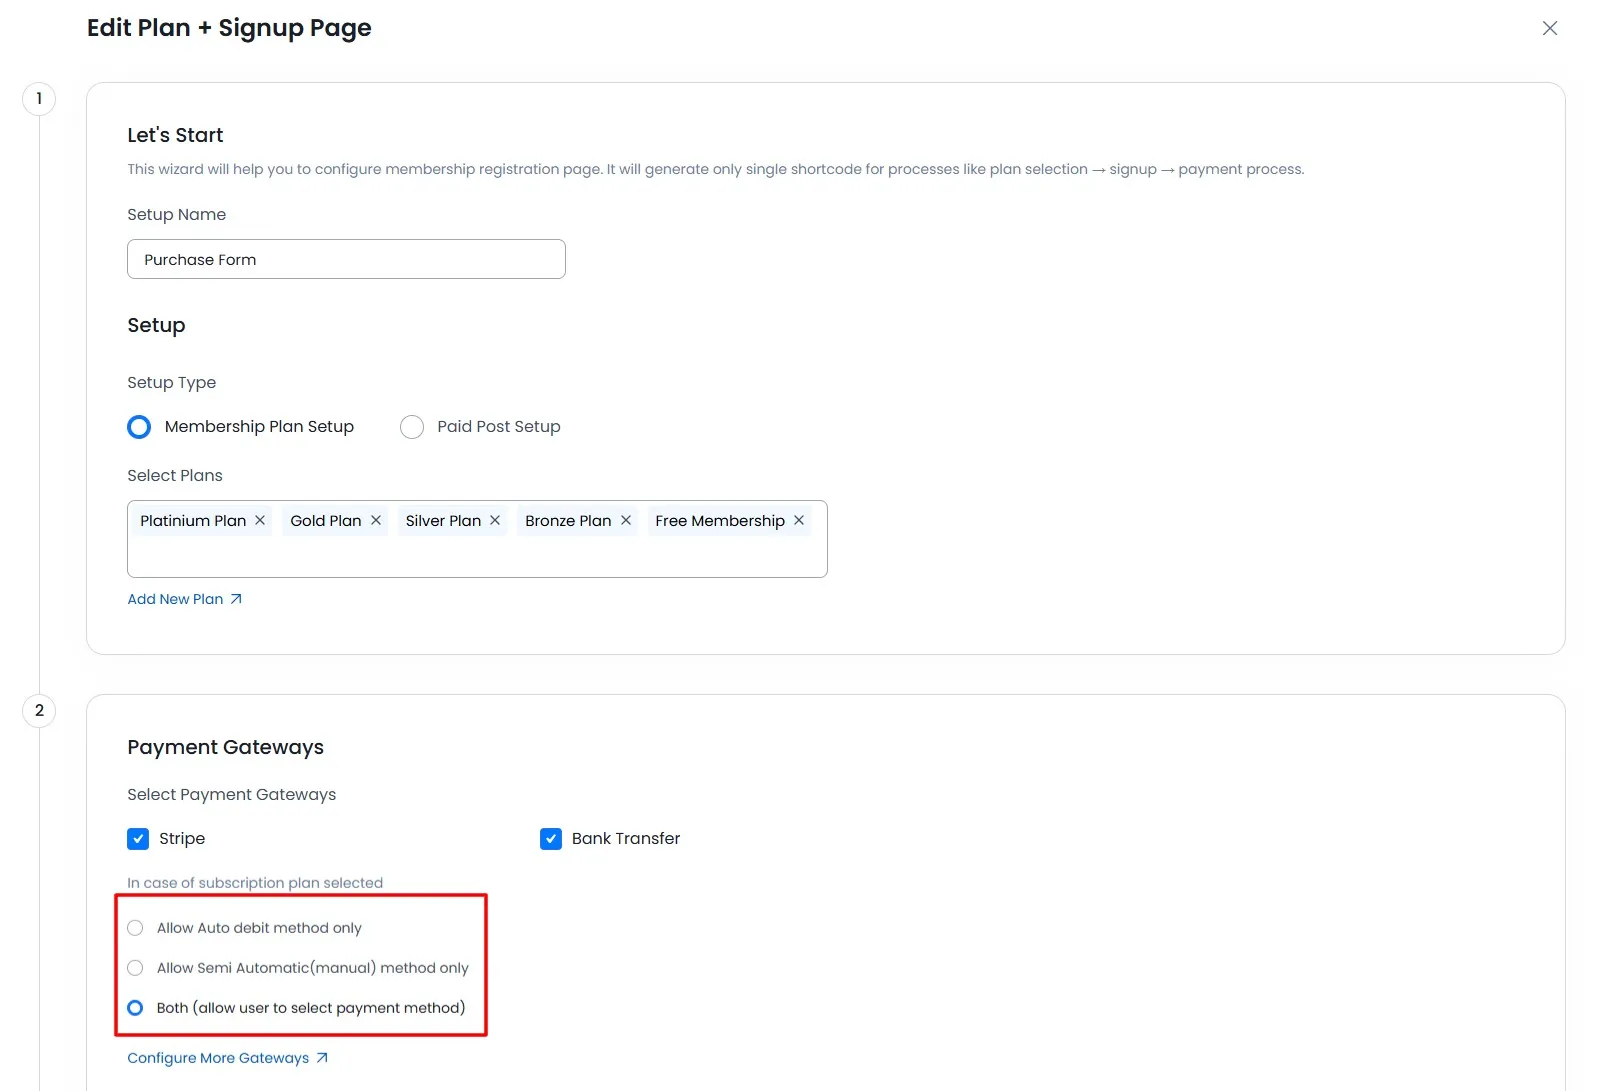
Firstly navigate to the ARMember ⇾ Manage Plans Page and create plan accordingly.
Go to your ARMember Configure Plan + Signup Page – and Select ARMember Stripe Integration Gateway. That’s it.
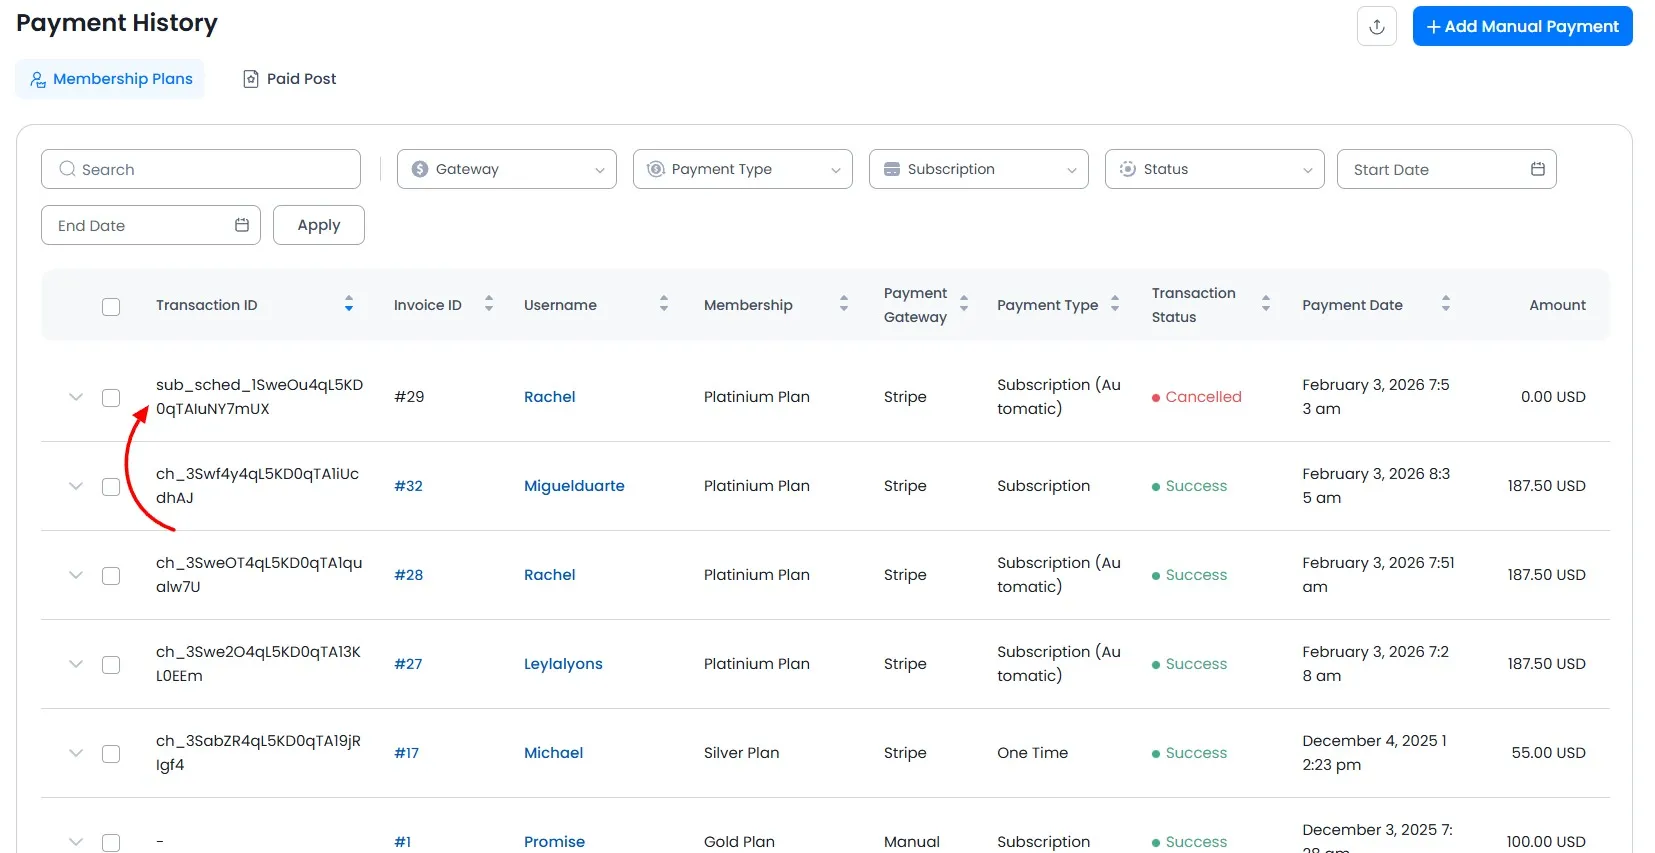
And after successful payment with stripe, you will be able to check the transaction at the ARMember ⇾ Payment History page.
Update Card
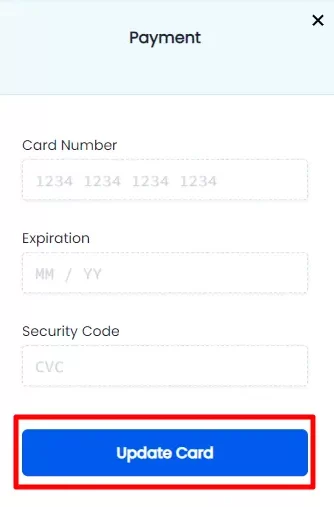
ARMember does provide a facility to update the card for the ARMember Stripe Integration, even if your site is using the Stripe in the “Built-in Form” or with “SCA-Complaint Popup” you can allow a member to update there card details.
You can allow the member to update their card details through the Current Membership shortcode. The ARMember does provide the Current Membership Shortcode and here there is an option to enable the update card button through which they can update the card details. Further, if you want to know more on the Current Membership Shortcode then click here and check the detailed documentation on the same.
Kindly check the update card image for the SCA-Complaint Popup:
Subscription Retries for Failed 3D Secure Authorizations
As per new SCA regulatory, If a subscription payment fails due to authentication issues when using 3D Secure, the payment would not automatically retry based on your retry settings. Unauthorized payments are still considered active, as they are waiting to be authenticated and have not technically failed as payments.
You will need to enable the Send a Stripe Email to Authenticate toggle in your settings and configure the retry settings.
To enable the settings for authenticate email, follow below steps
- Log into your stripe account at https://dashboard.stripe.com/
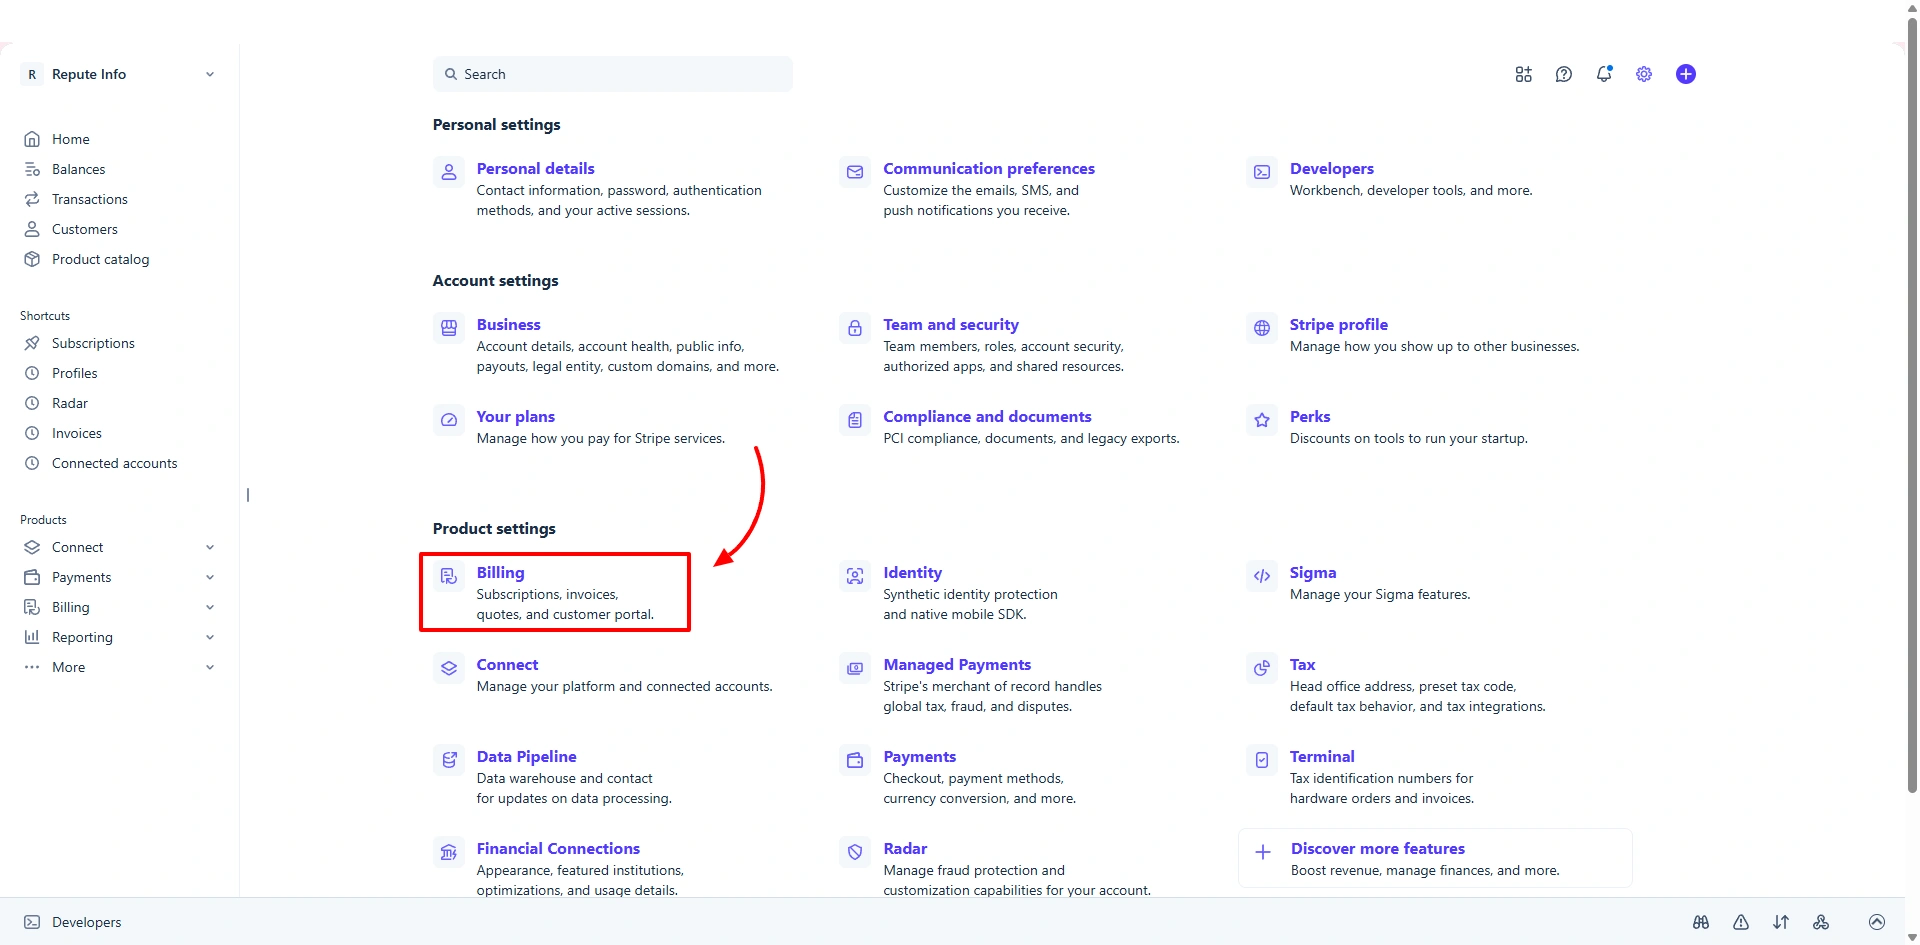
- Click on the settings and here select the option
Billing. - Click on Subscriptions and email from Billing section. Which you can find under the Stripe apps settings.
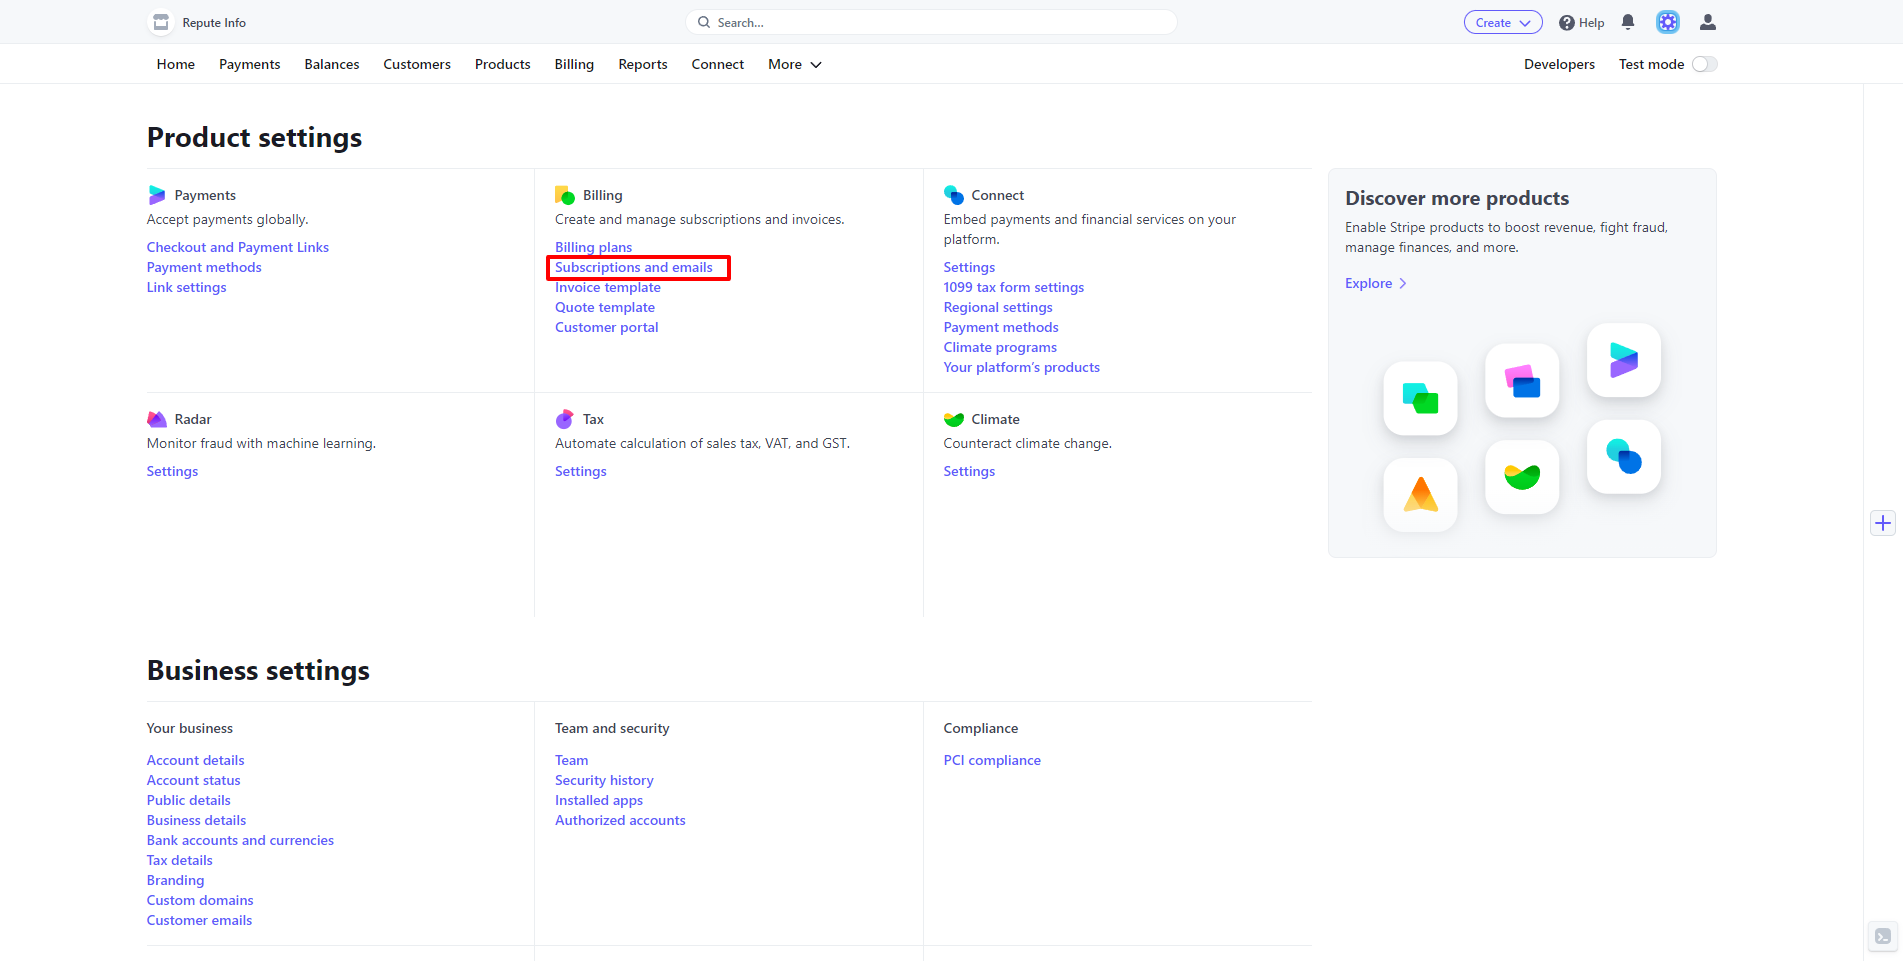
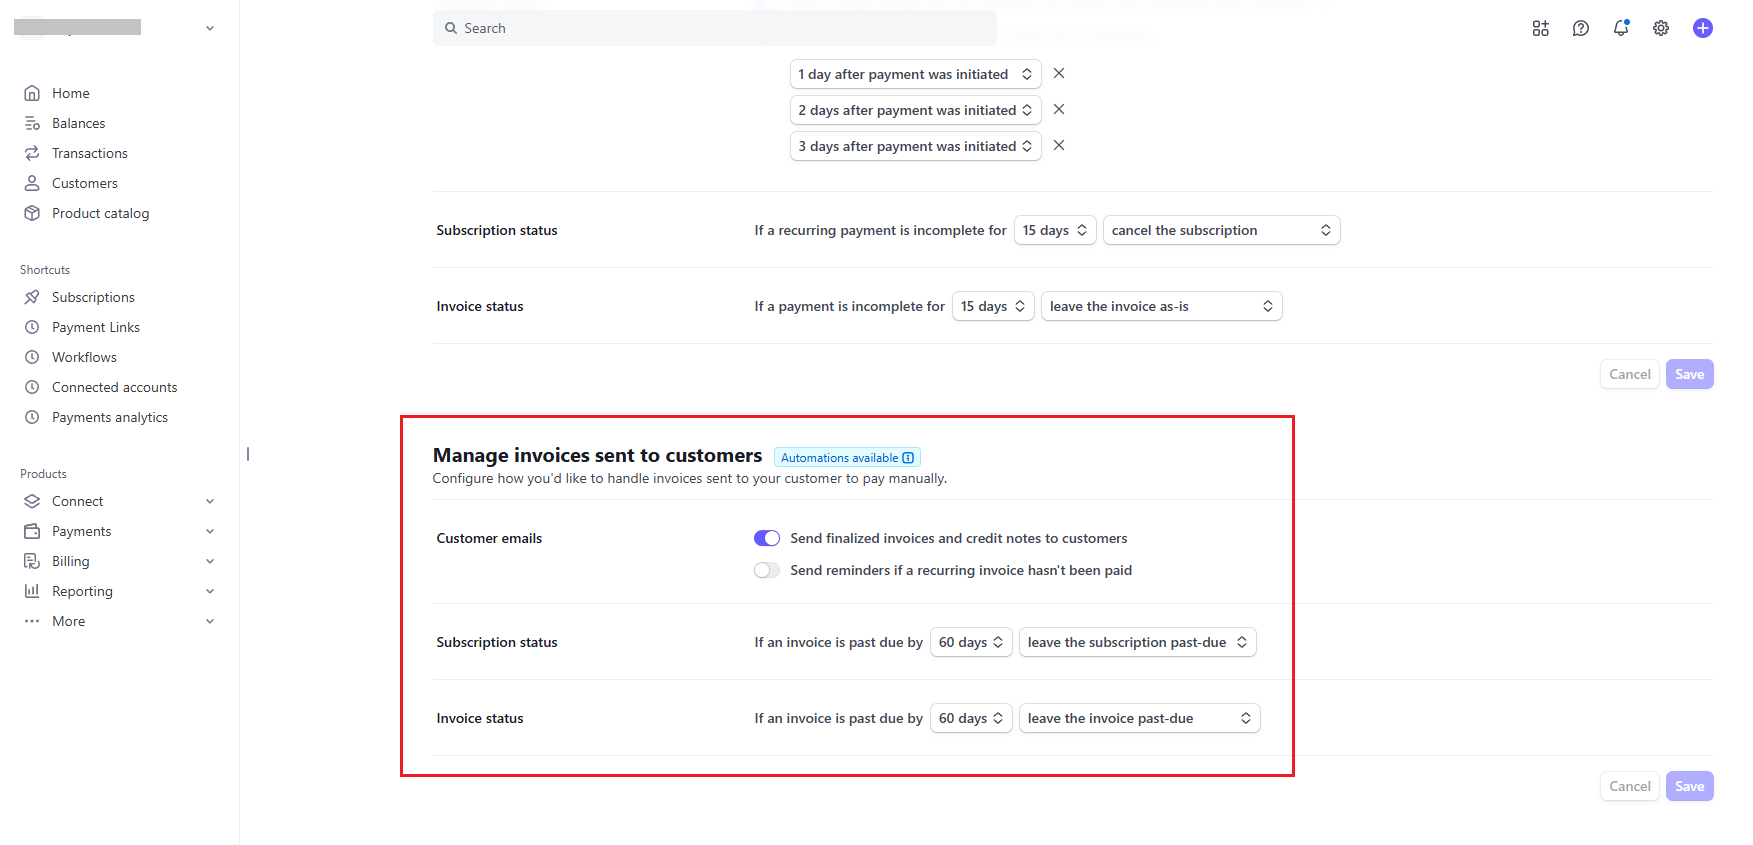
- Now enable switches for customer emails under Manage payments that require 3D Secure
- You can set up to 3 reminders for your customer to complete the payment after payment has been initialized but did not complete 3D authentication. Set as per your requirement
- Save settings
- Now if any subscription is initialized but failed due to 3D authentication, Stripe will send an email to your customer to confirm the payment with 3D authencation. Stripe will send the email based on your reminder settings.
Customize the SCA_Complaint Popup
ARMember does provide a facility to customize the popup as per your requirements, you can add the custom css as per your requirements at the ARMember ⇾ General Settings ⇾ Global CSS section, here you can add the CSS to customize the SCA Popup for ARMember Stripe Integration.
Below peovided is the CSS Class Information for the reference:
1. Container class: .arm_stripe_element_wrapper
2. Field Label class: .arm_stripe_field_label
3. Header Container: .arm_stripe_element_wrapper .site_info_row
4. Header Content text: .arm_stripe_element_wrapper .site_title
5. Stripe Input field class: .arm_stripe_field
Enable/Disable Stripe Email invoice notification
Stripe payment gateway does provide a facility to send a stripe payment invoice to customer if member purchase a membership plan from your site
If you wish to not to send a stripe invoice to customer then you can deactivate “Customer emails” feature from Stripe Dashboard ⇾ Settings ⇾ Billing ⇾ Subscriptions and emails page
How to configure the Stripe Advance Checkout Method?
ARMember does provide an add-on for implementing the Stripe Advanced Checkout Method. In order to use this, you need to have the add-on “Stripe Checkout.” With this method members will be redirected to the Stripe Checkout page, and they can make a payment from there directly.
Debug Log Data
ARMember allows you to check the data which are being received from the payment gateways, where in you can analyze that whether the webhook_data event is reaching at your site or not. As, the ARMember will take any action on the basics of the webhook_data received.
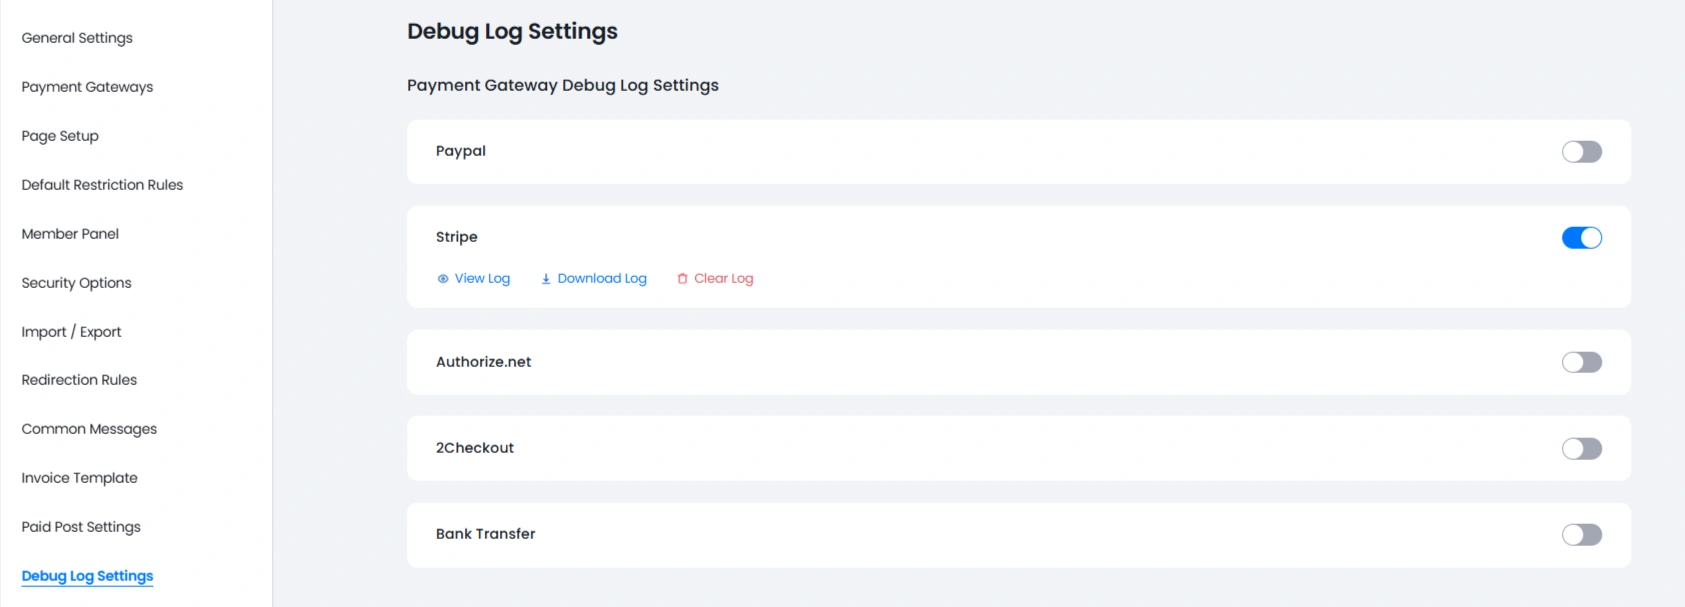
To enable the logs, navigate to the ARMember ⇾ General Settings ⇾ Debug Log Settings page here an option is available Payment Gateway Debug Log Settings under which enable the switch for Stripe and then save the changes. For more information you can click here.
FAQ’s
Stripe warning Sending credit card numbers directly to the Stripe API is generally unsafe or Stripe Error 402 (Can’t send raw data to Stripe’s API)
If you are getting the error message Sorry something went wrong while processing payment with Stripe. then you can enable the switch from the ARMember ⇾ General Settings ⇾ Payment Gateways at Stripe turn on the switch for Display actual error returned from payment gateway, and then make a test payment and check if you get the error mentioned above then it can be Stripe recommended making it SCA complaint and that’s why the credit card flow has been changed to the method that has been compatible with the SCA regulatory.
It will totally depend on the account that you may using from region so accordingly stripe does return the response. So, still ARMember does provide a built-in form field for the customers, but the stripe account does not allow then you may need to use the Stripe SCA Popup method. To achieve this you can navigate to ARMember ⇾ General Settings ⇾ Payment Gateways page, select the option SCA Compliant (popup), and then further save the changes. After that Kindly check again by purchasing a membership plan.