

How to integrate Razorpay Payment Gateway with ARMember Plugin
Razorpay Payment Gateway Integration will add payment option for ARMember plan with one time payment & plan with subscription payment.
Important Note:This add-on will work with ARMember Version 4.4 or grater.
Steps For Installation And Activation
You can install plugin in the following two ways. And ARMember – Razorpay plugin requires ARMember Plugin installed and active.
New installation via FTP
- Download the plugin and extract it. You will find a directory armemberrazorpay.
- In your WordPress installation directory, upload armemberrazorpay to
wp-content/plugins/ - Activate the
ARMember - Razorpay Addonplugin through thePluginsmenu from WordPress admin panel.
New installation via the WordPress Uploader
- Download the plugin.
- Log in to your WordPress admin panel
- Go to
Plugins⇾Add New⇾Upload - Click on “choose file” and browse the download package. When the plugin uploads successfully, click on
Activate Plugin.
Steps to Set up Razorpay For Your Website
Let’s setup membership for your website :
-
When plugin activated then RazorPay section will be display in
ARMember⇾General Settings⇾Payment gateways.Please see below screen.

-
Firstly need to activate the Razorpay payment gateway so you will be able to insert Key ID, Key Secret, Webhook secret and Contact Number. For activation click on active button.
-
If you do not have RazorPay account then create it.
For Live / Sandbox account click here.
-
Where do I get
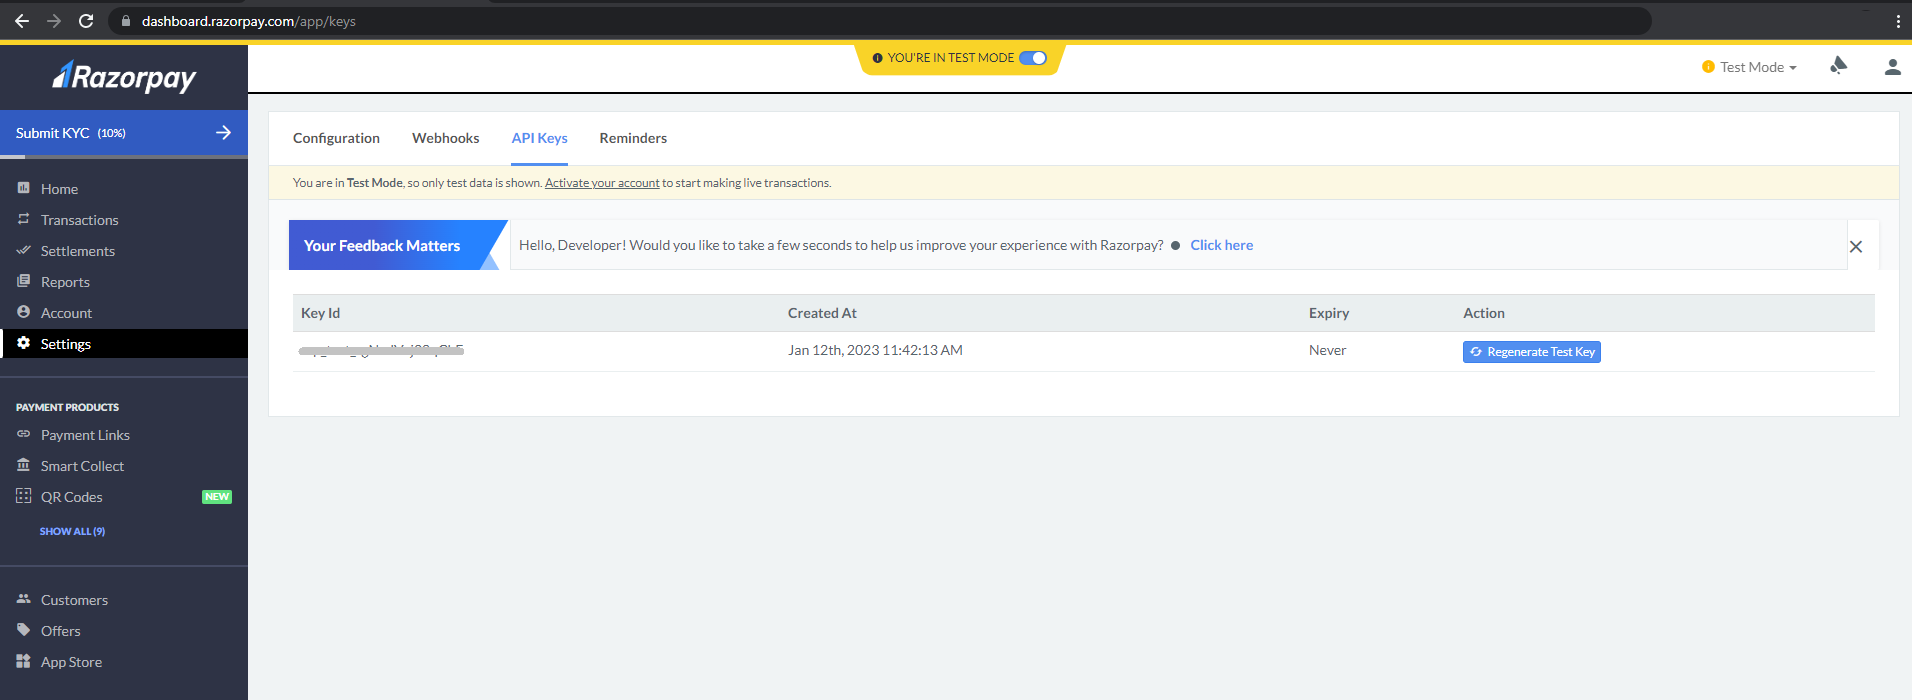
Key ID,Key SecretandWebhook secret?To obtain the
Secrect keyof Razorpay access the site with your login and the password follow the steps:Click Settings
Menu⇾API KeysYou can see
Key IDand ForSecret Keyyou need to generate it.
You can get
Webhook secretby creating Webhook URL in your Razorpay account, follow below steps to create Webhook URL. -
From where I can set
Webhook URL?To set
Webhook URLin Razorpay account, access the site with your login and the password follow the steps:Click on
Settings⇾WebhooksNavigate to
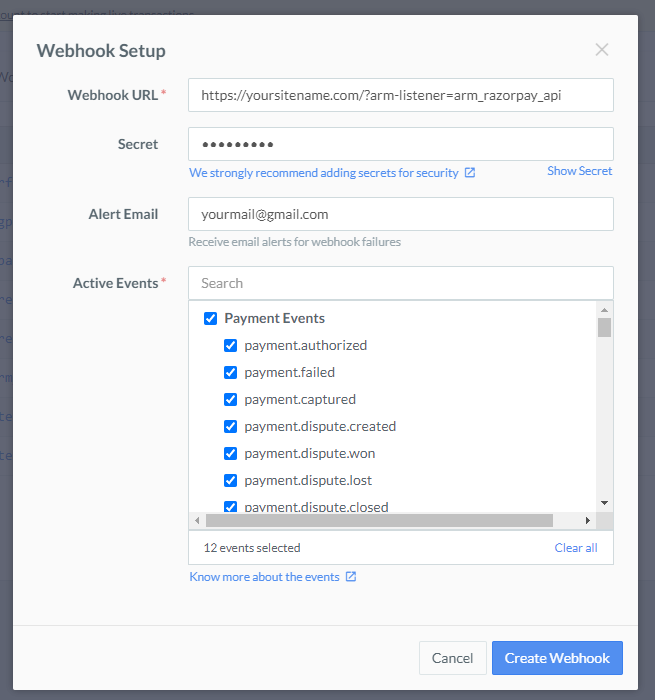
+ Add New Webhookbutton, It will open Webhook Setup pop-up page. In Webhook Setup pop-up:-
Enter the Webhook URL where you want to receive the webhook payload when an event is triggered, as https://yoursitename.com/?arm-listener=arm_razorpay_api. We recommend to use HTTPS URL.
You can set up to 5 URLs to receive Webhook notifications.
-
Enter a Secret(Webhook Secret) for the webhook endpoint. The secret is used to validate that the webhook is from Razorpay. Use this secret in ARMember Payment Gateway configuration page in Webhook Secret field.
-
In the Alert Email field, enter the email address to which the notifications should be sent in case of webhook failure. You will receive webhook deactivation notifications to this email address.
-
Select all available events from the list of Active Events. In order to receive notification when specific events occurs.
-
Click Create Webhook to add webhook. After you set a webhook, it appears on the list of webhooks.

-
-
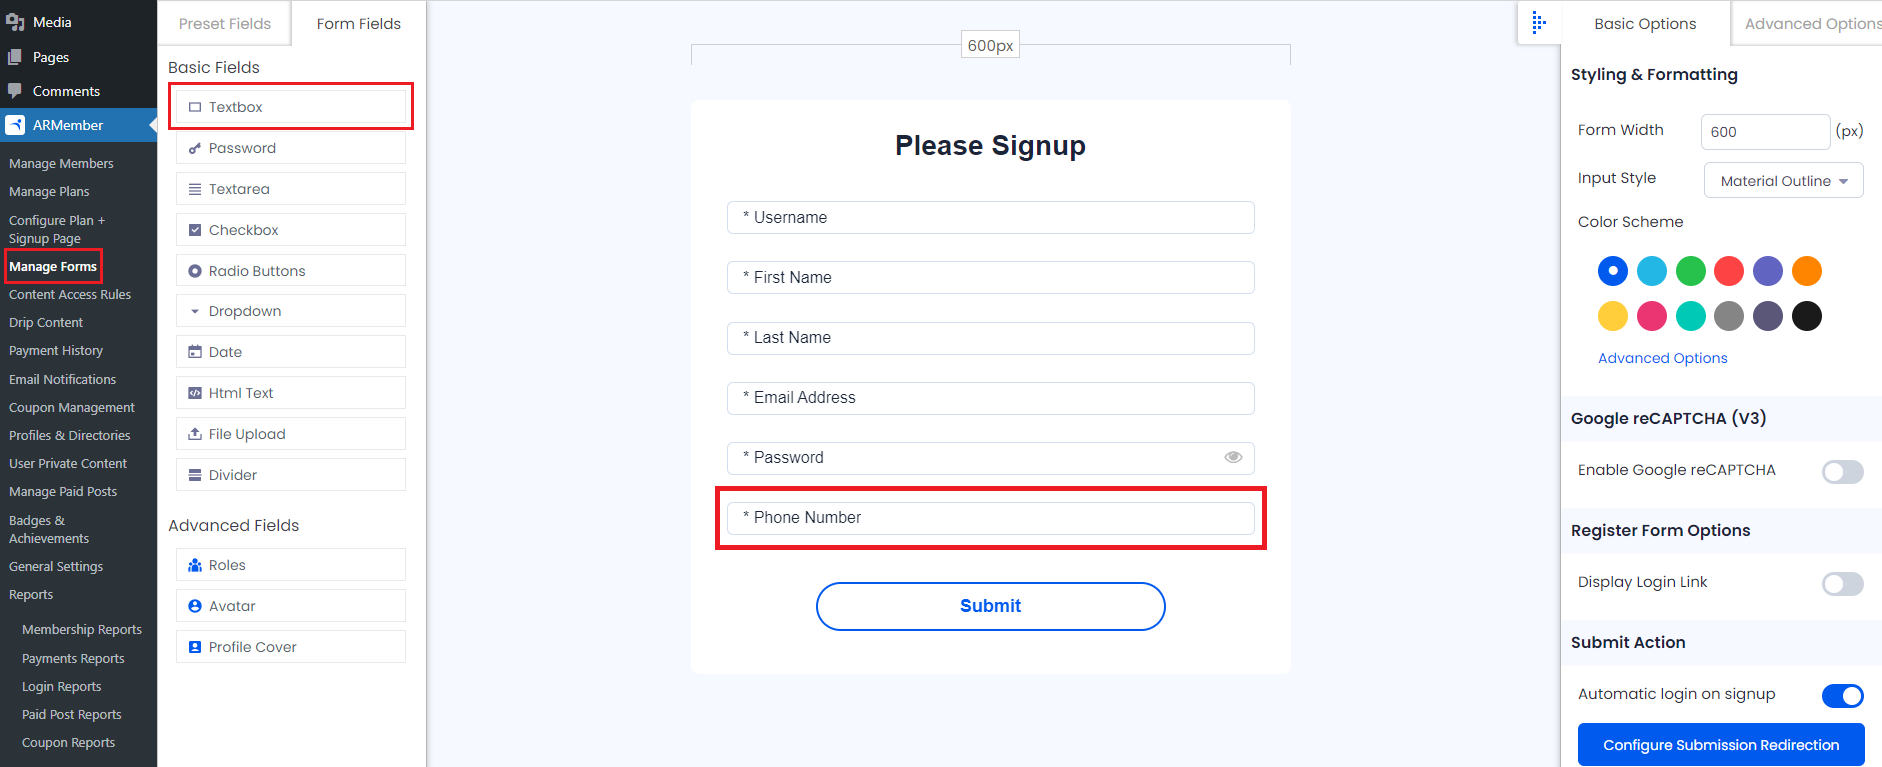
After that you need to select Contact Number field which is required by Razorpay. If you have not added phone number field in signup form than you need to create that field first from
ARMember⇾Manage formspage click on Add/Edit Signup Form and add Phone Number/contact number field if not exists in signup form.Please see below given screenshot.

-
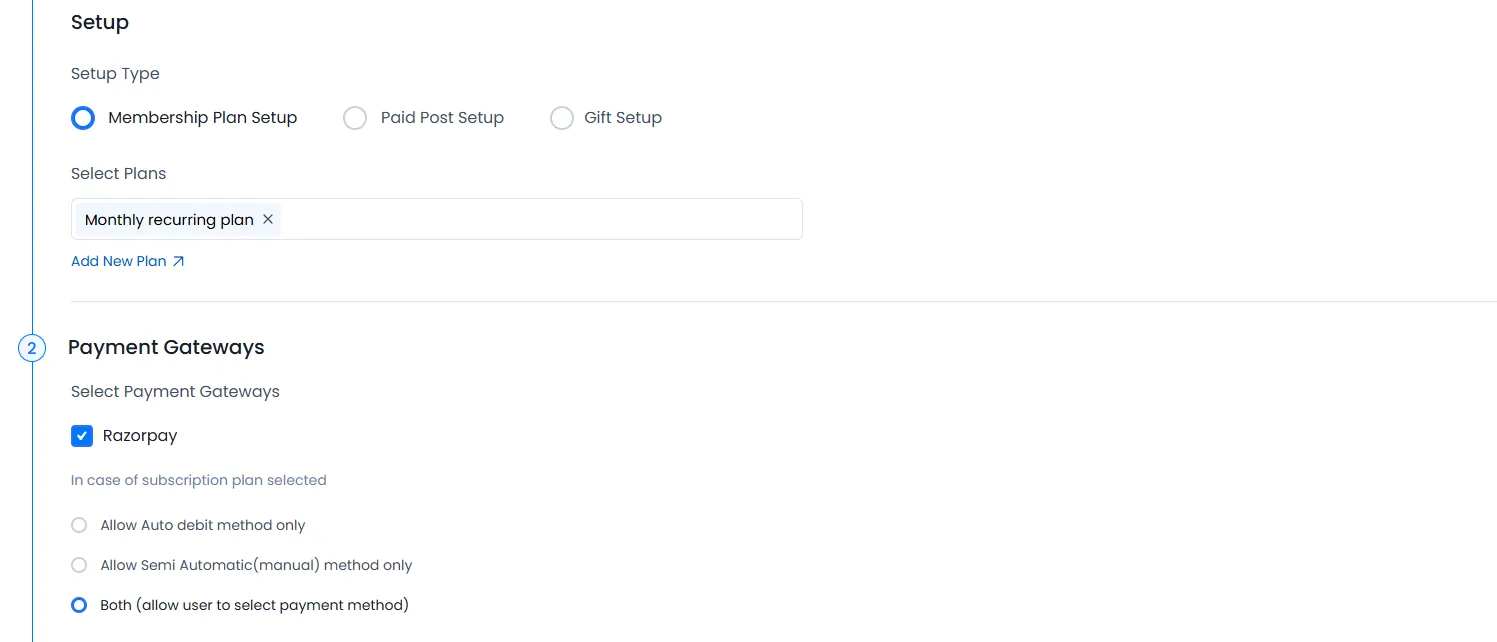
After configured Razorpay configuration you can select Razorpay payment gateway for the setup form from
ARMember⇾Configure Plan + Signup Form⇾Add/Edit Setup Formpage.Please see below given screenshot.

-
Razorpay support for one time and plan with subscription payment with Razorpay
-
ARMember Razorpay Addon supports payment with AED, ALL, AMD, ARS, AUD, AWG, BBD, BDT, BMD, BND, BOB, BSD, BWP, BZD, CAD, CHF, CNY, COP, CRC, CUP, CZK, DKK, DOP, DZD, EGP, ETB, EUR, FJD, GBP, GIP, GMD, GTQ, GYD, HKD, HNL, HRK, HTG, HUF, IDR, ILS, INR, JMD, KES, KGS, KHR, KYD, KZT, LAK, LBP, LKR, LRD, LSL, MAD, MDL, MKD, MMK, MNT, MOP, MUR, MVR, MWK, MXN, MYR, NAD, NGN, NIO, NOK, NPR, NZD, PEN, PGK, PHP, PKR, QAR, RUB, SAR, SCR, SEK, SGD, SLL, SOS, SSP, SVC, SZL, THB, TTD, USD, UYU, UZS, YER, ZAR Currencies.
For more information about currencies please refer Razorpay documentation: click here
-
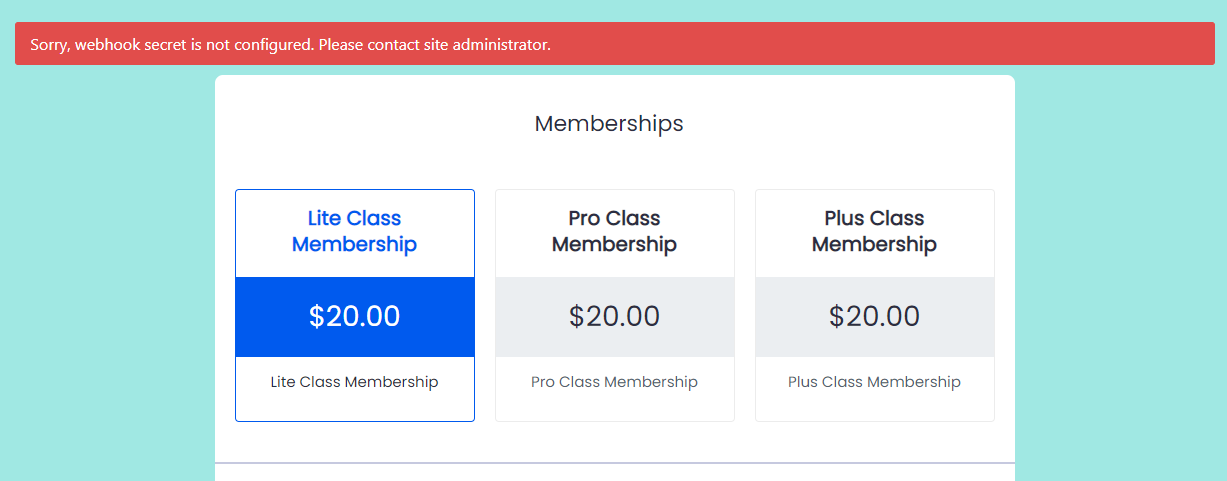
If Error message display like below then, Add webhook secret in ARMember payment gateway configuration page which is defined at a Webhook URL creation time, if webhook URL is not created follow step 5 to create webhook URL in Razorpay account.

If you have forgotten the Webhook Secret then, you can change it from the Razorpay Payment Gateway ⇾ Settings ⇾ Webhooks ⇾ Edit Webhook page, and then you can update that secret at the ARMember Razorpay Payment Gateway setting.

Important Note: If you have added Webhook and still user is not creating then kindly check by changing webhook URL with http:// instead of https:// at Razorpay Payment Gateway account ⇾ Settings ⇾ Webhook ⇾ Edit Webhook page.
Important Note: Razorpay Payment Gateway Limitations:
- Razorpay Payment Gateway does not support Trial Period for automatic subscription payments.
- Razorpay doesn’t support automatic subscription payment method below 7 days
- For automatic subscription payment method apply coupon code, Razorpay Payment Gateway does not support to apply coupon on first payment so for apply coupon admin need to select “For Recurring Plan Apply to Entire Duration” from Add/Edit coupon page.