

How to Manage Courses & Lessons using ARMember Online Courses Addon
Important Note:This add-on will work with ARMember Version 5.9 or greater.
Steps For Installation And Activation
You can install the plugin in the following two ways. and ARMember
Online Courses Addon requires ARMember Plugin installed and active.
New install via FTP
- Download the plugin and extract it. You will find a directory armembercourses.
- In your WordPress installation directory, upload armembercourses to
wp-content/plugins/ - Activate the
ARMember - Online Courses Addonplugin through thePluginsmenu from WordPress admin panel.
New install via the WordPress Uploader
- Download the plugin.
- Log in to your WordPress admin panel
- Go to
Plugins->Add New->Upload - Click on “choose file” and browse the download package. When the plugin uploads successfully, click on
Activate Plugin.
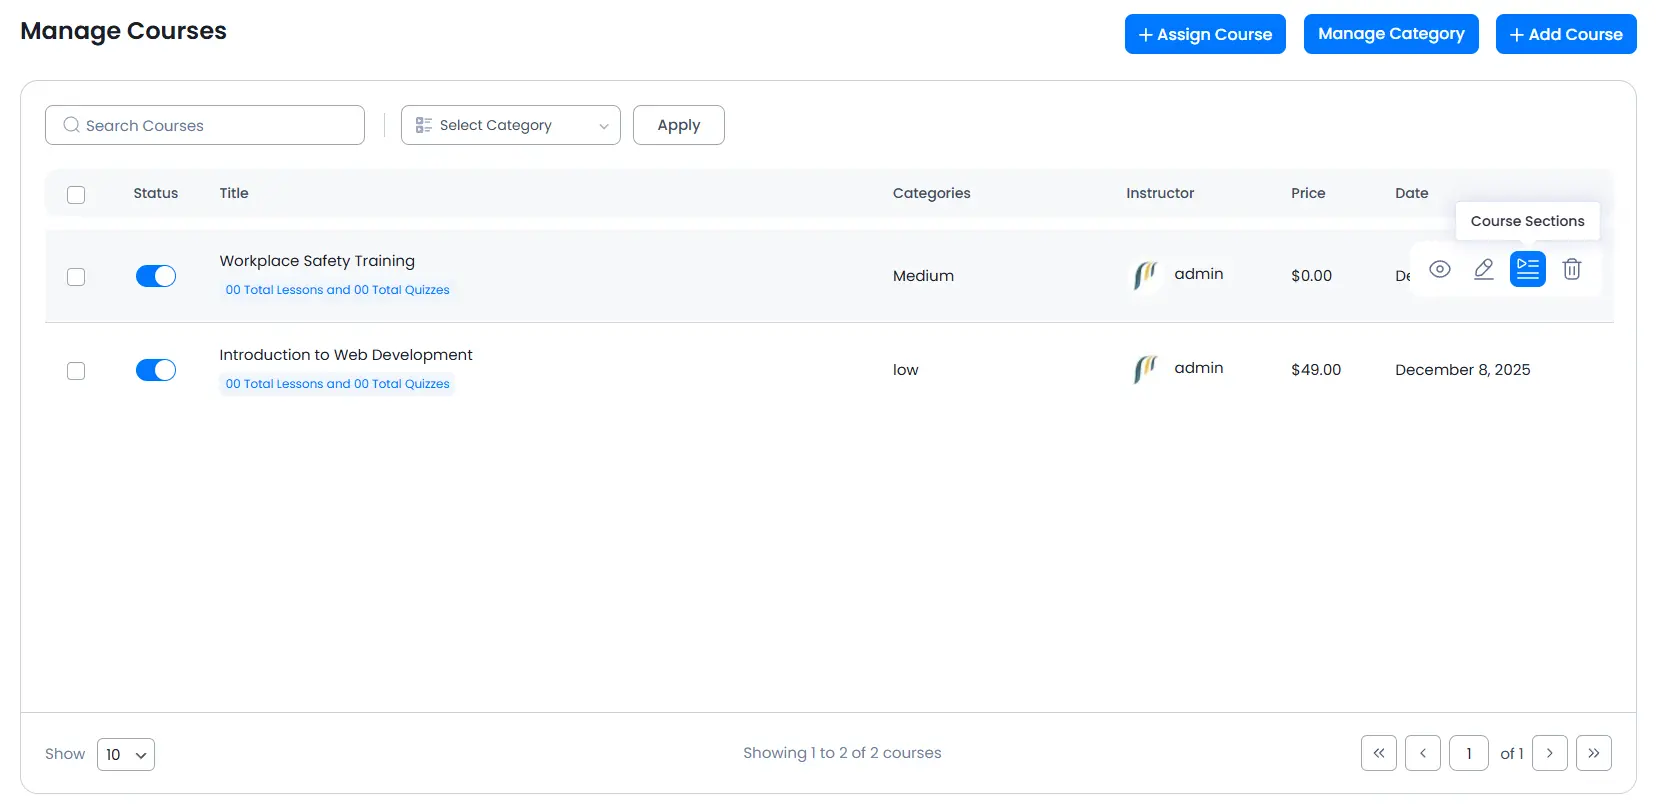
Manage Courses
Online Course is a functionality that provides the facility to add free or paid courses. For example, If you want to provide teaching through your website, then you can set the course with the subjects of which you are sharing the knowledge. You can set the course to be accessed for free or by receiving some fees. In this case you can use Course functionality.
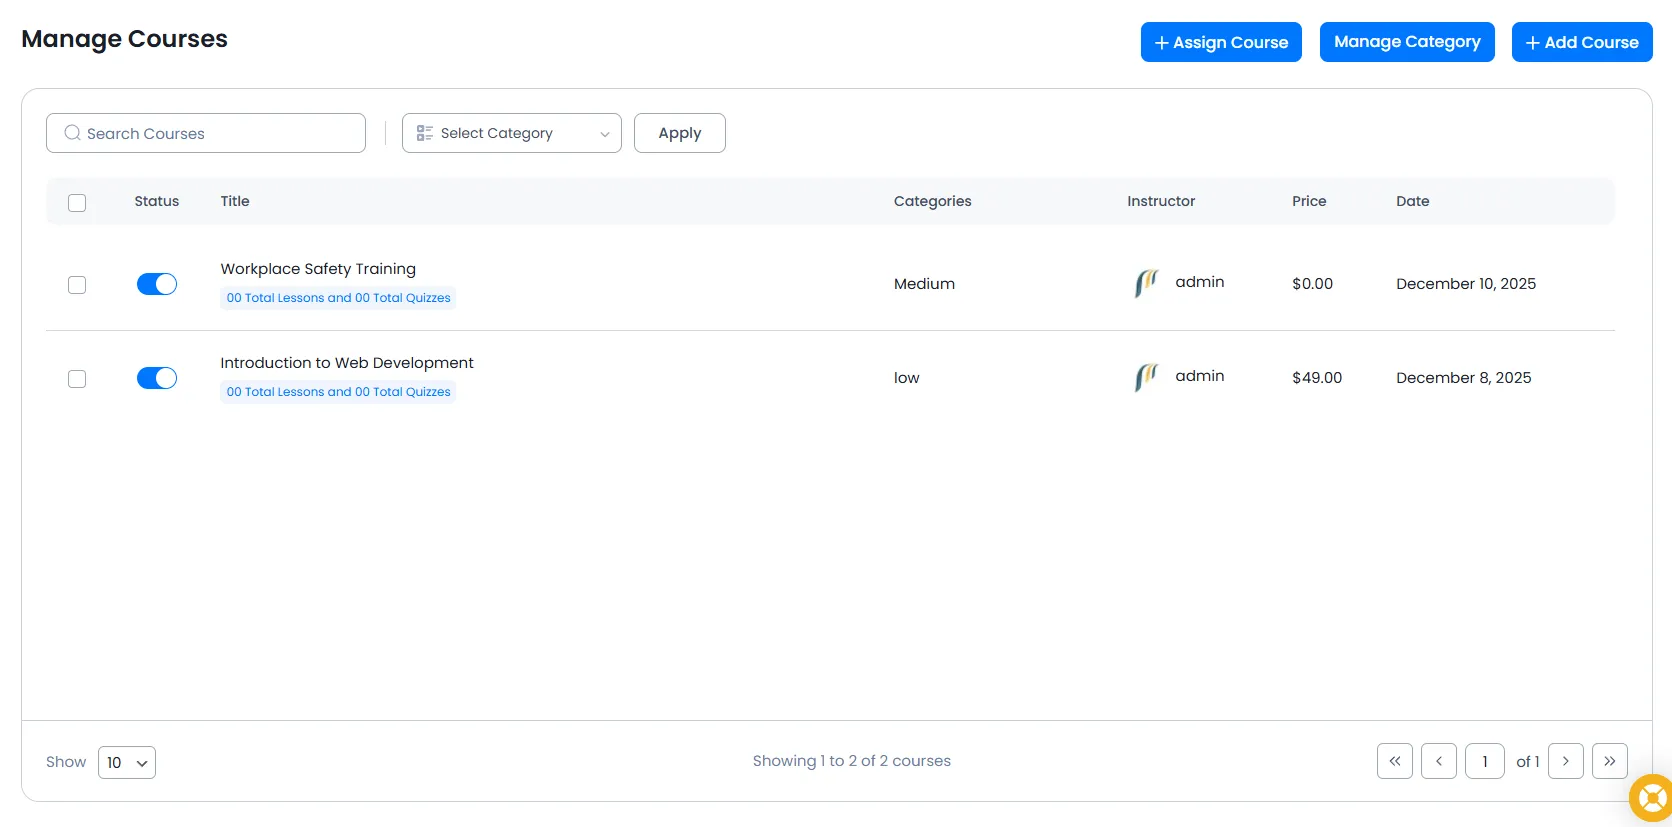
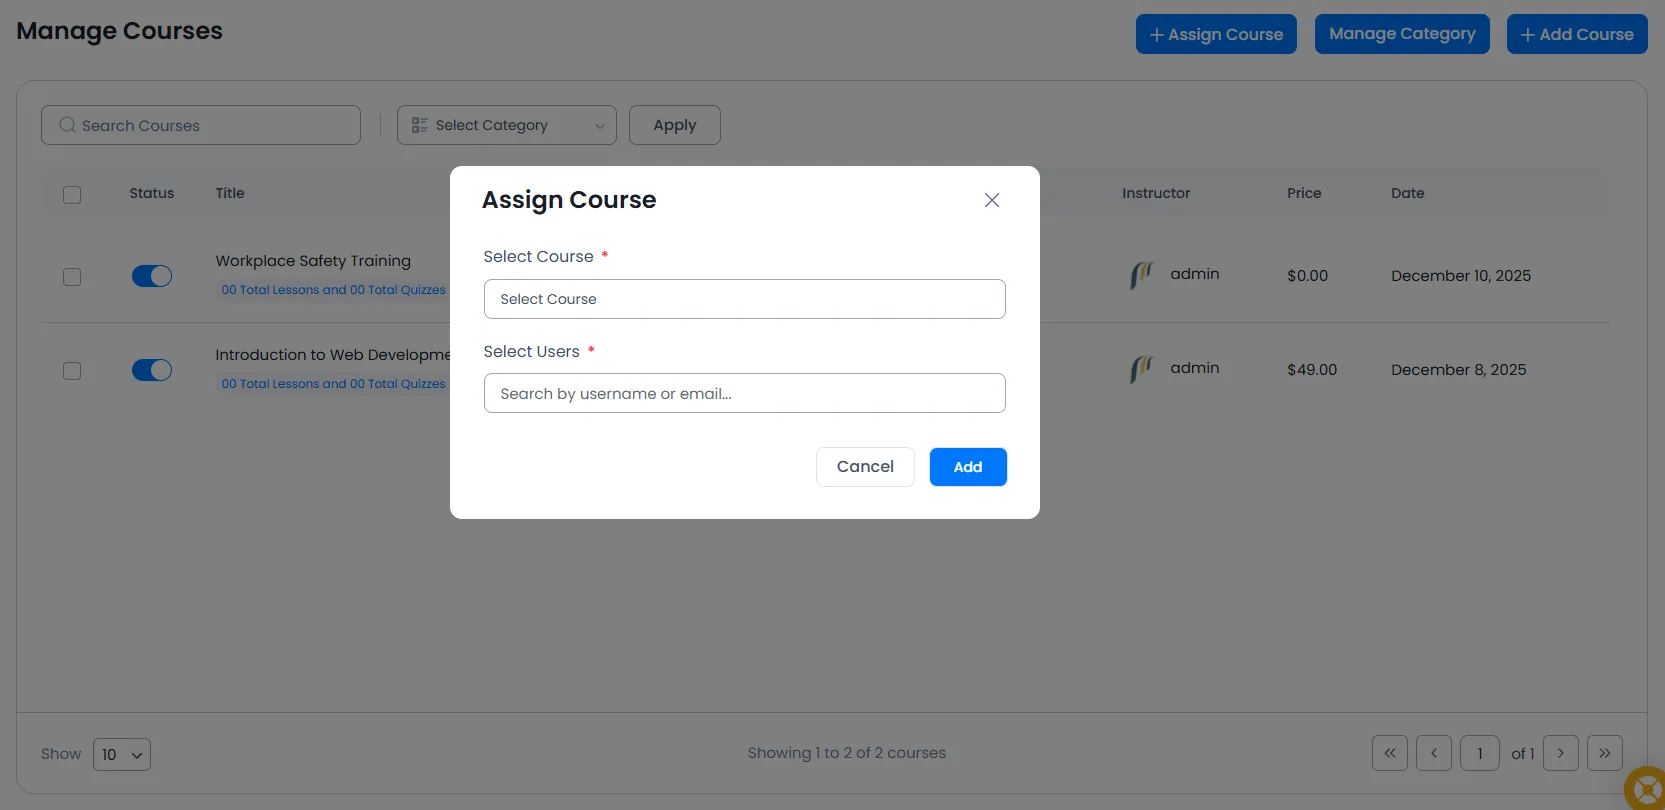
Assign Course
The + Assign Course option allows you to have a facility to search for a course and then assign it to the member searched. Once this button is clicked then a popup will be displayed, same as below provided screen, and then you can select the course and member and then click on “Add” button to your requirements.
Even, there are other two different ways as well to assign a course to the member directly from the ARMember > Manage Members page as per your requirements, for more detailed information on the same click here.
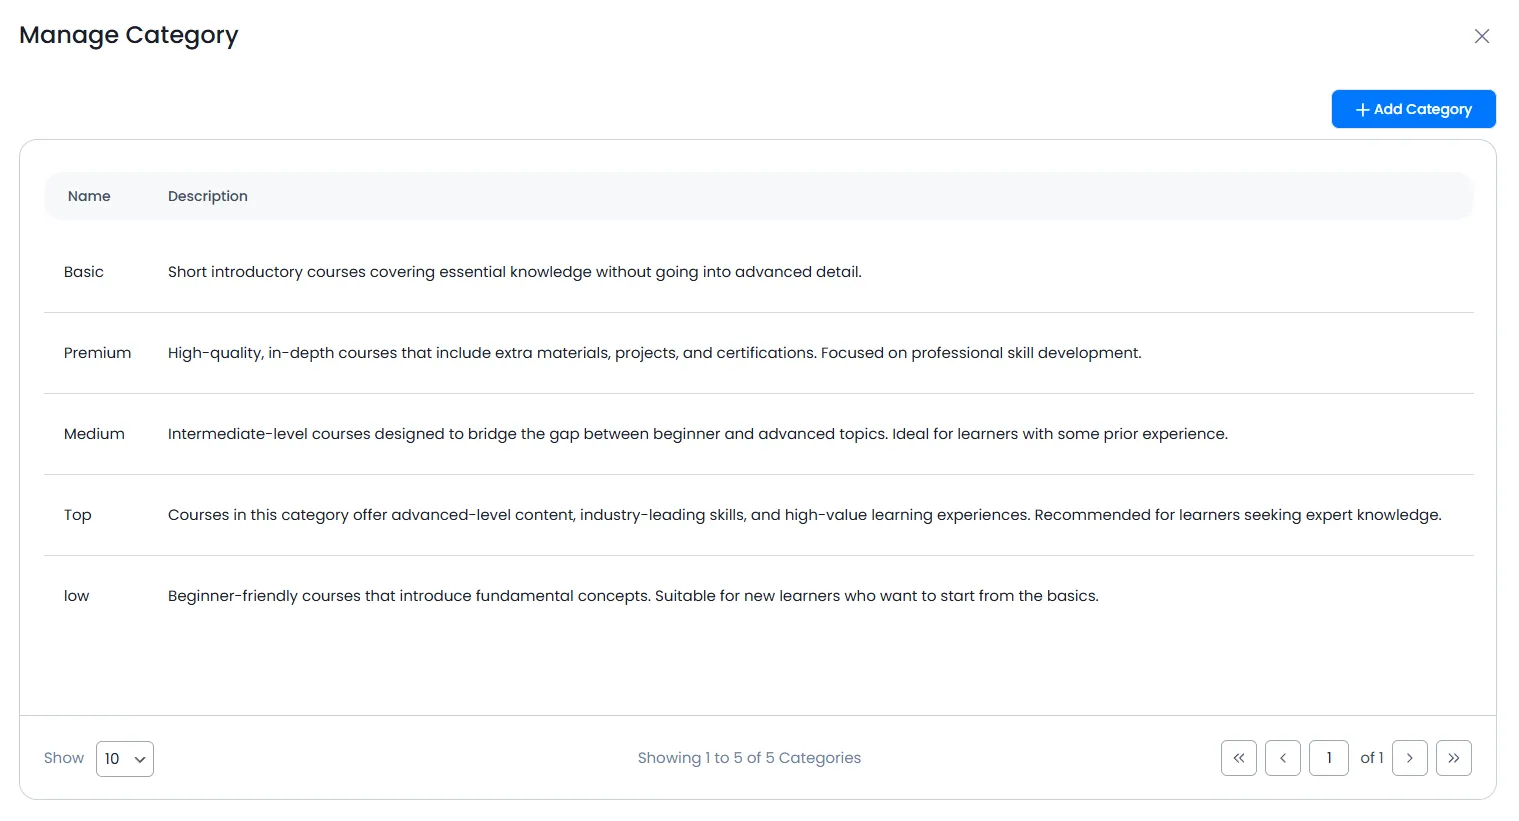
Add Category
The category will help you to divide the different courses.
For example, if there are various different information topics to provide the information for, then the topics will become a Category and as the name of the addon itself, you can set the course for the topics.
To add a new category, go to ARMember -> Manage Courses, and from here click on the Manage Category button. From the popup, click on the Add Category button, and set the title of the category and the description of the category.
Add Course
After adding a category, now add a free/paid course which will contain the main information.
You can add the course as the Text/HTML file, a video file, or an audio file
To add a new course, go to ARMember -> Manage Courses, and from here click on the +Add Courses button.
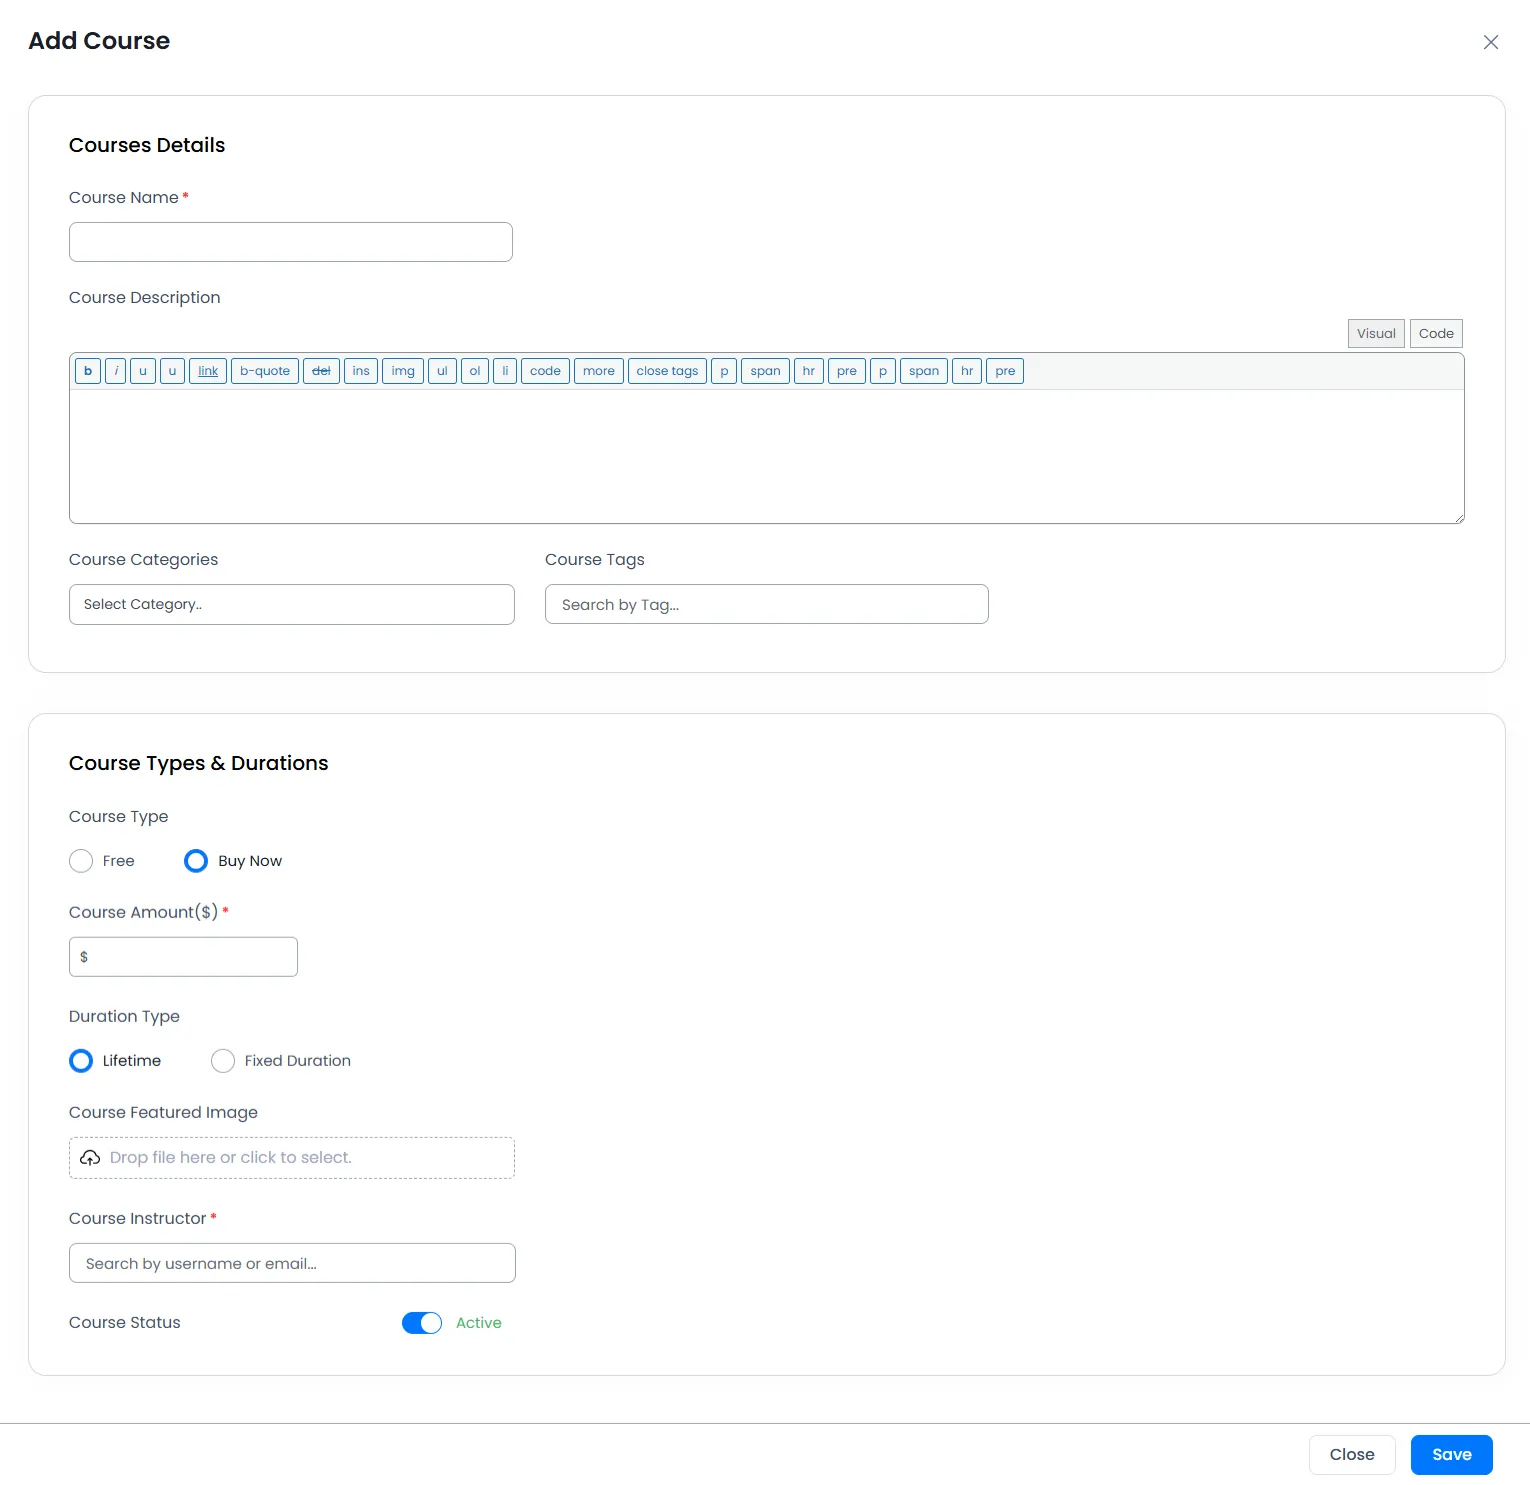
- Add the course name and description.
- Select the category, under which the particular course can be purchased and accessed
- Set the tags(you can set the main points which includes in the course). Tags can be easily added, just add the text and hit enter, and the tags will be added within seconds.
- Set the course type between free and paid. If you want the course to be paid, select the
Buy Nowoptions and set the price for the course. - Now, set the duration of the course till which the members will be able to access the course. Under the
Duration Typeoption. If you select theLifetimeoption, then the course will be displayed to the members for an unlimited time bound. - Similarly, if you set the course access Duration Type to
Fixed Duration, then you will be able to set the duration inDays, Weeks, MonthsandYears - Now, upload an image which will displayed as the cover of the course and set the instructor (ex: author) of the course.
- You can set the course status too, so after the course is created, and if you wish to deactive the course temporarily in the midway, then you can change the status of the Course between active and deactive simply by enabling and disabling the switch for
Course Status - Save the setup
Course Sections
After the course and the categories is configures, now you will be able to add the content of the course, the sections/lessons which will include all the information of the course.
To add the sections/lessons to the course, hover over the course and click on the Course Sections option to add/manage the courses.
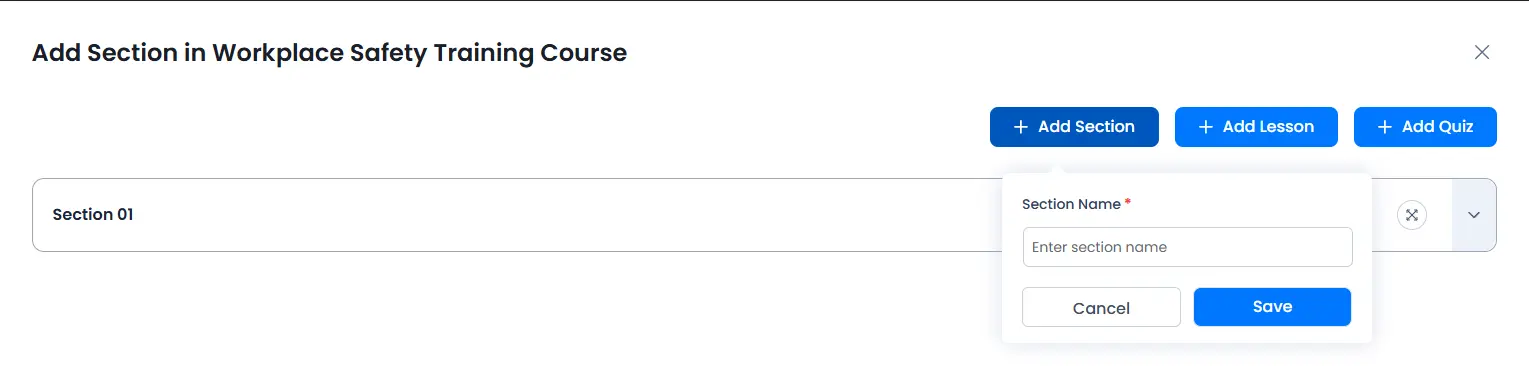
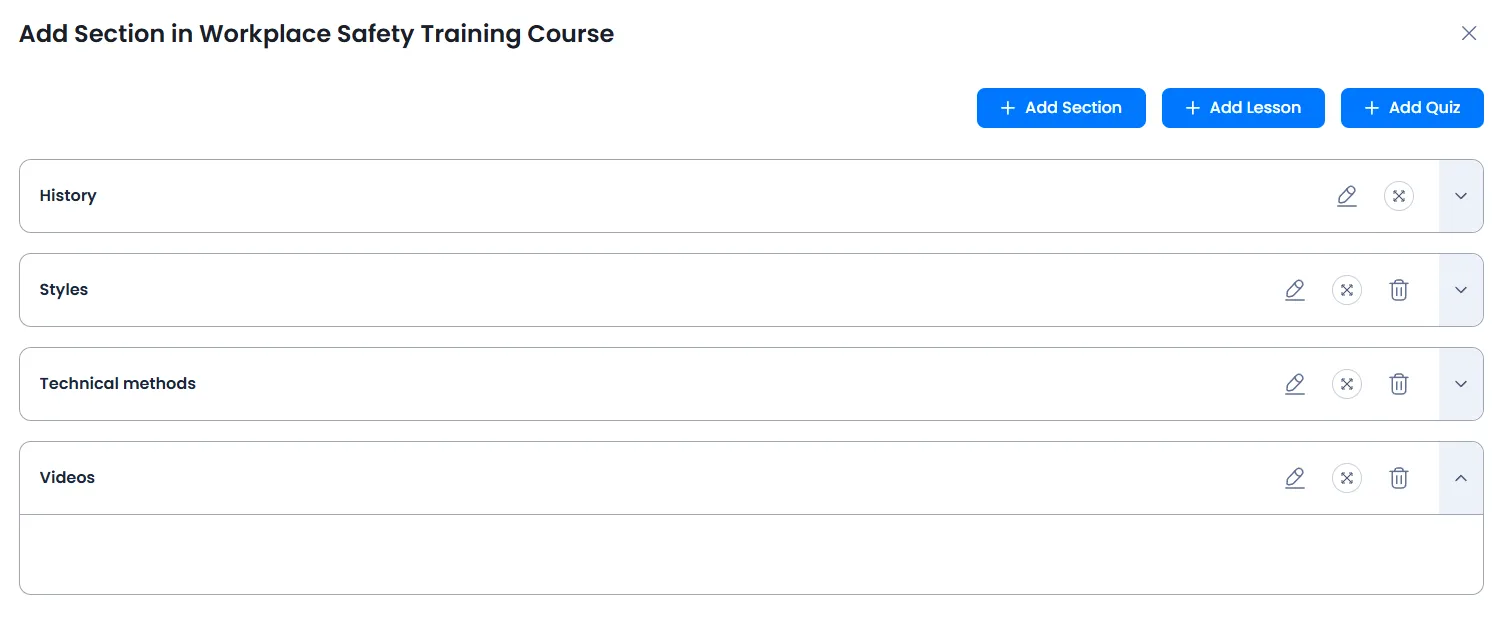
Add Section
Click on the + Add Section button and add the name name in the “Enter Section Name” textbox and hit the save button. The section will be added on the spot.
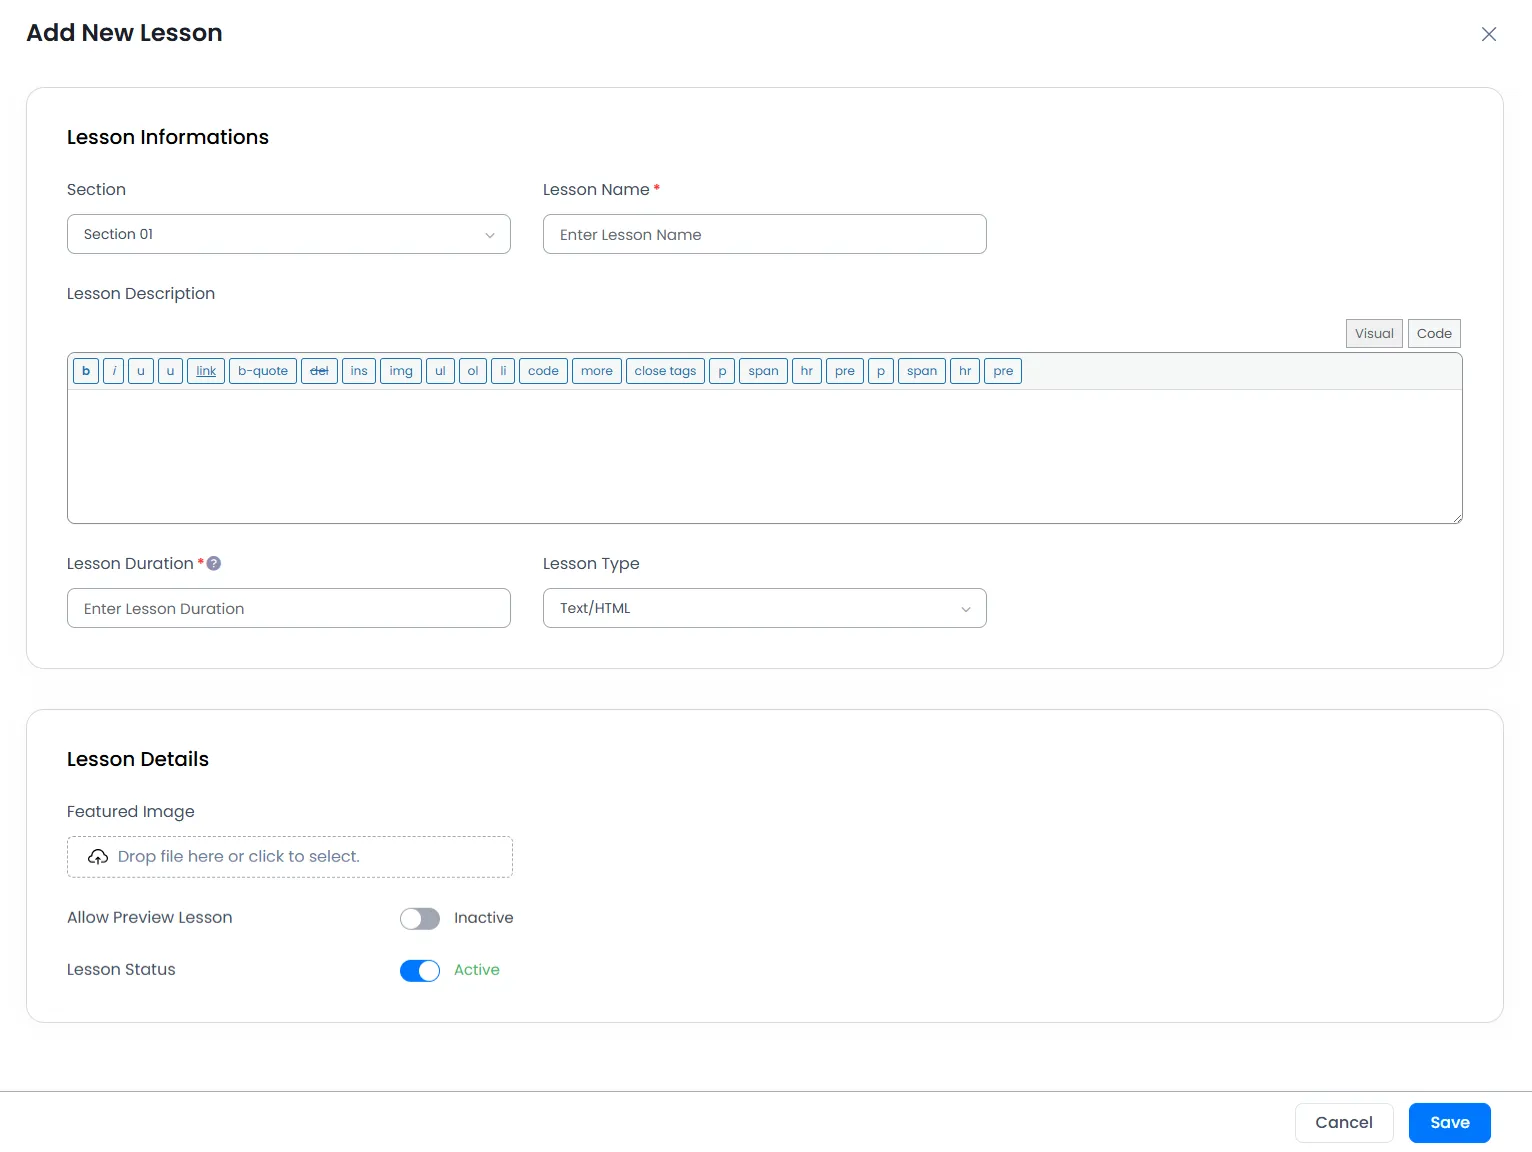
Add Lesson
After the sections are added, add the main content, the lessons. You can add the lessons as per the following steps:
- Click on the
+ Add Lessonbutton. - Select the Section from the dropdown under which the lesson will be displayed.
- Enter the name and the description of the lesson
- You can set the lesson type in 3 different types:
1. Text/HTML
Only the content set in the description section will be displayed
2. Video
You can upload a direct video, set the video URL or embed the video code
3. Audio
You can upload a direct audio, set the audio URL or embed the audio code
- If you want to set the Preview of the lesson, then enable the
Allow Preview Lessonand set the preview depending on theLesson Typeselected.
After adding a lesson and done with setting it in the section, you can add later change and add a lesson to any sections as per your requirement.
You can drag and set the order of the sections as well as the lessons inside the sections according to your requirement.
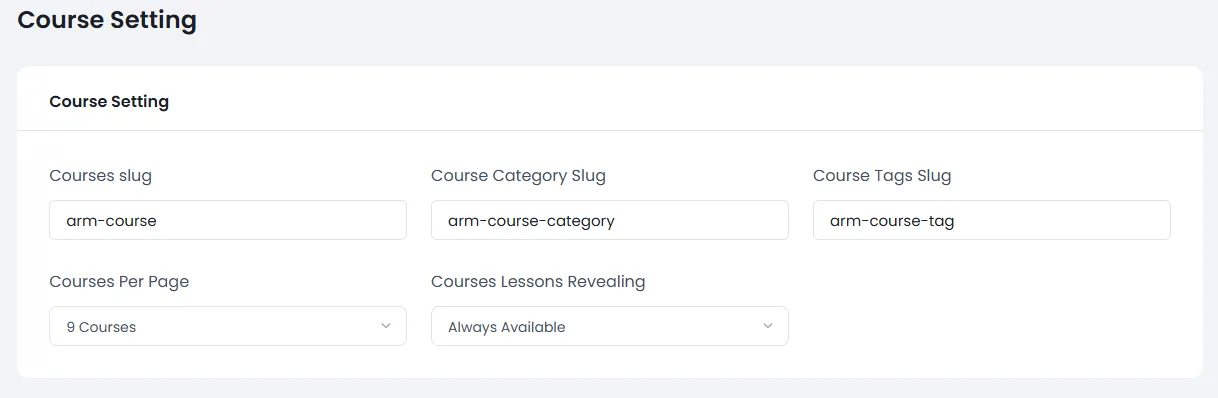
Course Settings
Go to ARMember->General Settings->Course Settings, from here you will be able to configure the front-end options to display the courses.

Courses Slug
Set the slug for the page where you will be able to view the list of the courses as the slug is the unique identifying part of any web address through which you will be access the page.
Course Category Slug
Set the slug for the page where you will be able to view the list of the categories which includes different courses.
Course Tags Slug
For accessing the content via the tags, you can set the slug according to your requirement.
Courses Per Page
From this option, you will be able to set the total number of course to be displyed in the page.
Suppose there are total of 6 courses available at your site, then the course list will be divided into two pages, so the first page will display the list of 3 course and similarly, next page will display the list of other 3 courses.
You can set minimum 3 Courses to be displayed within a single page.
Courses Lessons Revealing
Online course provides a facility to set the access of the lessons to the members directly and at particular times.
You can set revealing time of the course by 3 different methods:
- Always Available
- After Completion of current lesson
- Every x days
If this option is selected, then the members will be able to access lessons from the list.
This option lets you to set the new lesson to be accessed from the list only after the 90% of the content is viewed from the previous lesson.
Note: This option is only available in video and audio content uploaded or url type.
This options lets you to set the new Lessons of the course to be accessed from the list after the x days of purchasing the course.
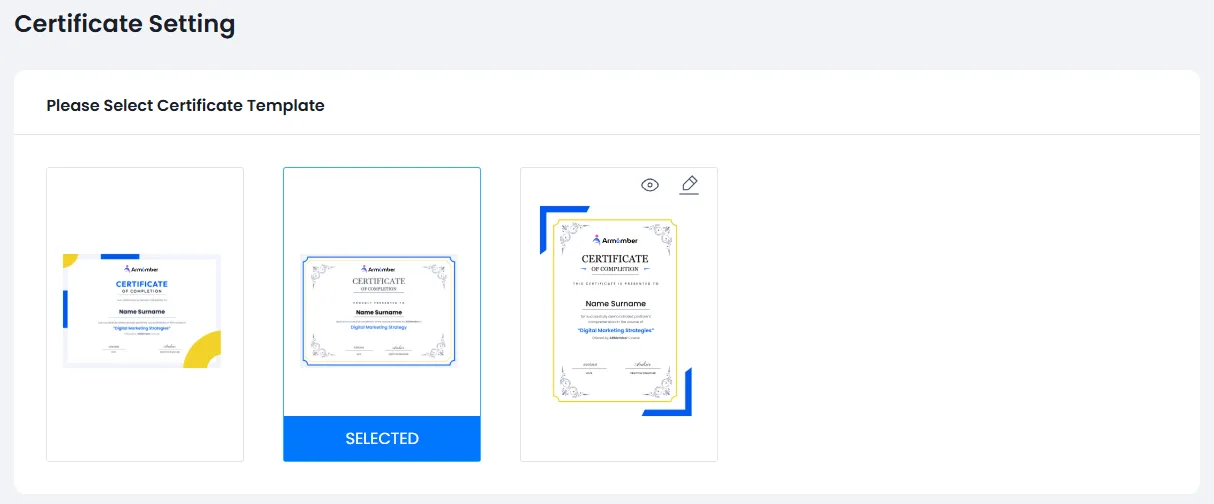
Certificate Setting
Online course Addon provides a facility to set provide the certificates to the members when they complete a particular course.
On completing each course, the member will get an access a new certificate in which the members will be acknowledged that they have completed the particular course.
The online course addon provide 3 different options to choose a certificate design from.
You can hover over the certificate and click on the Edit button to start editing the certificate.
- Title
- Footer message
- Background Frame
- Logo
- Signature
Set the title of the certificate.
Set the message to share at the footer of the certificate.
You can set the background frame to the design according to your requirement.
You may set the logo of your institution according to your requirement.
Course addon provides a facility to set a unique signature which may help the members to be acknowledged as valid certification.

After configuring the certificate with the Frame, Logo, and Signature, you can check how the certificate will look like by simply hovering over the certificate template and clicking on the preview icon.
The certificate design selected from the course settings will be assigned to the members after the completion of the course.
Attach Certification with the email
ARMember does provide a facility to send the email notification when a member completes a course, now if your site requires to send the Certificate as an email attachement, then you can totally utilize our addon PDF Creator Addon which allow a facility to send the certificate in PDF form as an attachment to the email, for more information you can click here.

Paid Post setup for enrollment.
In order to enroll for a course, it is neccessary to keep the Pay Per Post addon activate from the ARMember -> Addons page.
Once you have activated the Pay Per Post addon, then further the next step is to create a setup form in order to allow the users to register and make a payment for the course they selected.
To create a paid post setup form you can navigate to the ARMember -> Configure Plan + Signup Page, and here you can create a new setup form and select the “Paid Post” for the type of setup. For more information click here.
Now let’s see how the courses can be accessed by the Customer.
When the Online Course addon is activated, at the time, two pages course & My courses are created by default.
Go to the URL https://yourwebsiteurl.com/courses and you will find the list of all the course.
Members will only be able to access the list of the course when they are logged in to the website.
From the page, you can search/filter any course by directly searching the course name or filter the course based on the category and the author of the course.
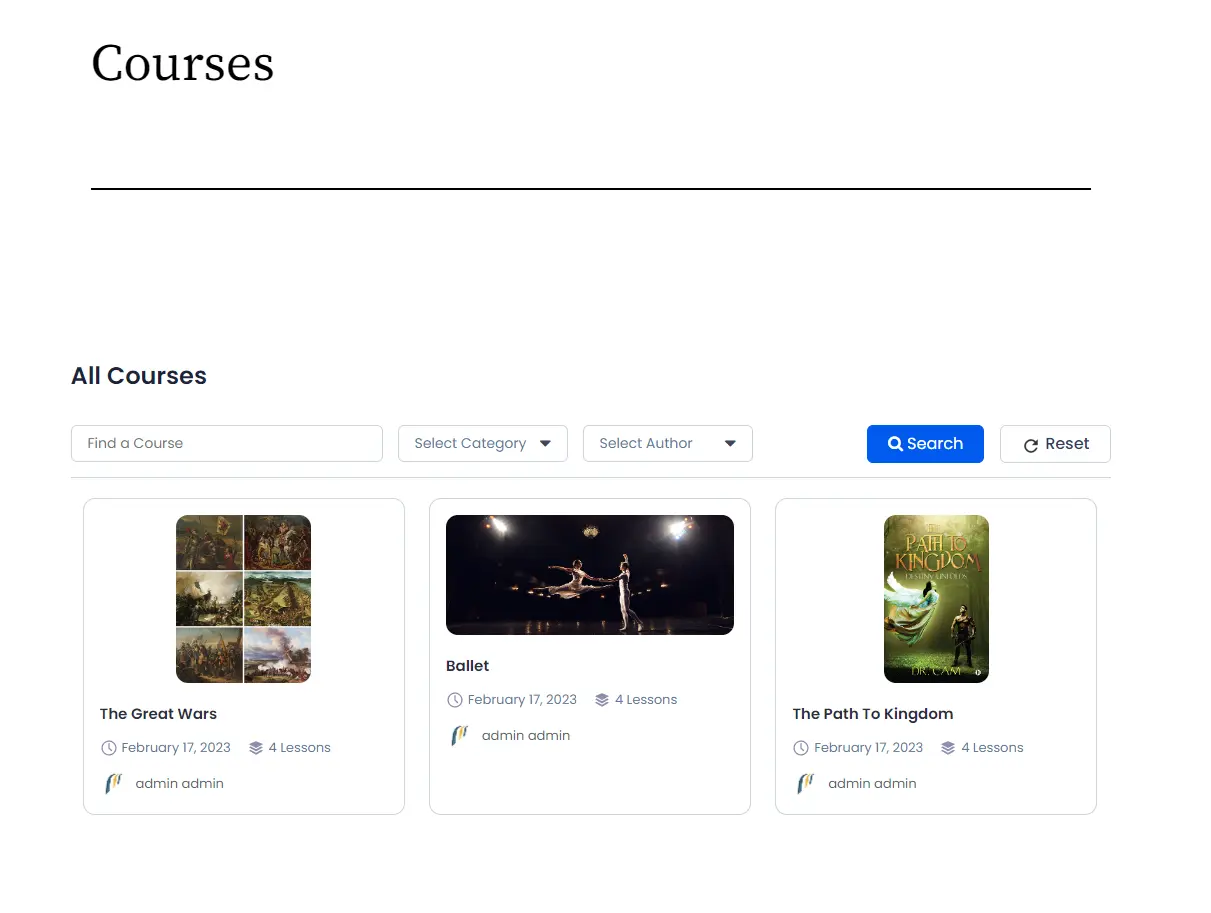
To view the overview of the course, click on the particular course. From here, you will be able to view the cover image, the section of the course.
Next to cover image of the course, you can find the summary and the price of the course along with the purchase button. The Summary will display the total duration of the course, total lectures, category of the course along with Author’s name and the Course Tags.
If there is any preview set for the lesson, then the members can simply click on the preview button and the preview of the lesson will be displayed to them.
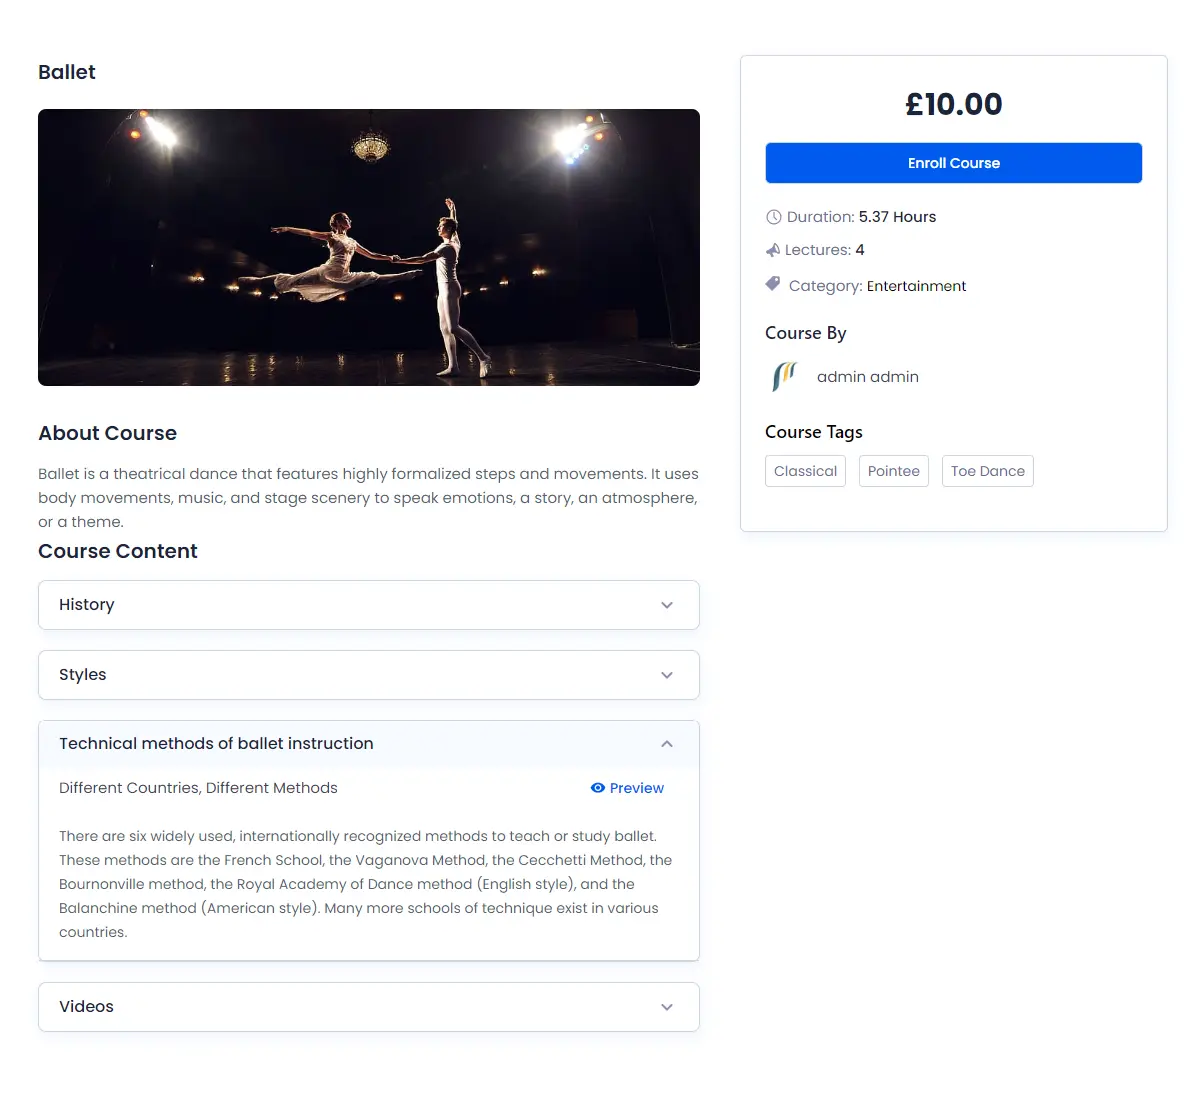
To purchase the course, click on the Enroll Now button and after that the customer will be able to purchase the course from the same payment gateways which you set for the paid post setup to purcahse a paid post.
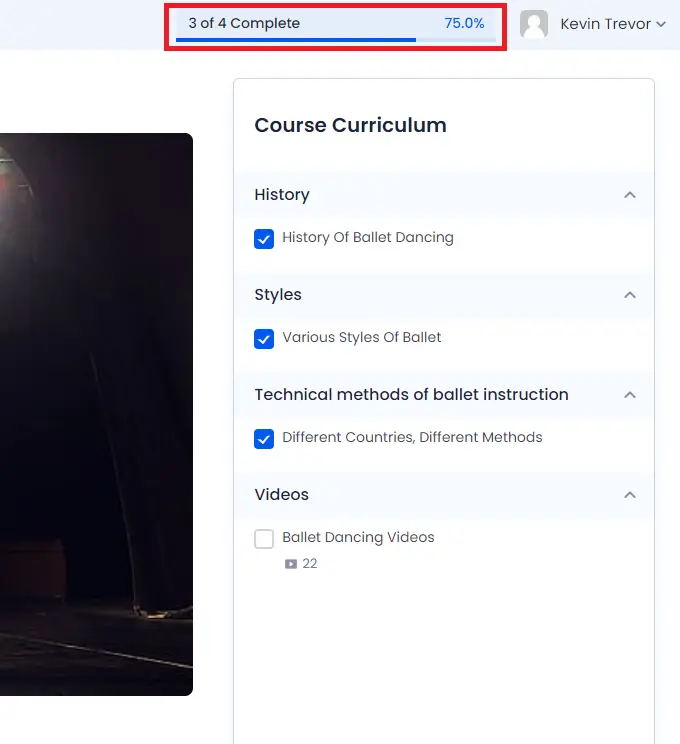
After purchasing the course, the members will be able to access Course Curriculum panel, from where you can choose a leesons from the section available in the course.
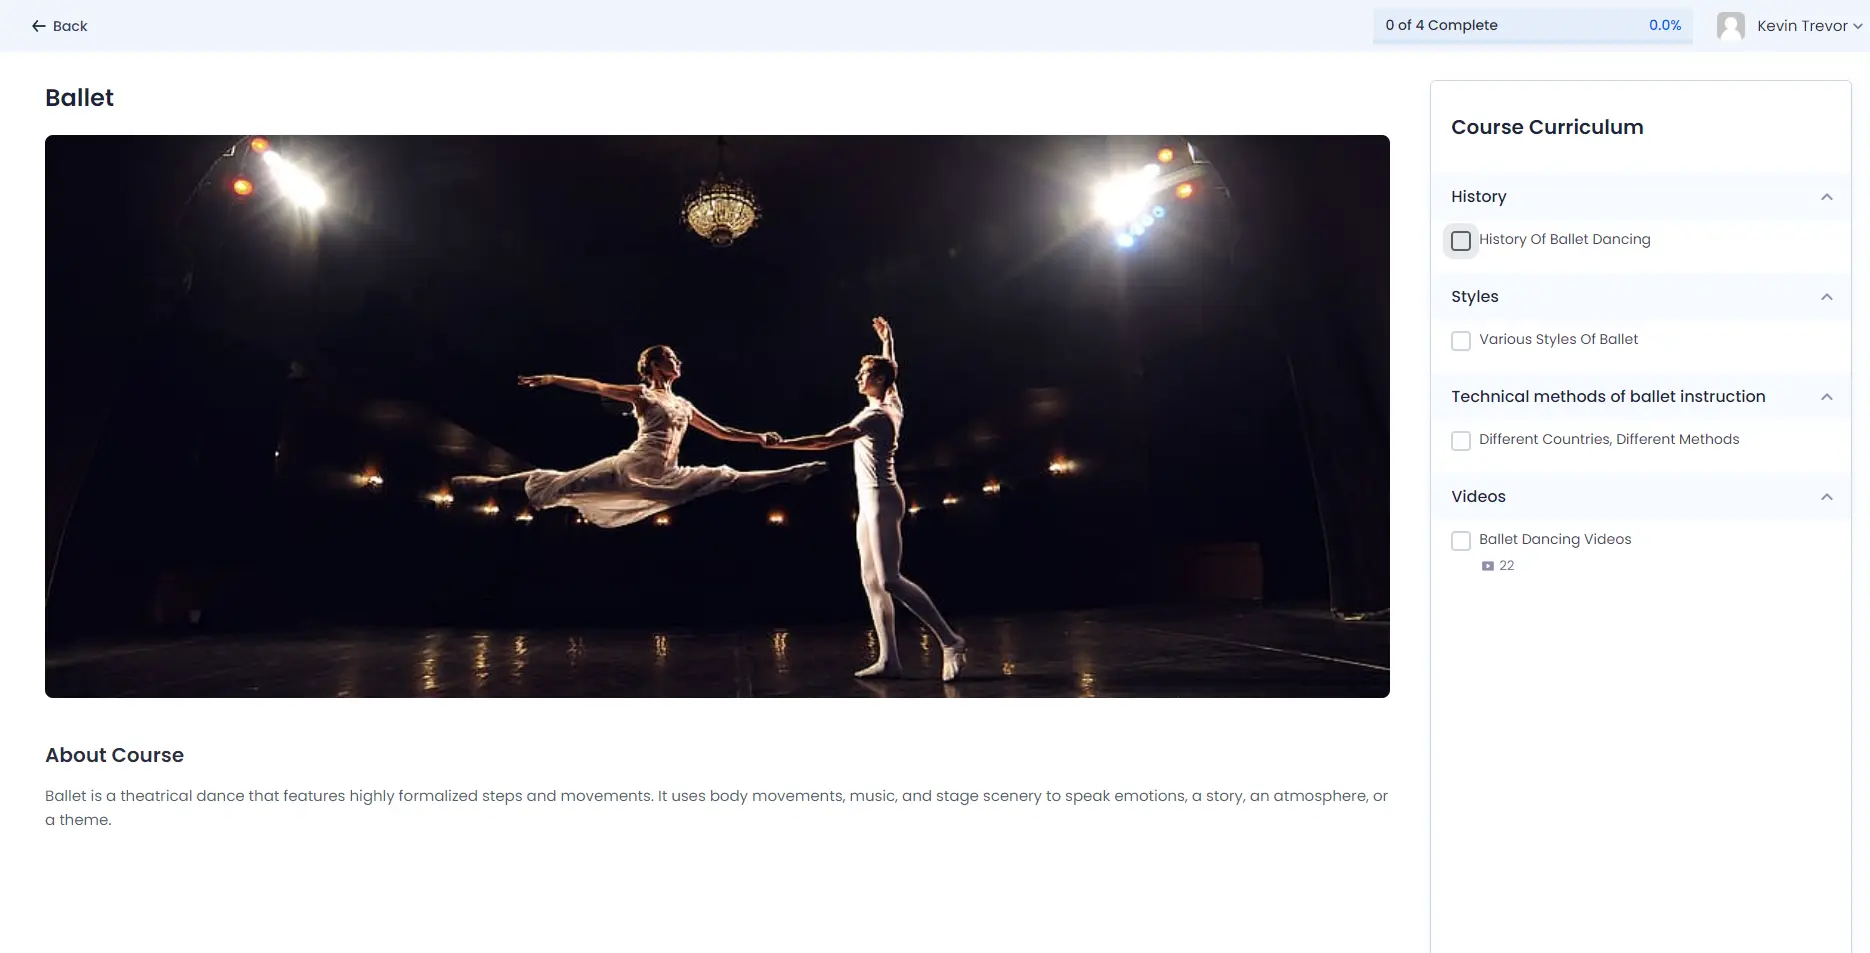
After marking the lessons one by one as completed, the progress bar will calculate the percentage of the course that the member has completed.
When completing all the lessons (whole course), the members can go to https://yourwebsiteurl.com/my_courses from where they can download a certificate for completing the whole course.
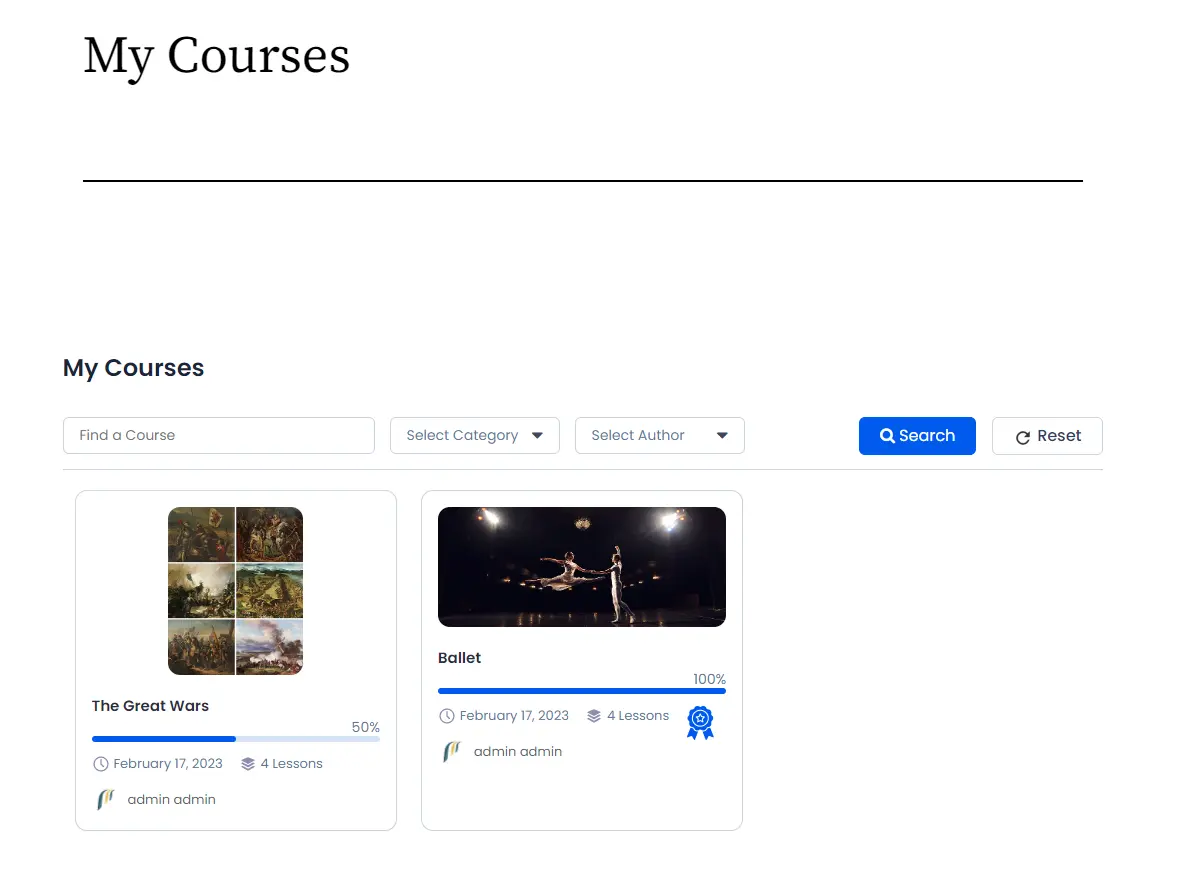
Members will get a new certificate each time when they complete a single course.
Email Notifications
ARMember allows you to enable and configure email notifications for different activities. To configure email for course completion please go to ARMember->Email Notification.
Click on Add New Response you will get a popup open to configure email notifications where you have option of course completion mail in Message To Be Sent input as you can see in following image.

Modify Common Labels & Messages
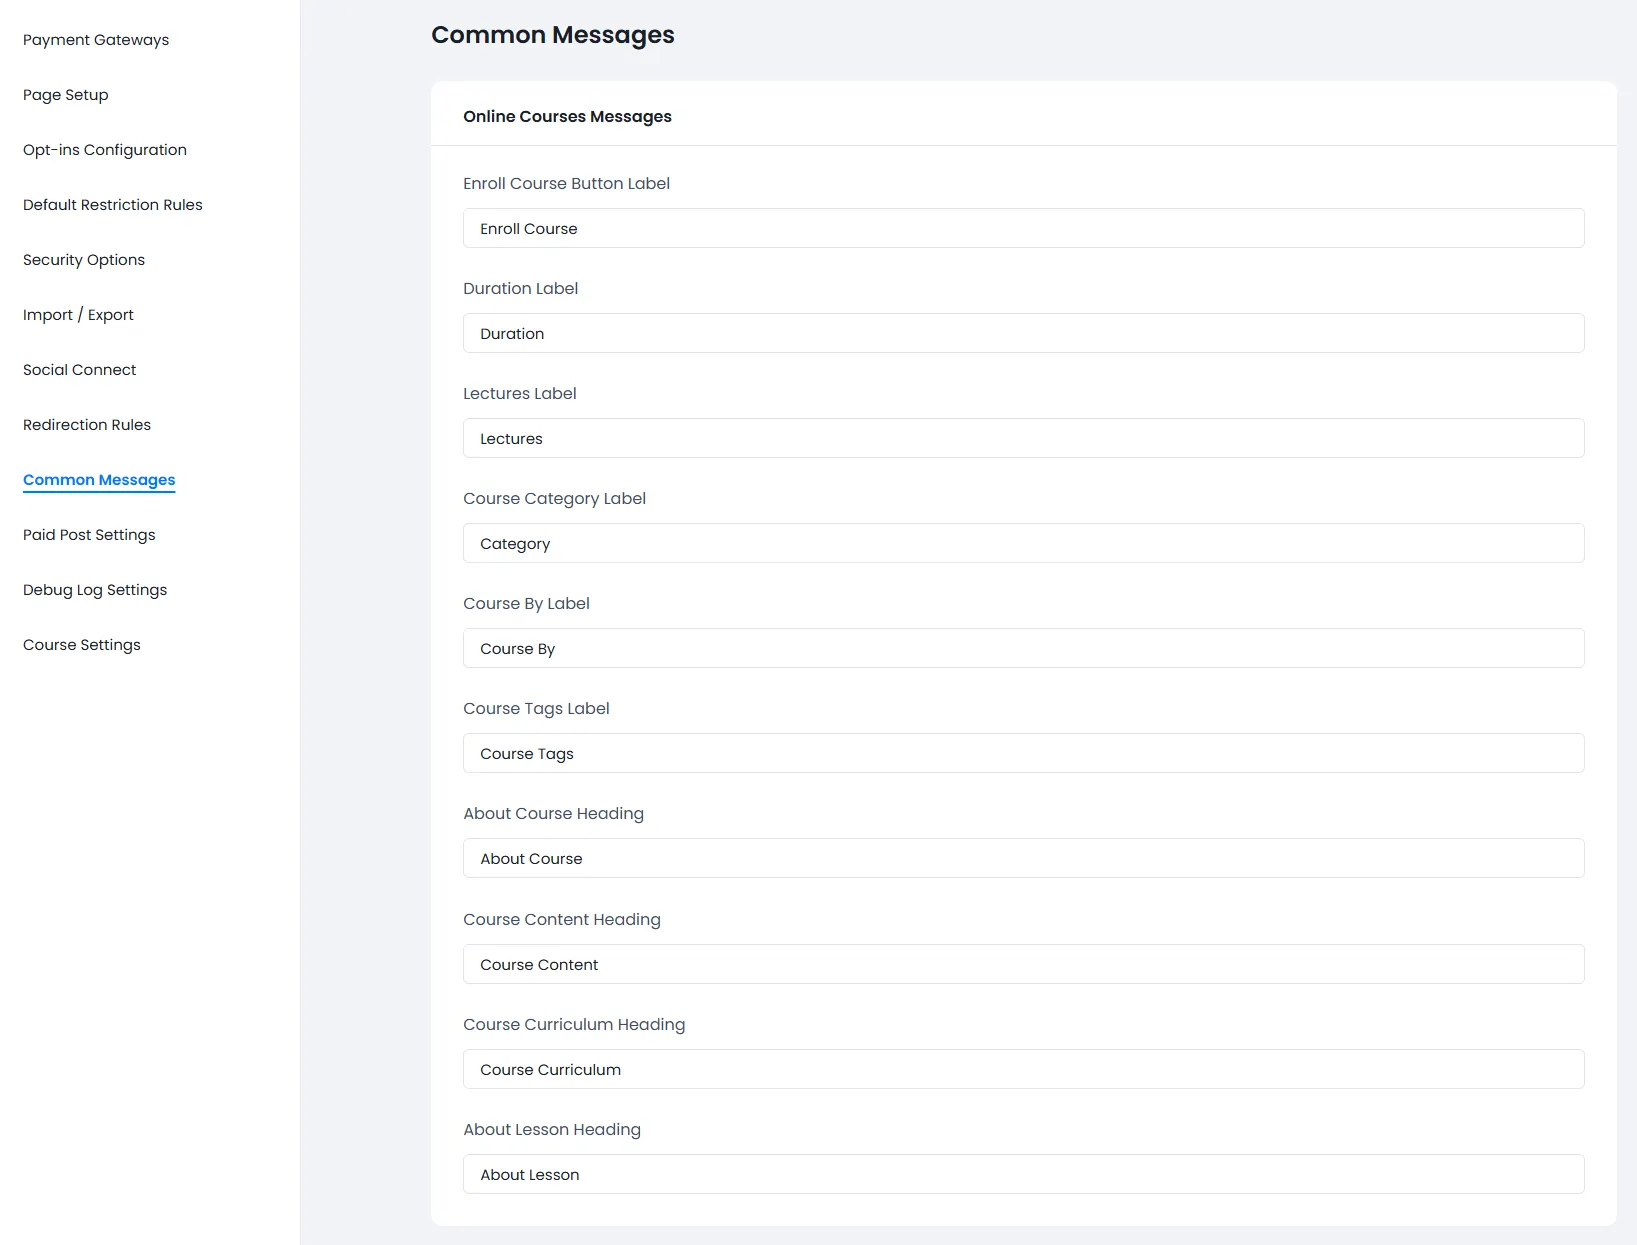
You will able to change the labels and messages easily from ARMember->General Settings->Common Messages page that you can change the “Enroll Course Button”, “Duration”, “Lectures”, “Course Category”, “Course Tag”, and other heading labels according to your requirements.
Assign Course with plan
ARMember does provide an facility to assign the online course along with the membership plan, so when the member purchases the membership plan then they will also have the access to the course as well. For more information to acheive this you can click here.
How to configure course quiz
Configure Online Courses Addon 2.0 – Manage Courses, Lessons & Quizzes using ARMember Pro Plugin
Quiz feature will only available if you activate Online Course from Add-ons and will only work from the online course version 1.4
Add Quiz
The Quiz Edit and Delete feature will only not available if any one user attempted the quiz.
For Add New Quiz on the Course then go to Course Section then click on Add Quiz

- Enter the name and the description of the quiz
- Select the Section from the dropdown under which the quiz will be displayed.
- Enter the duration (minutes) of the quiz
- Enter the passing grade in the percentage of the quiz
- If you want to set the nagative marking cencept then enable the
Quiz Negative MarkingorQuiz Negative Marking for skip - Quiz Negative Marking
- Quiz Negative Marking for skip
- If you want to allow the members to review the quiz then enable the
Quiz Review - If you want to allow the members to retake the quiz then enable the
Quiz Retake - Once you enable the
Quiz Retakeyou will be able to seeAllow Quiz Retake Countoption - Enter the number of times the members can retake the quiz leave blank or set 0 for unlimited retakes
When you enable the Quiz Negative Marking then the members’s wrong answers points will be counted as minus
When you enable the Quiz Negative Marking for skip then the members’s skipped answers points will be counted as minus
Add Question
For Add New Questions on the Quiz then go to Add/Edit Quiz then hit on the Add Question button

- Single Choice
- Multiple Choice
- True/False
- Short Answer
- Fill In The Blanks
- Sort the values
- Match Matrix
- Likert Scale
-
Choose 1st option = 1 point (1 x 1 points)
-
Choose 2nd option = 2 points (2 x 1 points)
-
Choose 3rd option = 3 points (3 x 1 points)
-
Choose 4th option = 4 points (4 x 1 points)
-
Choose 5th option = 5 points (5 x 1 points)
This type of question allows the user to select only one correct answer from a list of options.

This type of question allows the user to select multiple correct answers from a list of options.

This type of question allows the user to select either True or False.

This type of question allows the user to enter a short answer or you can set characters limit for the answer which is used to check the answer is correct or not.
For Short answer questions, the correctness of the answer is checked based on the number of characters in the question.

This type of question allows the user to enter the answer in the given blanks.
For Fill in the blanks type, enter answer in the square brackets. For Example: this is [answer] of the question
Write one or more blanks in the question and enter the all answer(s) in the square brackets
Important Note: For Fill in the blanks type, answers are case-sensitive.

This type of question allows the user to sort the values in the correct order.
Enter the values in the right order while creating the question and the answers for this question type.

This type of question allows the user to match the correct values with their corresponding values in the matrix.
Enter the correct values in the pair and the answers for this question type.

This type of question allows the user to select the scale of the like and dislike.
You can generate rating related question in this type.

For this type point system will be different from the others. which is shown below
For Example: This question has 5 options and 1 point
So Point System will be:
Quiz For Users
After enroll the course user will be able to see the quiz in the Course Curriculum section.
User will be able to start the quiz after enroll the course.

When user start the quiz timer will be start as per quiz duration.

User can use Next Question and Previous Question button for change question.
Question Types
- Single Choice
- Multiple Choice
- True/False
- Short Answer
- Fill In The Blanks
- Sort The Values
- Match Matrix
- Likert Scale


User Completed Quiz
When user completed the quiz result page will be displayed.

Users can either retake the quiz with pending attempt(s) or review it.
Review Quiz
For review quiz you have to enable Quiz Review while Add/Edit Quiz

Important Note: If member has already given the quiz then you will not able to edit the existing Quiz.
After enable quiz review option user can find review button after completed the quiz.
When user hits Review button,User can review his quiz.

Modify Common Labels & Messages For Quiz
You will able to change the labels and messages easily from ARMember -> General Settings -> Common Messages page at the “Online Courses Quiz Messages”, you can change the “Minutes Label”, “Passing Grade Label”, “Start Quiz Label”, “Question Title Label”, “Next Question Label”, and other heading labels according to your requirements.

Course Shortcodes
[arm_all_courses]
Use this shortcode to display the list of all the courses available at your website. Also, please note that the list will only be displayed when the member is looged in.
| Possible Arguments: | |
|---|---|
layout_view |
Display the list in a Grid or List view |
title |
Display the title of the course list heading |
hide_title |
If you want to hide the title, then pass the parameter True, else False. The default parameter will be False |
search_placeholder |
Set the label of the placeholder inside the search textbox |
category_placeholder |
Set the label of the placeholder for the Select Category dropdown |
author_placeholder |
Set the label of the placholder for the Select Author dropdown |
no_result_message |
Set the message to be displayed, if there are no courses in the list |
[arm_my_courses]
Use this shortcode to display the list of all the purchased courses by the members at your website. Also, please note that the list will only be displayed when the member is looged in.
| Possible Arguments: | |
|---|---|
layout_view |
Display the list in a Grid or List view |
title |
Display the title of the course list heading |
hide_title |
If you want to hide the title, then pass the parameter True, else False. The default parameter will be False |
search_placeholder |
Set the label of the placeholder inside the search textbox |
category_placeholder |
Set the label of the placeholder for the Select Category dropdown |
author_placeholder |
Set the label of the placholder for the Select Author dropdown |
no_result_message |
Set the message to be displayed, if there are no courses in the list |