
How to Use & Configure the ARMember Stripe Advanced Checkout Payment Gateway
Stripe Advanced Checkout Integration
Overview
This add-on will allow you to take payments on your ARMember membership setup via the Stripe advanced checkout method.
The Advanced Checkout integration automatically supports all payment methods enabled in your Stripe account configuration. This includes wallets such as Google Pay and Apple Pay, as well as regional and buy-now-pay-later options like iDEAL and Klarna. Any payment method activated in your Stripe Dashboard will be available during checkout automatically, with no additional integration changes required.
Important Note: This add-on will work with ARMember Version 7.5 or higher.
Steps For Installation And Activation
You can install the plugin using either of the following methods. The ARMember – Stripe Advanced Checkout Add-on requires ARMember version 7.5 or higher to be installed and activated.
New install via FTP
- Download the plugin and extract it. You will find a directory at armember-stripe-advanced-checkout.
- In your WordPress installation directory, upload armember-stripe-advanced-checkout to
wp-content/plugins/ - Activate the ARMember – Stripe Advanced Checkout add-on plugin through the Plugins menu from the WordPress admin panel.
New install via the WordPress Uploader
- Download the plugin.
- Log in to your WordPress admin panel
- Go to
Plugins⇾Add New⇾Upload - Click on “choose file” and browse the download package. When the plugin uploads successfully, click on Activate Plugin.
You can find this plugin from ARMember ⇾ Add-ons. When this add-on gets activated on your site, you will get an additional option in ARMember ⇾ General Settings ⇾ Payment Gateways.
Choose Your Currency
The very first step is to select your desired currency of your choice. To set the currency, navigate to the ARMember ⇾ General Settings page, and here check option for Default currency and select the currency that works for you. ARMember provides a wide range of currencies to choose from, however if you feel like adding your desired currency, then you can add the custom currency too.
Stripe Supported Currencies
Although ARMember offers a comprehensive list of the all the currencies, it is very important to verify the currencies supported by the Stripe Payment Gateway.
Stripe frequently updates its list of supported currencies, so it’s a good idea to check their official website or help resources for the most current information regarding supported currencies and any specific limitations or conditions that may apply. Checkout this reference article.
AEDAFNAMDANGAOAARSAUDAWGAZNBAMBBDBDTBGNBIFBMDBNDBOBBRLBSDBWPBYNBZDCADCDFCHFCLPCNYCOPCRCCVECZKDJFDKKDOPDZDEGPETBEURFJDFKPGBPGELGIPGMDGNFGTQGYDHKDHNLHTGHUFIDRILSINRISKJMDJPYKESKGSKHRKMFKRWKYDKZTLAKLBPLKRLRDGNFLSLMADMDLMGAMKDMMKMNTMOPMURMVRMWKMXNMYRMZNNADNGNNIONOKNPRNZDPABPENPGKPHPPKRPLNPYGQARRONRSDRUBRWFSARSBDSCRSEKSGDSHPSLESOSSRDSTDSZLTHBTJSTOPTRYTTDTWDTZSUSDUAHUGXUYUUZSVNDVUVWSTXAFXCDXOFXPFYERZARZMW
ARMember – Stripe Advanced checkout Key Features
- Easy Installation and Setup
- Supports One-Time and Recurring Payments
- Supports Free Trial and Paid Trial Subscriptions
- Compatible with Stripe Checkout
- Supports Apple Pay, Google Pay, iDEAL, Klarna, and other Stripe-supported payment methods
Setup ARMember Stripe Integration Payment Gateway
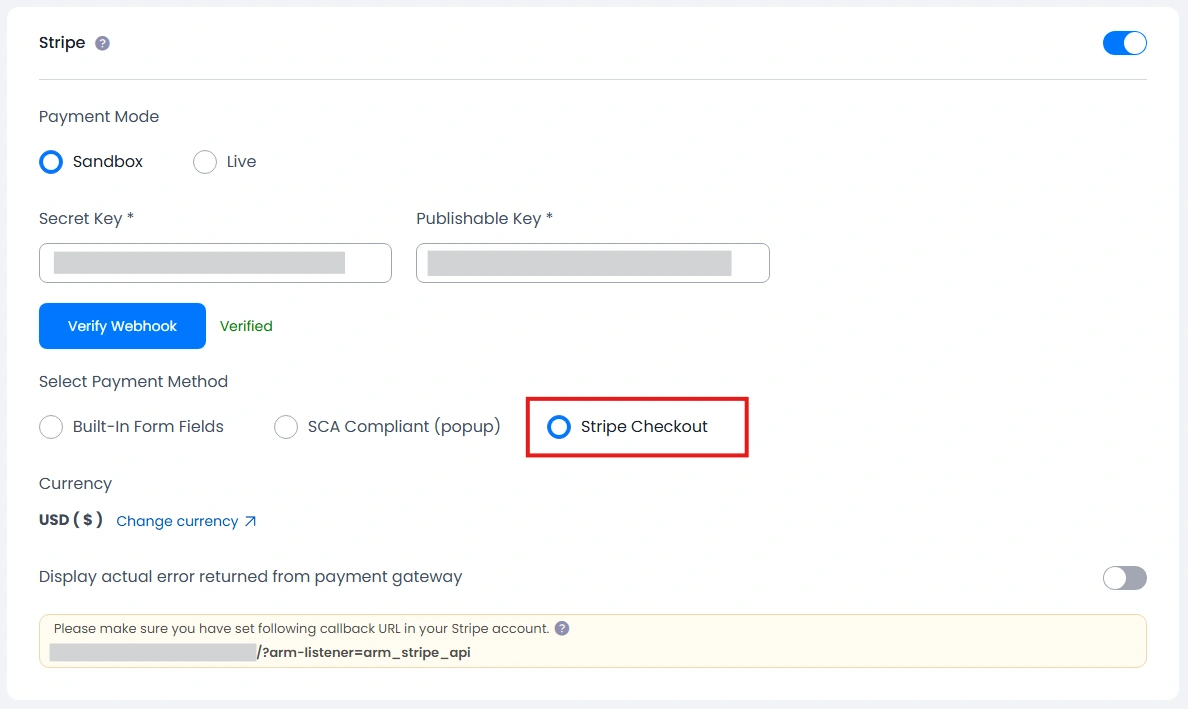
When the add-on is activated, then the Stripe checkout section will be displayed in ARMember ⇾ General Settings ⇾ Payment gateways at the Stripe payment gateway.
Here select the payment mode as “Sandbox” or “Live” as per your requirements and accordingly get the API keys from Stripe.
Important Note: While uninstalling ARMember, if any user has an auto-recurring subscription, then that will be canceled from payment gateways.
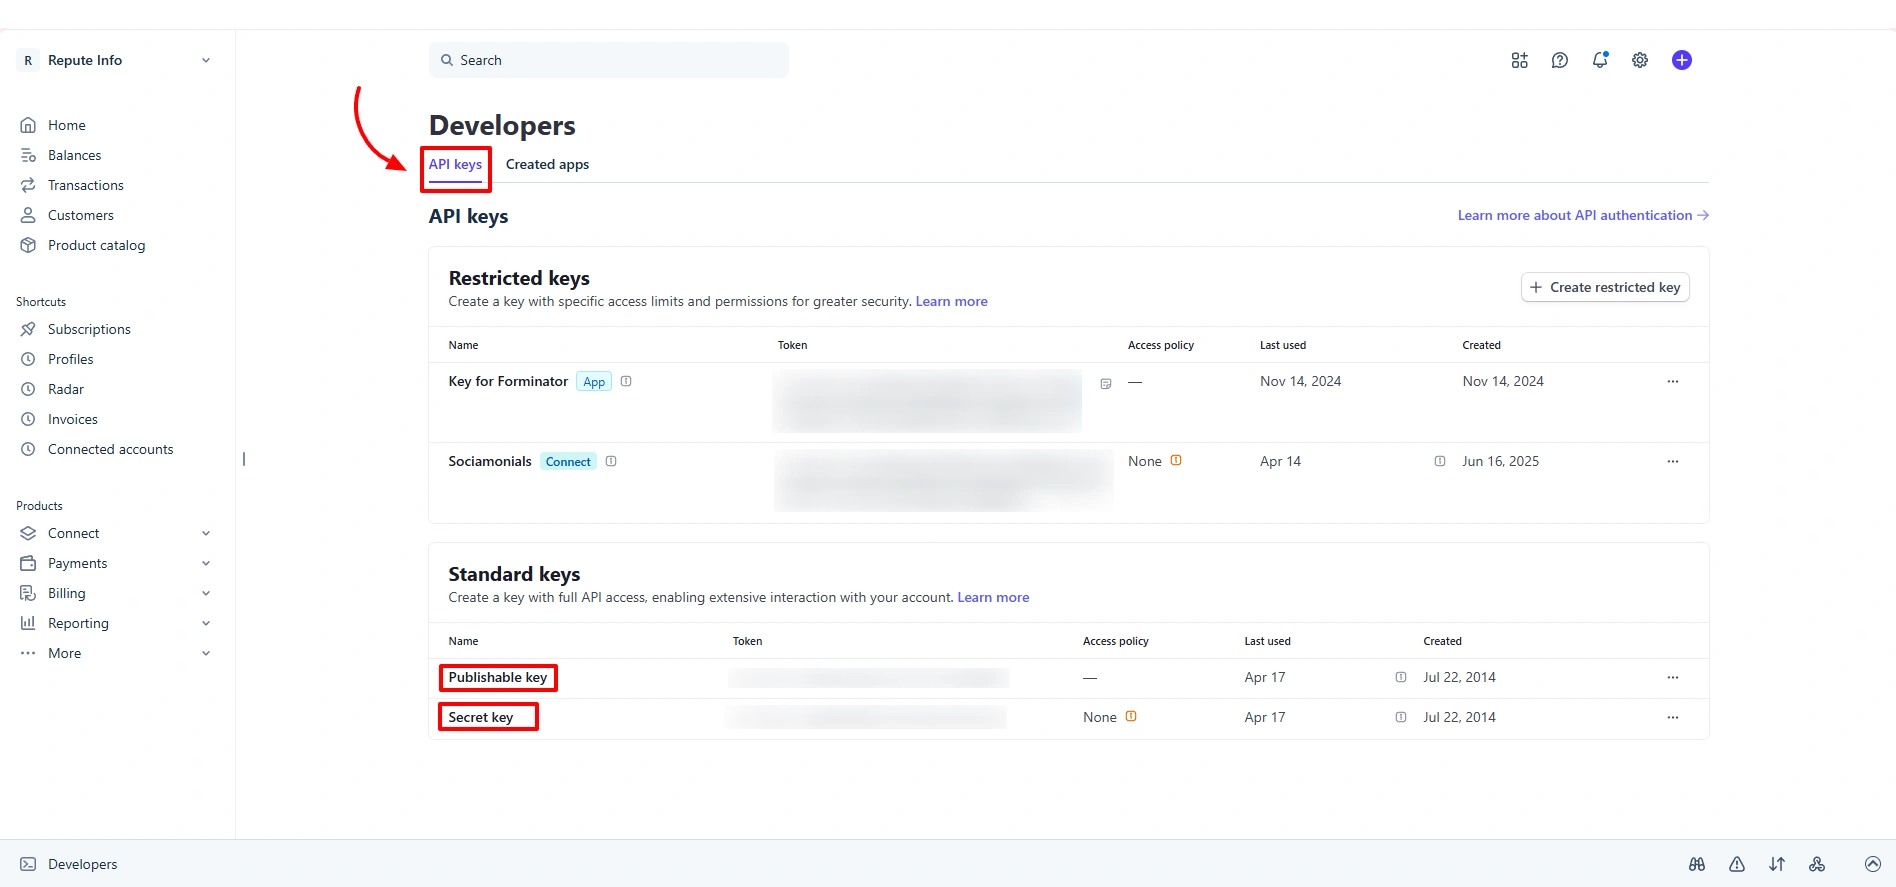
How to get API keys?
To activate ARMember Stripe integration, you must require Secret Key & Publishable Key. Find your API keys in your Stripe account at account settings. Follow the below steps to get API keys:
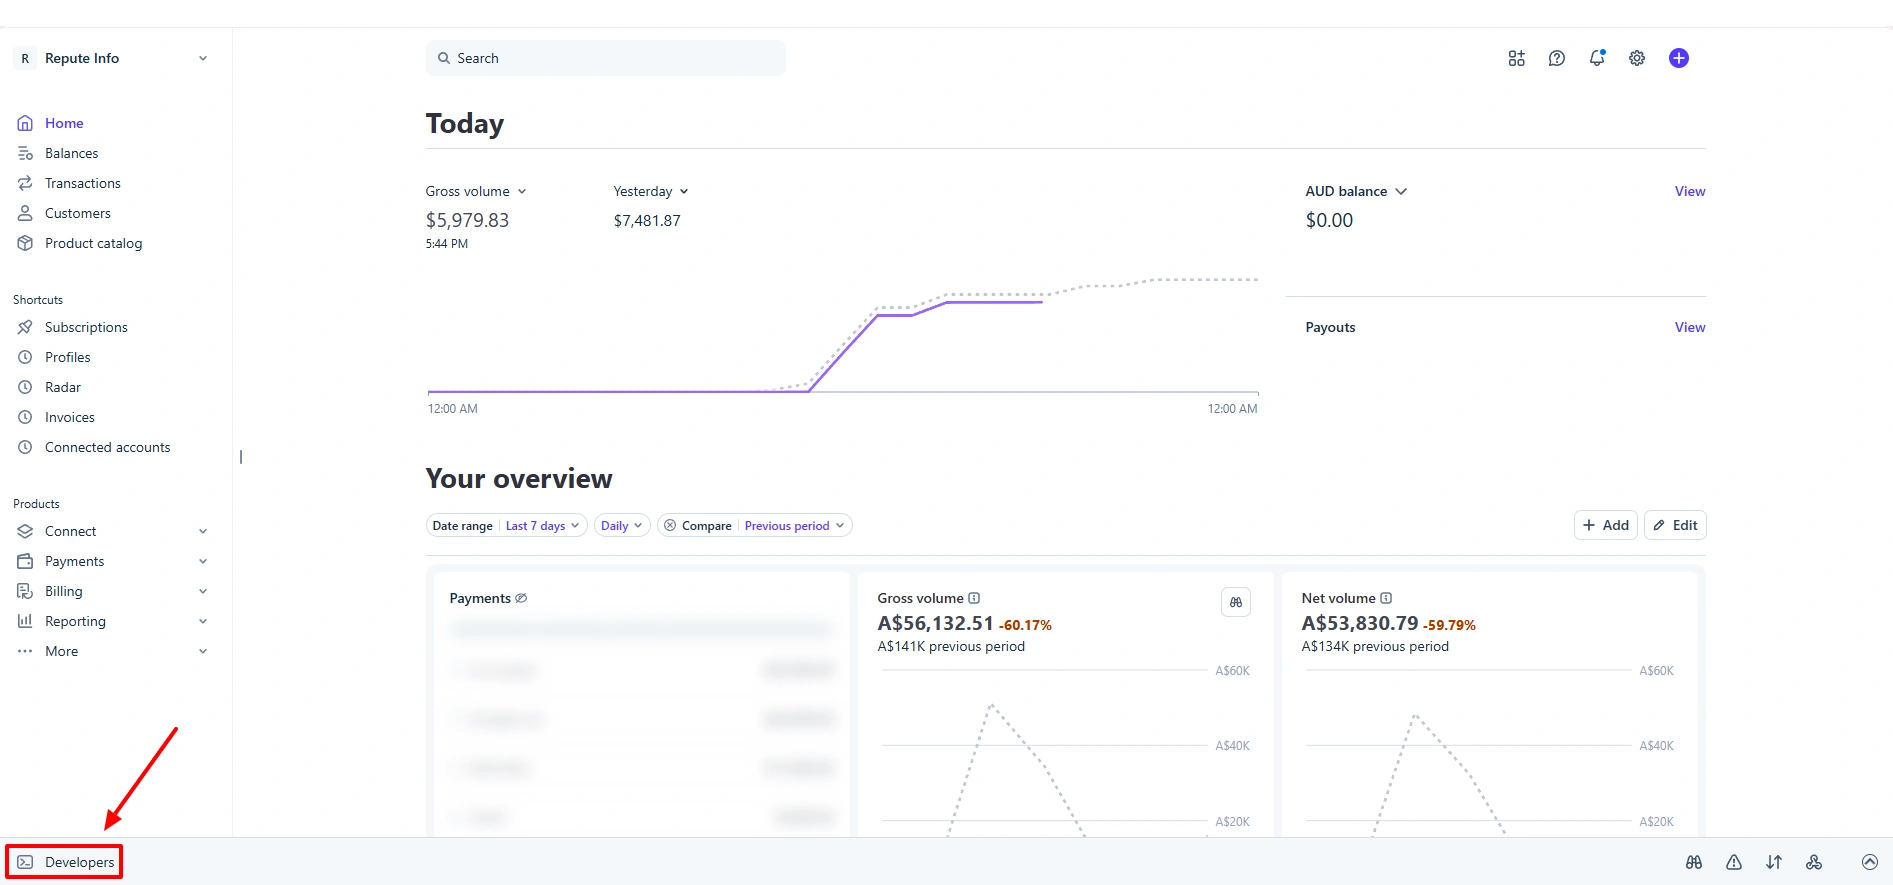
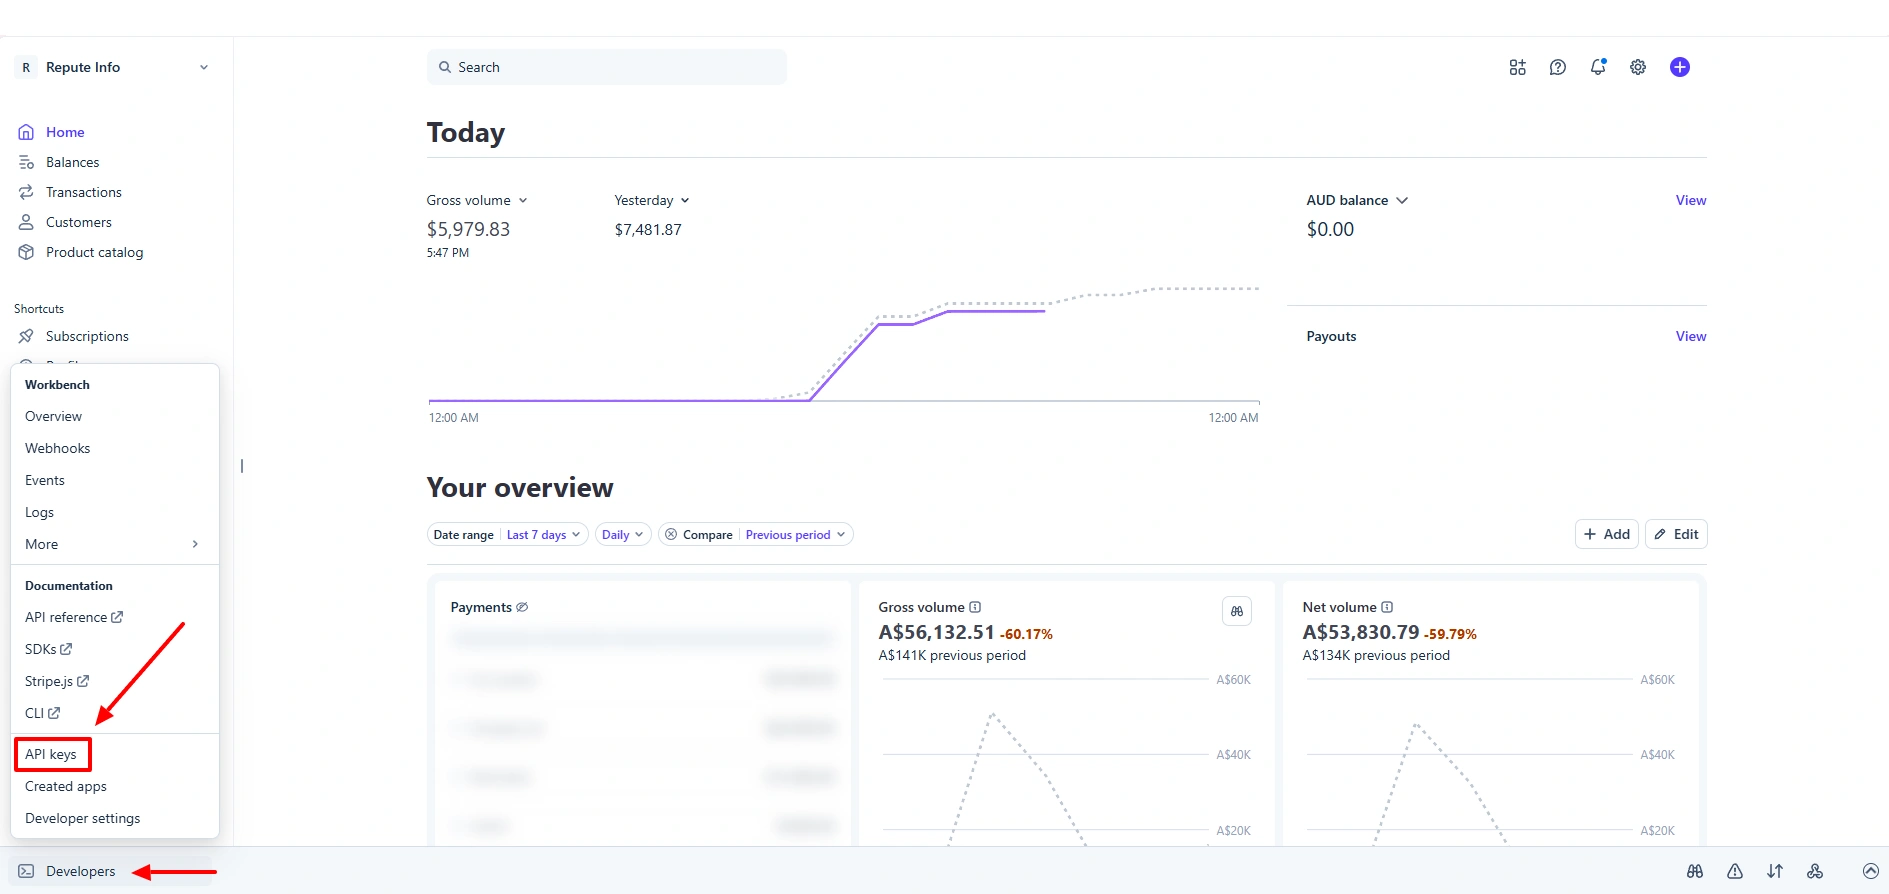
- Log in to your Stripe account, and once you have successfully signed in to your dashboard, look toward the bottom-left corner of the screen, where you will find a menu item labeled Developers, which provides access to additional tools and settings.
- Click on the Developers option to open its submenu, and once the list of options appears, navigate through it and select API Keys, which will take you to the section where you can view and manage your API credentials.
- On this page, you will find two important keys: the
Publishable Keyand theSecret Key, which are essential for integrating Stripe with your application, enabling secure communication, and managing API requests effectively.
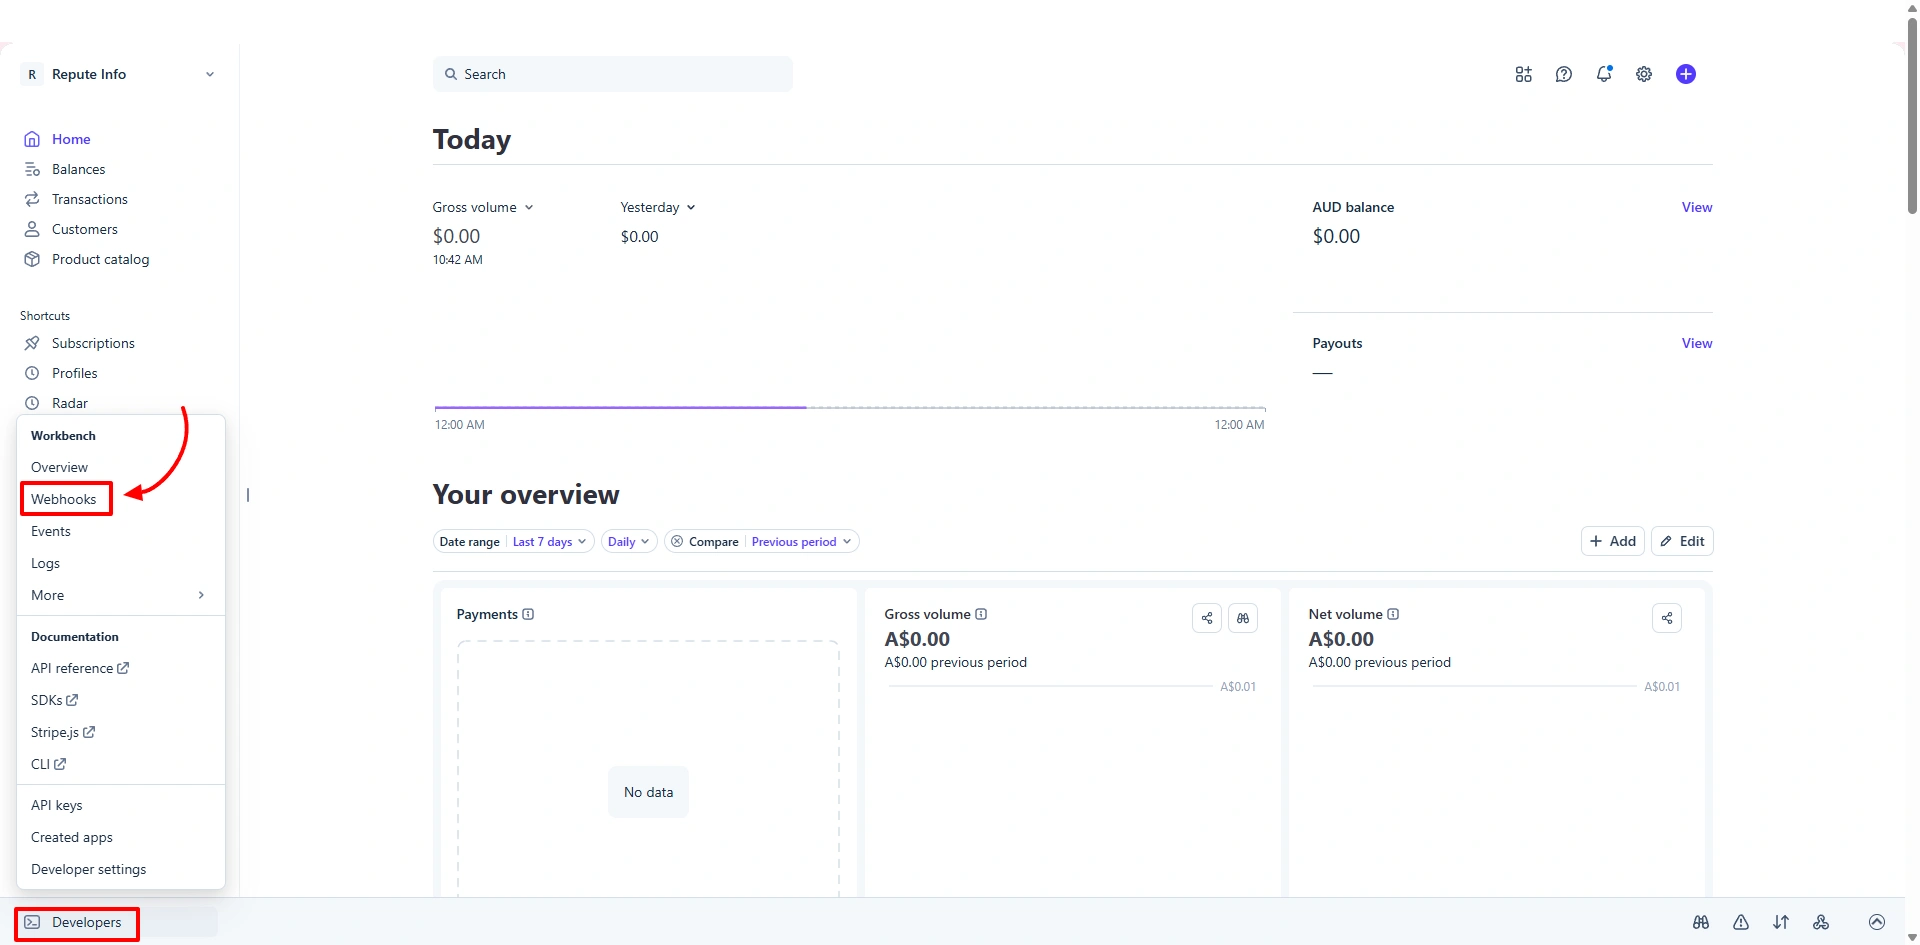
How to configure a webhook?
You must need to set up a webhooks URL for recurring billing. Please follow the below steps to configure webhooks.
- The very first step in order to configure your webhook is to log in to your Stripe account. Go to
Your Account ⇾ Developers. - At the
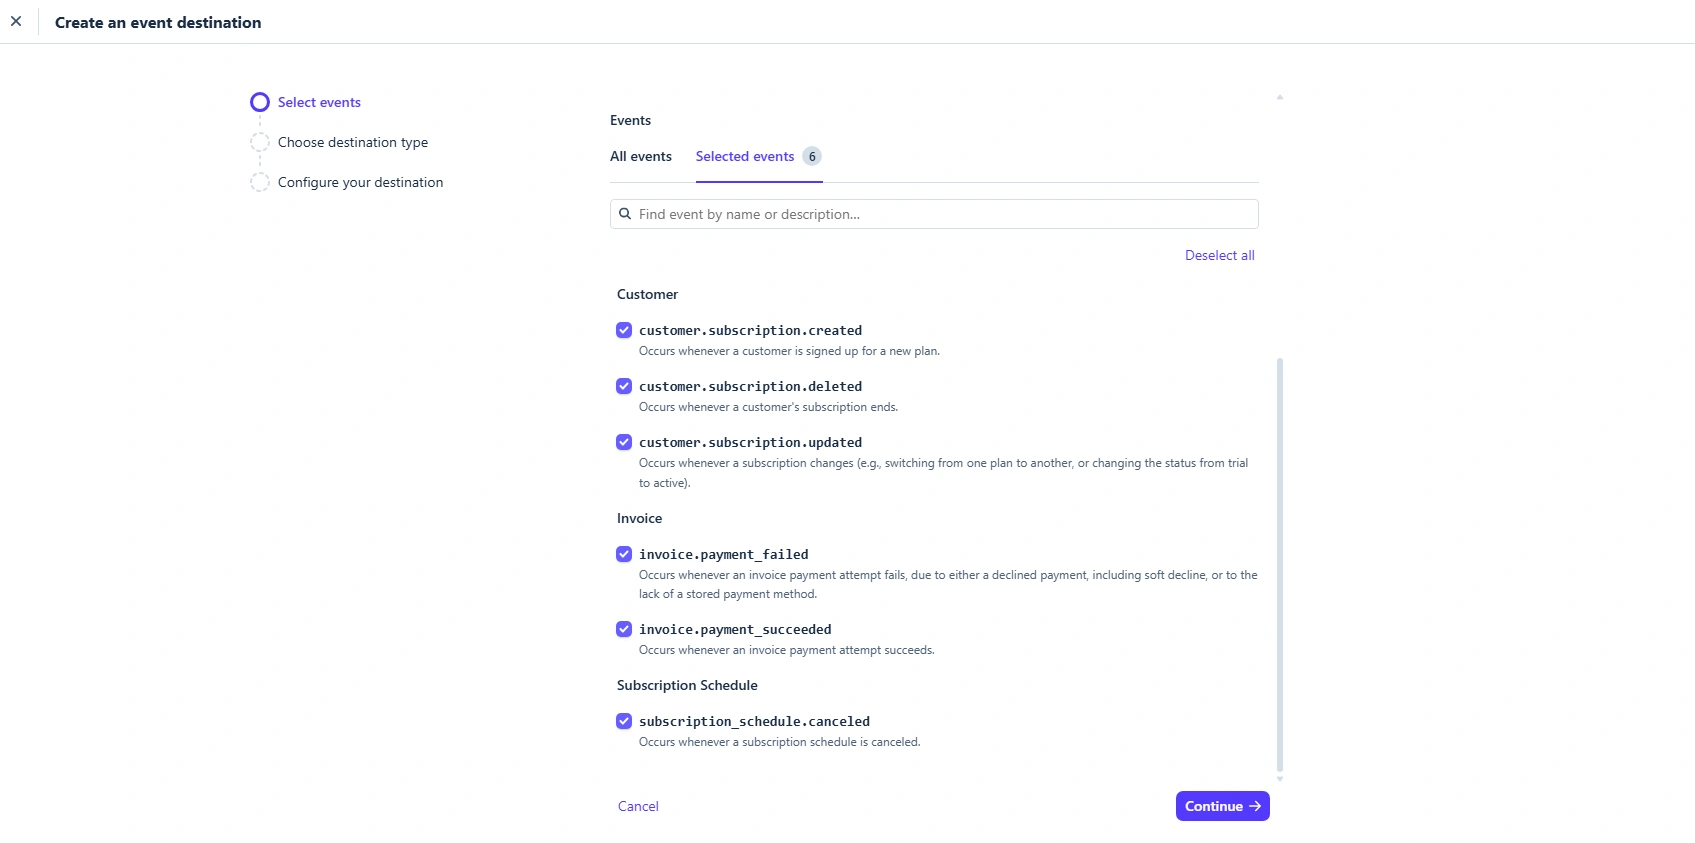
Developersmenu, you will be able to bring up the sub-menu and select theWebhooks. - Click on the “+ Add destination” button to add the webhook URL. Select all events to send. You need to add the below-given Webhook Events for subscription payment work properly with ARMember Stripe Integration:
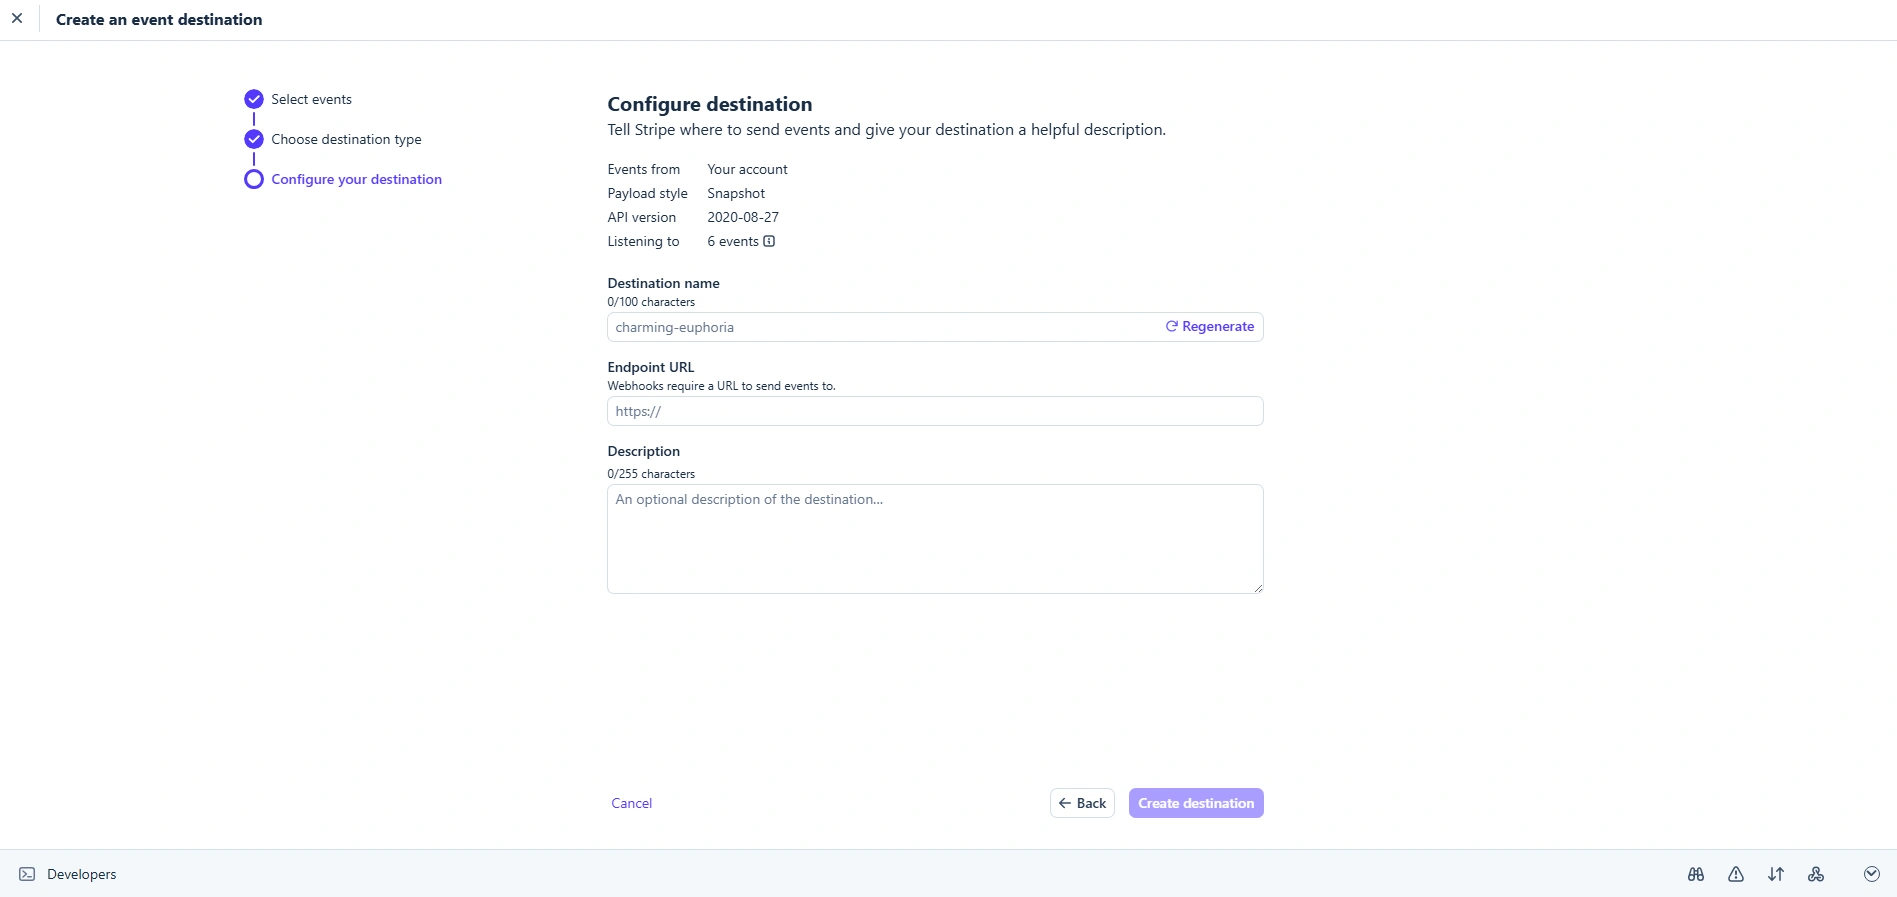
invoice.payment_succeededcustomer.subscription.updatedcustomer.subscription.deletedinvoice.payment_failedcustomer.subscription.createdsubscription_schedule.canceledcheckout.session.completedcheckout.session.async_payment_succeeded- Furthermore, click one continue button, and the next step will be to choose Choose Destination Type. On this page, select the option Webhook Endpoint. and then click on the Continue button.
- Now, add it
https://yoursite.com/?arm-listener=arm_stripe_apiinto the URL input.


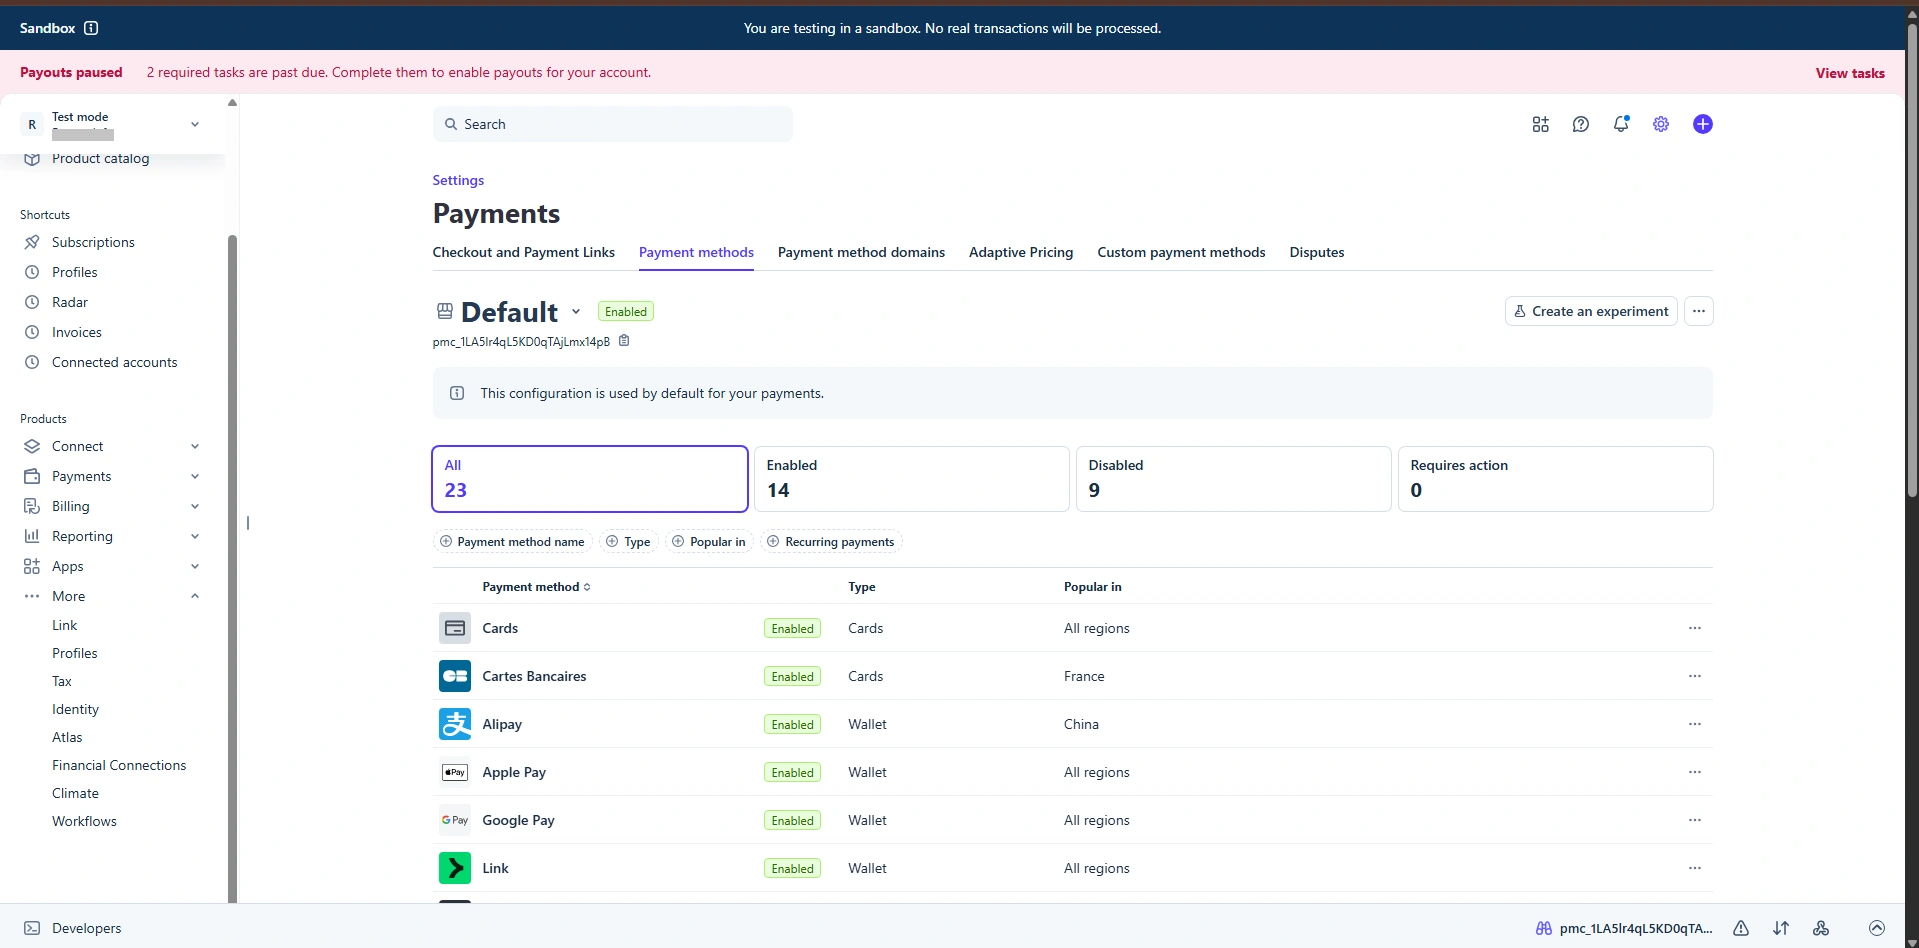
How to enable the payment methods at Stripe?
The payment methods enabled on the Stripe side will only be visible at the Stripe Checkout. So to enable the payment methods to be included in Stripe Checkout, log in to the Stripe dashboard and then navigate to the Settings ⇾ Payments page at the Payment Methods tab.
Debug Log Data
ARMember allows you to check the data that are being received from the payment gateways, wherein you can analyze whether the webhook_data event is reaching your site or not. As such, the ARMember will take any action on the basics of the webhook_data received.
To enable the logs, navigate to the ARMember ⇾ General Settings ⇾ Debug Log Settings page here an option is available: Payment Gateway Debug Log Settings under which enable the switch for Stripe and then save the changes. For more information you can click here.
