


How to Integrate Group/Umbrella Membership Addon with ARMember Pro Plugin
Important Note: This Addon will only work if the ARMember plugin is installed with version 4.1 or higher
The ARMember Group/Umbrella Membership Addon allows you to create and manage group-based membership subscriptions with ease. Using this add-on, a parent member can purchase multiple child user seats under a single membership plan and manage all associated users from one account.
It is an ideal solution for businesses, teams, organizations, educational platforms, and agencies that require centralized membership management. The add-on seamlessly integrates with the ARMember Pro plugin and provides features such as child user invitations, seat management, invite codes, group member listings, email notifications, and customizable registration workflows.
Steps For Installation And Activation
You can install the plugin in the following two ways. And the ARMember Group Membership Addon requires the ARMember Plugin to be installed and active.
New install via FTP
- Download the plugin and extract it. You will find a directory for armembergroupmembership.
- In your WordPress installation directory, upload armembergroupmembership to
wp-content/plugins/ - Activate the
ARMember Group Membership Addonplugin through thePluginsmenu from the WordPress admin panel.
New install via the WordPress Uploader
- Download the plugin.
- Log in to your WordPress admin panel
- Go to
Plugins⇾Add New⇾Upload - Click on “choose file” and browse the download package. When the plugin uploads successfully, click on it.
Important Notes to remember before Configuring Group Membership
- It will not be possible to purchase a group membership plan with the auto-debit payment method.
- If any user signs up as a child user, then the user cannot purchase membership plans. And content permission will be inherited from their parent user.
- The administrator can assign a non-group membership plan to a member if a group membership plan is not available in the member’s account.
- The ARMember Group Membership Addon is not possible to use with the ARMember Multiple Membership Addon.
- If any parent user closes their account or is removed by admin, then all the child members associated with that parent user will also be removed.
How does the ARMember Group Membership Add-on function?
There is a certain way through which the calculation of the group membership is considered; below, certain points are addressed through which it will be clear how the functionalities work altogether.
- Pricing Structure
- User Count
It is important to know how exactly the pricing structure is considered when the Group Membership Plan is purchased. ARMember Group Umbrella Membership provides a facility to set the Minimum Child Members, Maximum Child Members, and Child Member Purchase Slab.
While the parent user purchases a plan, they will have an option to select the seats they wish to have along with the purchase. Let’s understand this with an example.
For instance, a parent who signs up for a plan priced at $100/month intending to include 5 children will be billed a total of $100 $500($100 x 5 child users) upon signing up. The monthly payment remains consistent at $500, regardless of whether the parent activates all 5 child accounts or none at all.
The ARMember Group Membership Addon allows the users and price to be set as per the site owner or admin user; therefore, it is necessary to understand how the parent or child users are calculated before creating a plan.
In our subscription model, the parent member is counted as one user alongside their child accounts. This means that when a parent subscribes, they gain access to the plan for themselves in addition to the children included in their plan. Check out the below-provided example to have a clearer idea of how the users are counted.
Consider a scenario where a parent subscribes to 5 child accounts. In this case, the total user count will be 6 that is 1 parent + 5 children. This allows the parent to manage and monitor the activities of all associated child accounts seamlessly. If the parent chooses to only activate 2 child accounts, they still retain access for themselves and can manage the remaining 3 child accounts without additional cost.
Steps to Set Up the ARMember Group Membership Add-On for Your Website
Step 1: Create Group Membership Plan
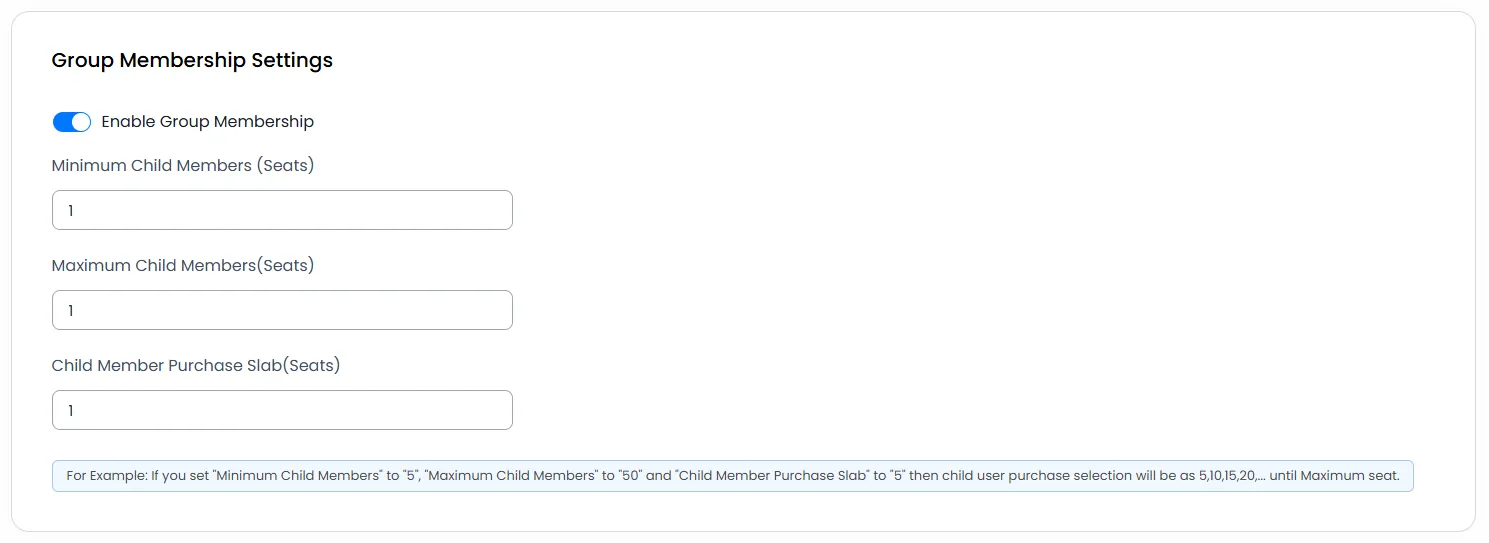
After activating the add-on, create a group membership plan. To create a group membership plan, navigate to the ARMember ⇾ Manage Plans ⇾ Add / Edit Plan ⇾ Group Membership Settings.
Enter the value of your minimum members limit in the Minimum Child Members option. Also set the maximum number of seats you want a parent user to select at the Maximum Child Members. Select your purchase slot from the Child Member Purchase Slab.
For example: If you set “Minimum Child Members” to “5,” “Maximum Child Members” to “50,” and “Child Member Purchase Slab” to “5,” then the child user purchase selection will be 5, 10, 15, 20, … up to the maximum seat.
Step 2: Configure Group Membership Plan at Purchase Form
After activating Group Membership for the plan, configure your plan with Configure Plan + Signup Page. After configuring your setup, copy the setup shortcode and add it to your signup page. Now when you access your signup page, it has the option of how many users you want to purchase, like the below screen.
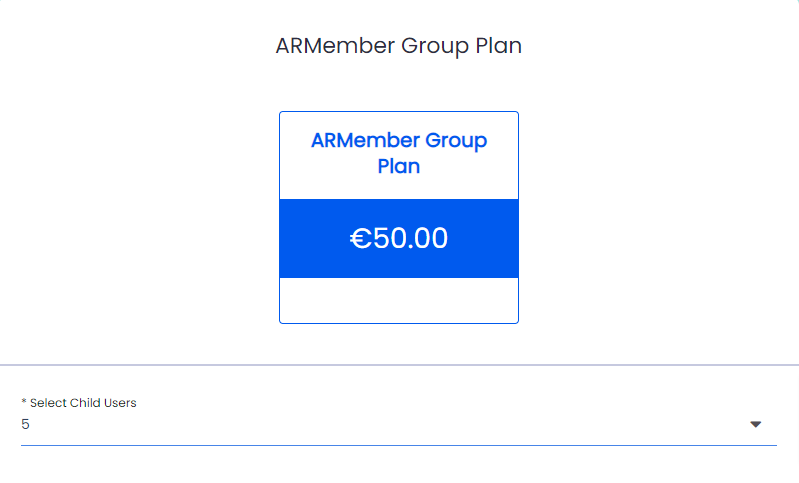
In the ‘Sub User Selection’ section, it will display purchased seats according to your purchase slot selection for the plan.
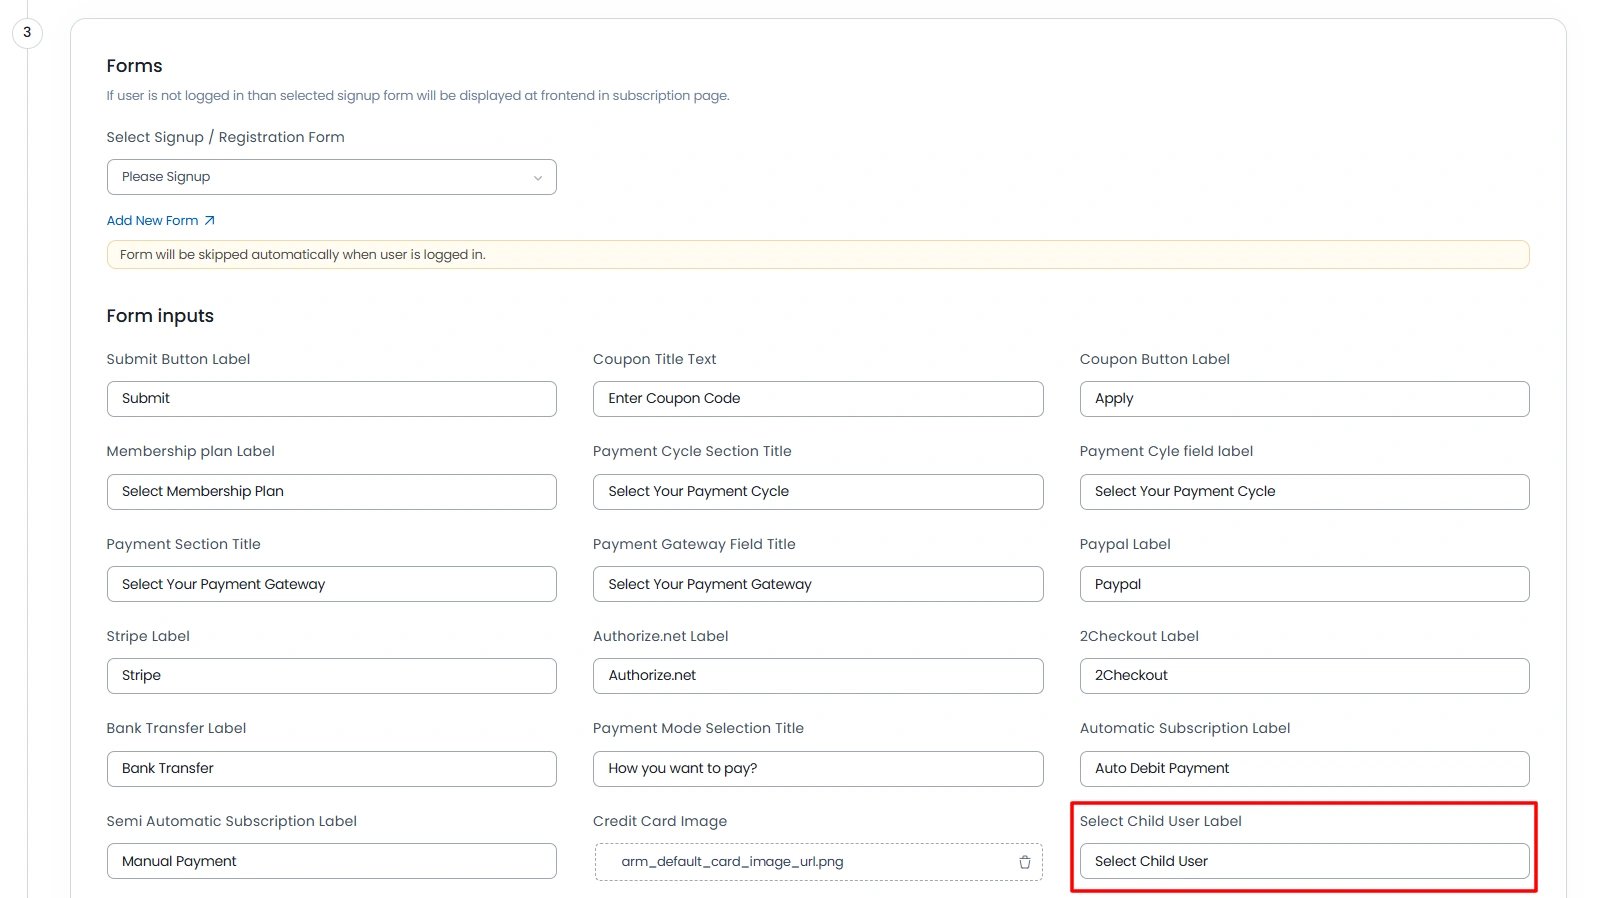
You can change the label of ‘Select Child Users’ for your plan setup from Configure Plan + Signup Page. Navigate ARMember ⇾ Configure Plan + Signup Page ⇾ Add/Edit Setup Form page at Form Inputs the section.
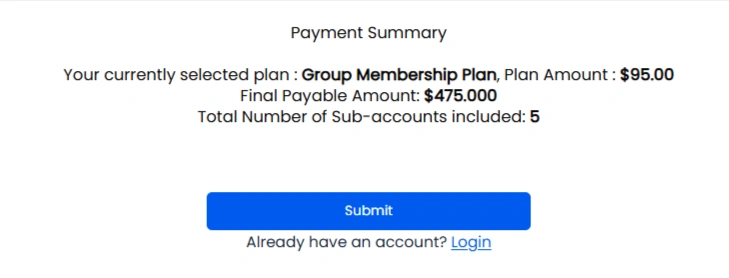
With the ARMember Group Membership Addon, you can add summary text in your plan summary text; you can add it from your Configure Plan + Signup Page. In the ‘Summary Text’ option from your plan setup, there is one option of [SELECTED_CHILD] which will be replaced with your selected child user.
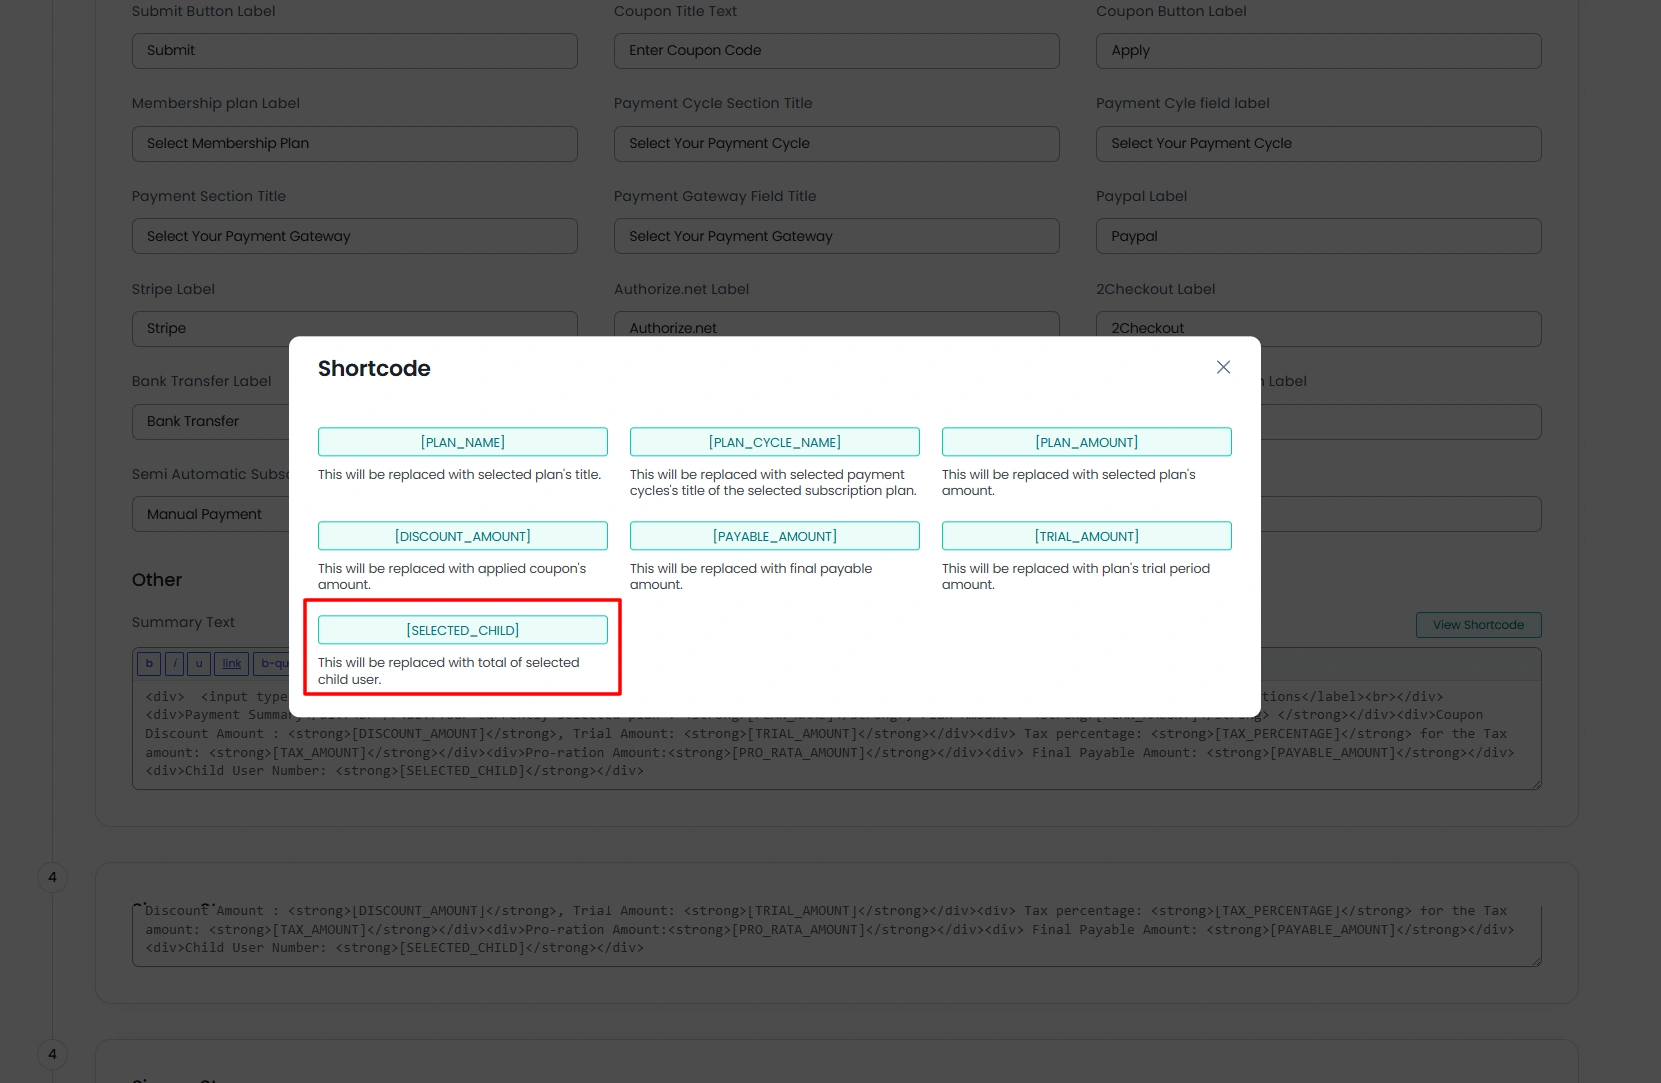
After adding the shortcode to the payment summary, it will be displayed in the front end. As shown in the below image.
Step 3: Set Register Form to Allow Child Users
For child user signup, you need to set the ‘Enable Child User Invitation?’ option on your register page. Let’s check how to add this. Go to the Admin Panel ⇾ Pages ⇾ Edit the register page (where you have added the registration form shortcode); here search for the ‘Membership Shortcode’ block.

Here, click on the Forms tab and select the Registration and select yes for the field Enable Child User Invitation? . Check the below-provided example; you can replace it FORM_ID if you have created another registration form.
[arm_form id="101" is_child="1"]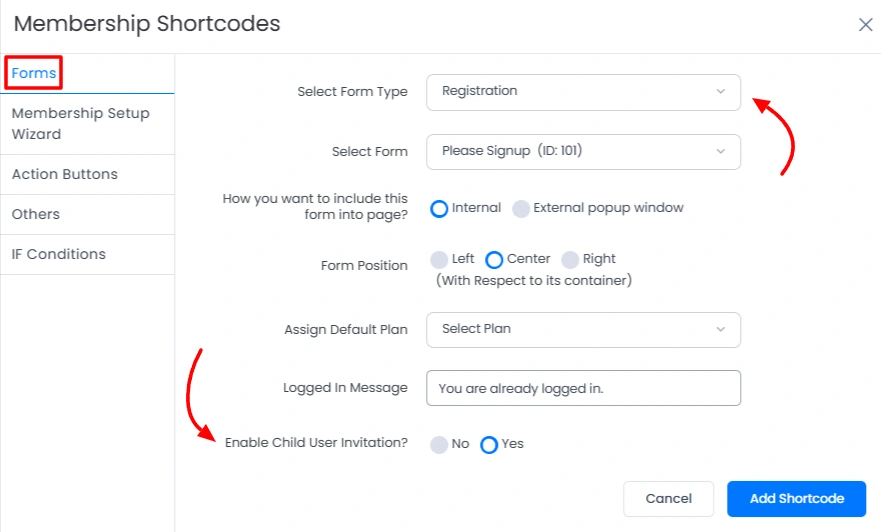
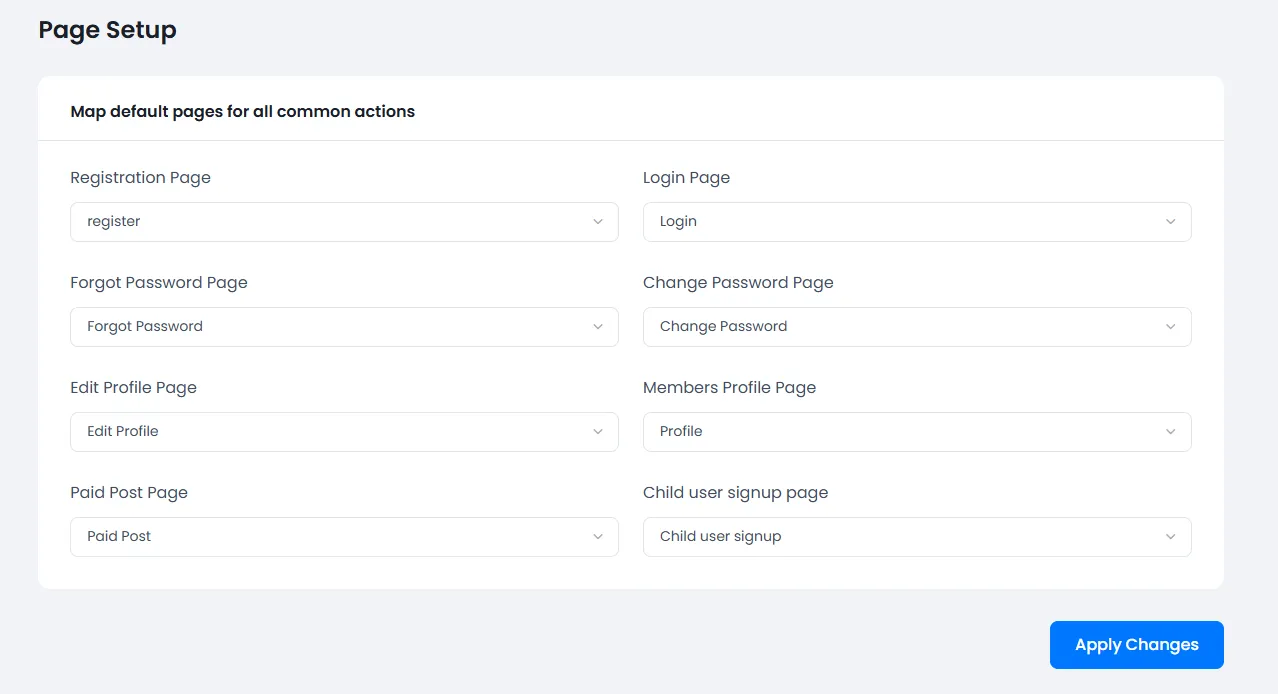
Step 4: Page Setup for child registration
Once you have created the registration form with the child user registration, then map this page with the child registration, navigate to the ARMember ⇾ General Settings ⇾ Page Setup, and here select the child registration page at Child user signup page and save the changes.
Step 5: Admin Management for Group Membership
The admin user can see all group members’ data on the ARMember ⇾ Group Membership page. It looks like the following screen.
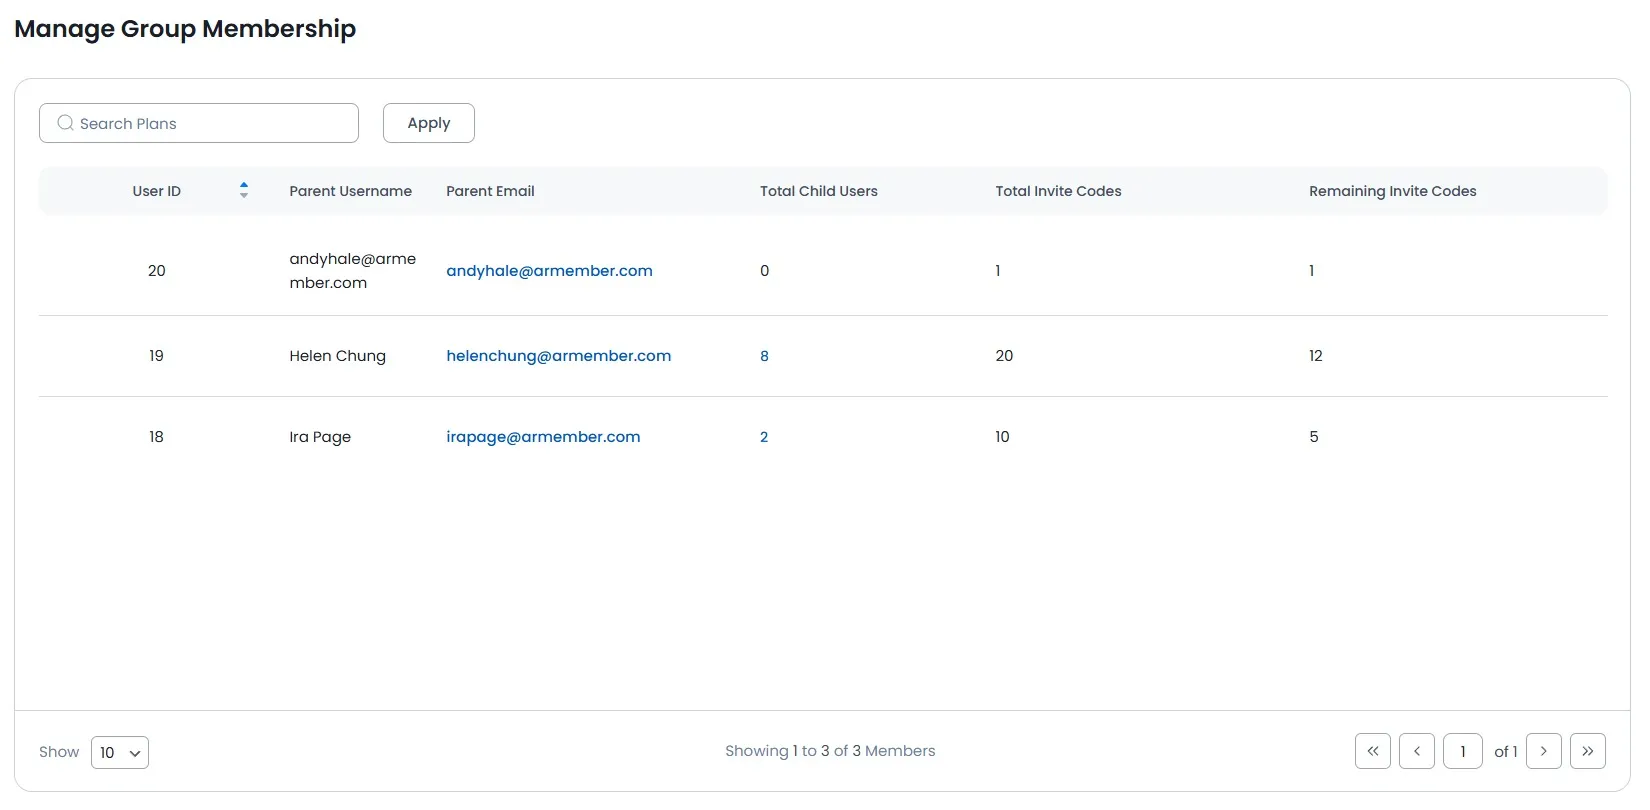
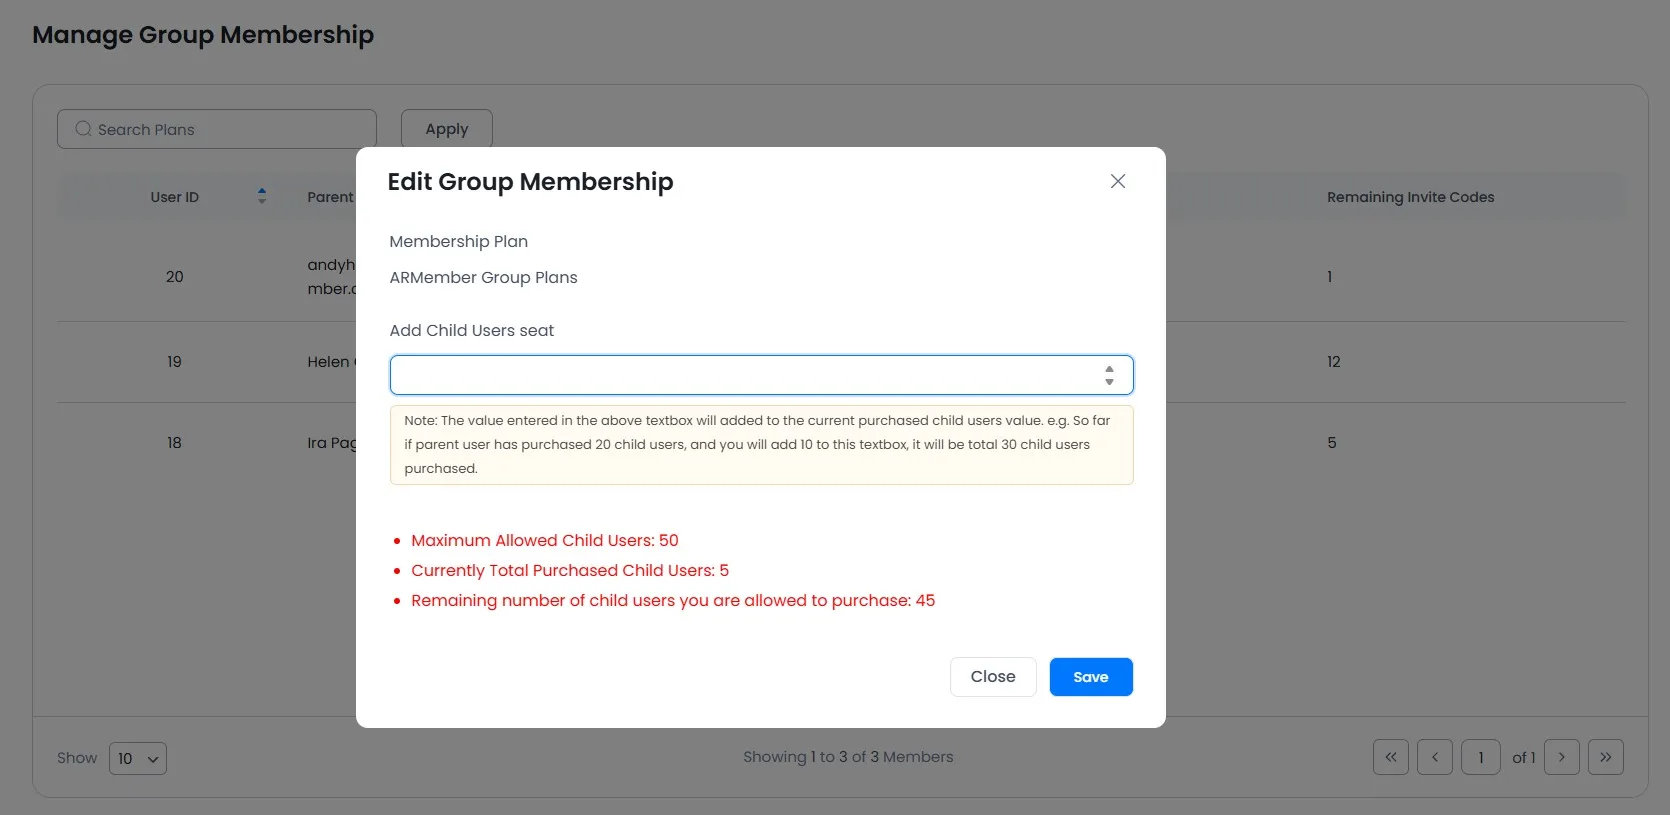
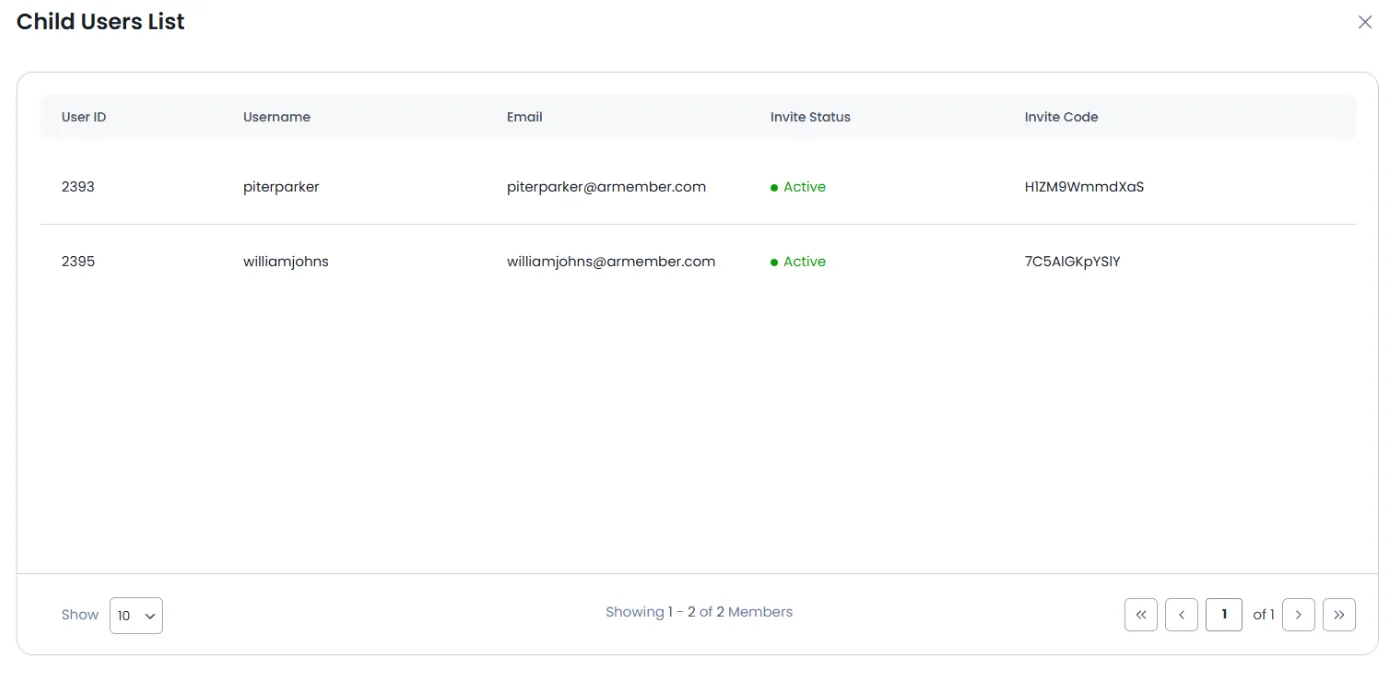
Also, admin users can view child users’ data with one click of the child users’ counter on the group membership page. If the admin wants to edit the group membership of any user or if the admin wants to add a child user, then it can be done from the Group Membership page. Also, the admin can delete the group membership of any member from the group membership page.
To add child users from the admin side, navigate a section of ‘Group Membership’ in ARMember, and on this page, there is a listing of members who have group membership enabled. To add specific child users to any member, it has the option to add child users, like the following screen.
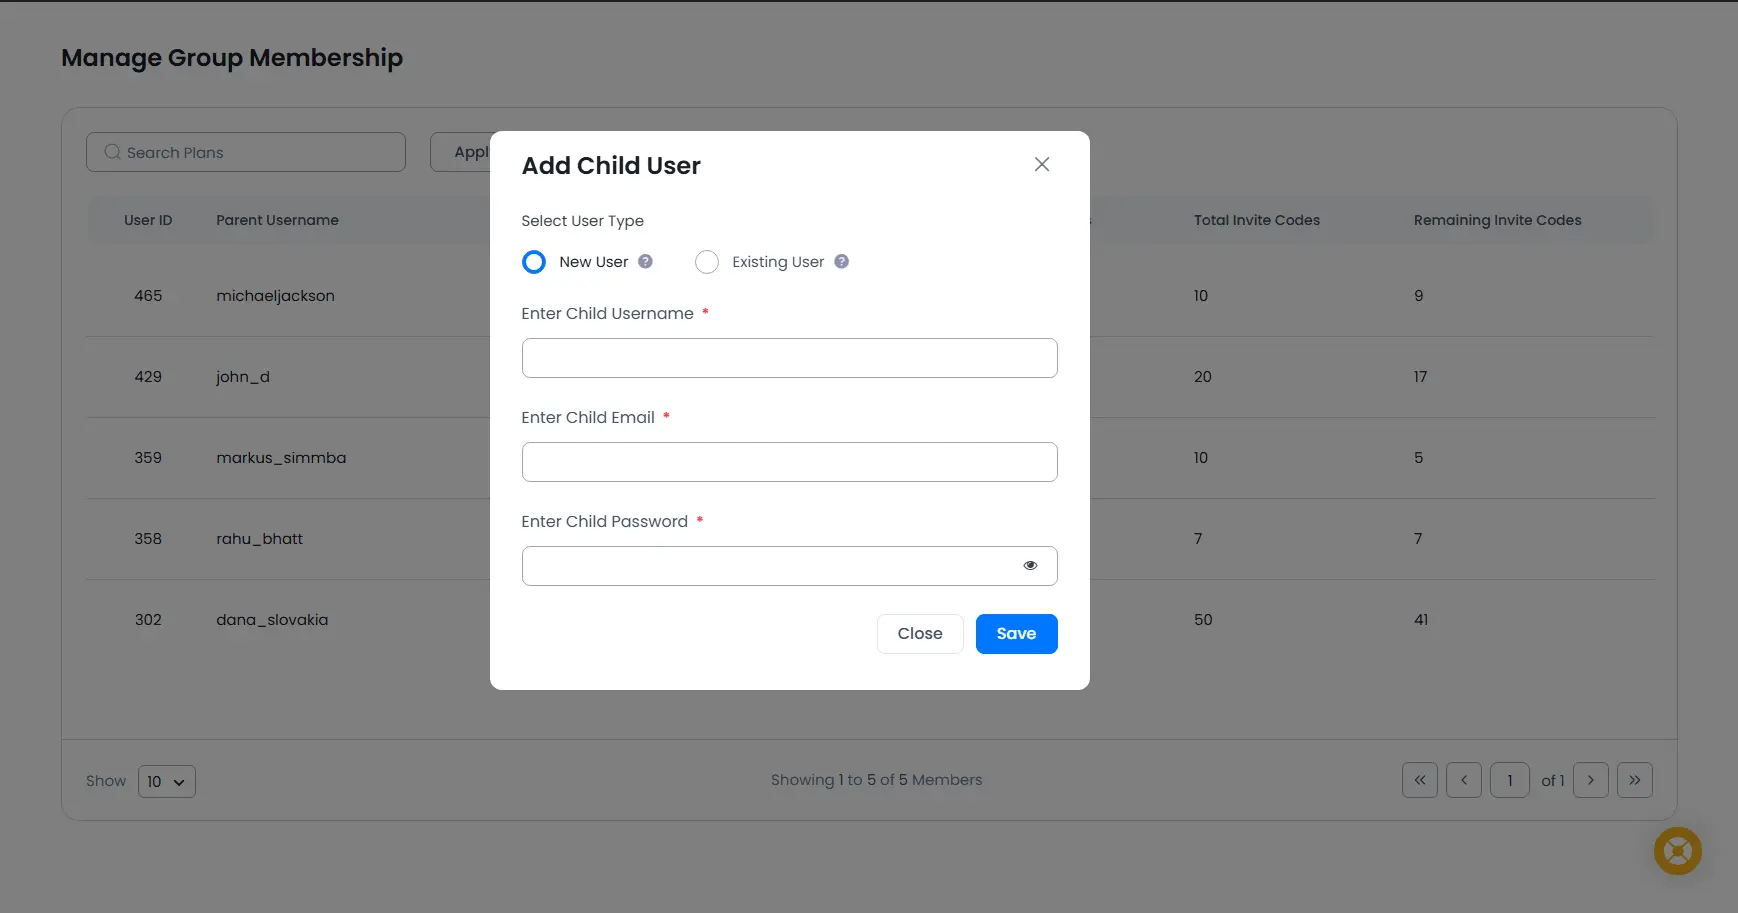
There will be two ways to add the child member to parent user as below:
New User: This option will allow to create new member as child user.
Existing User: This option will allow to add existing member as child user without removing existing users.

How to Manage Child Members from a Parent Account Using the ARMember Group Membership Addon
Important Note: Existing users can only be assigned as child users to a parent user if they are not currently assigned to any Membership plan.
Also, to edit any group membership user’s seat limit, the group membership user has the option of ‘Edit Group Membership. So a member can edit their group membership.
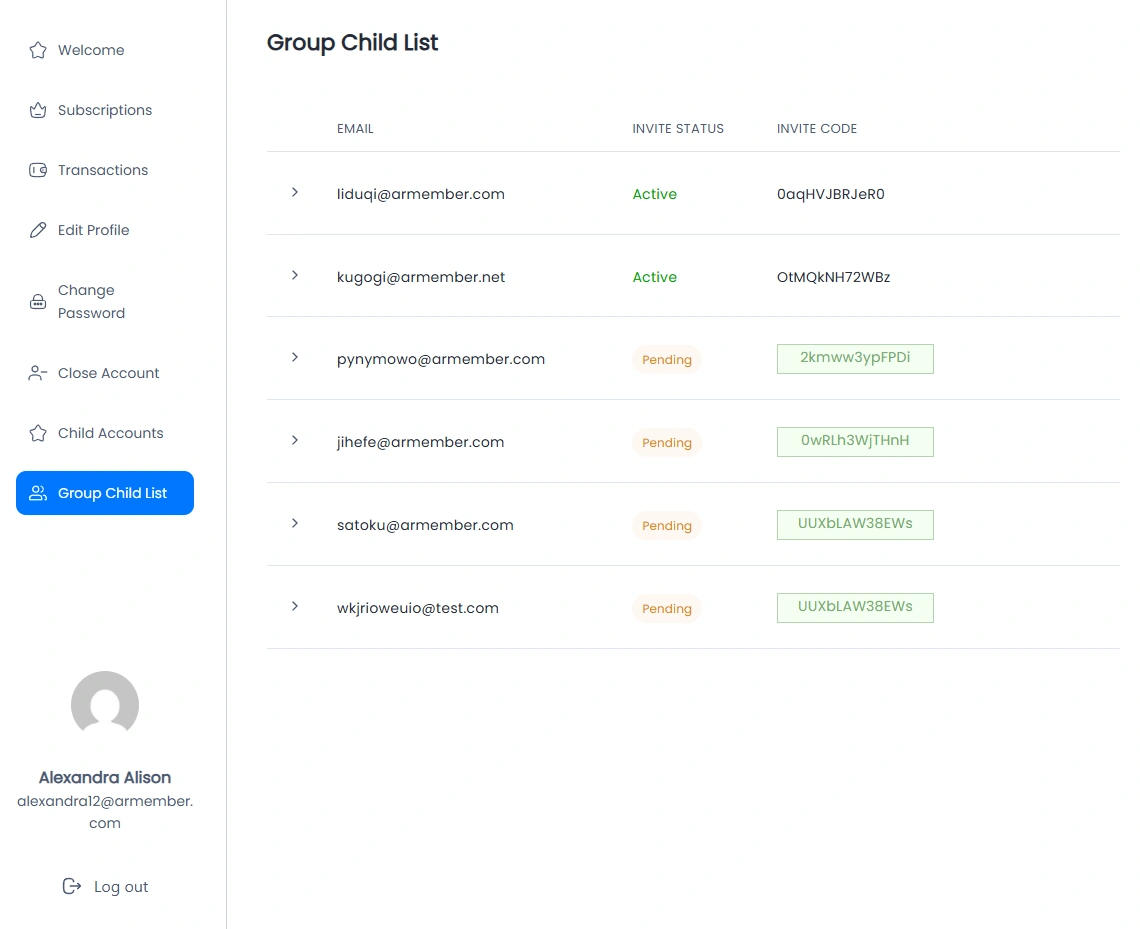
On the group membership listing page there is an option to display all child users. There is a column of child users, and it displays a counter of child users. When clicking on the child user’s counter, it will display a list of all child users like the following screen.
How to add shortcodes of group membership for the front end?
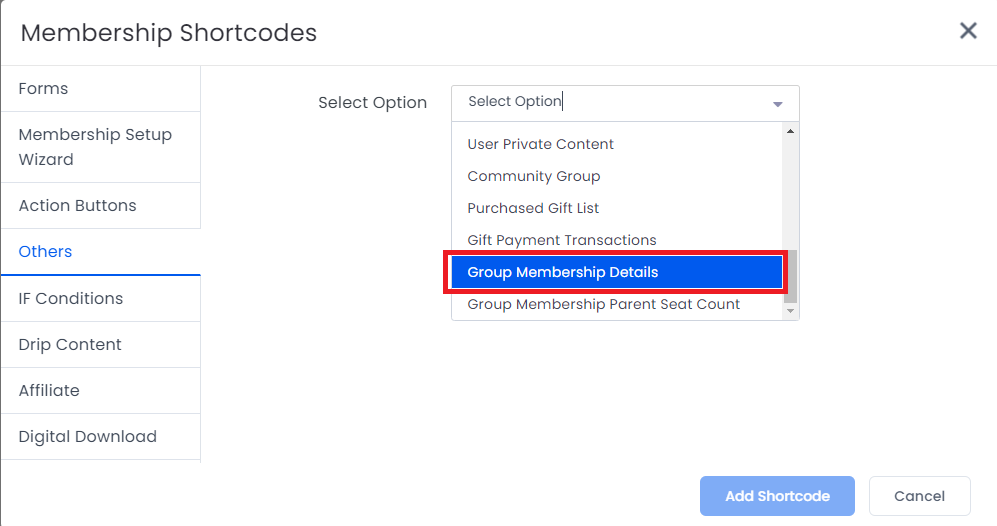
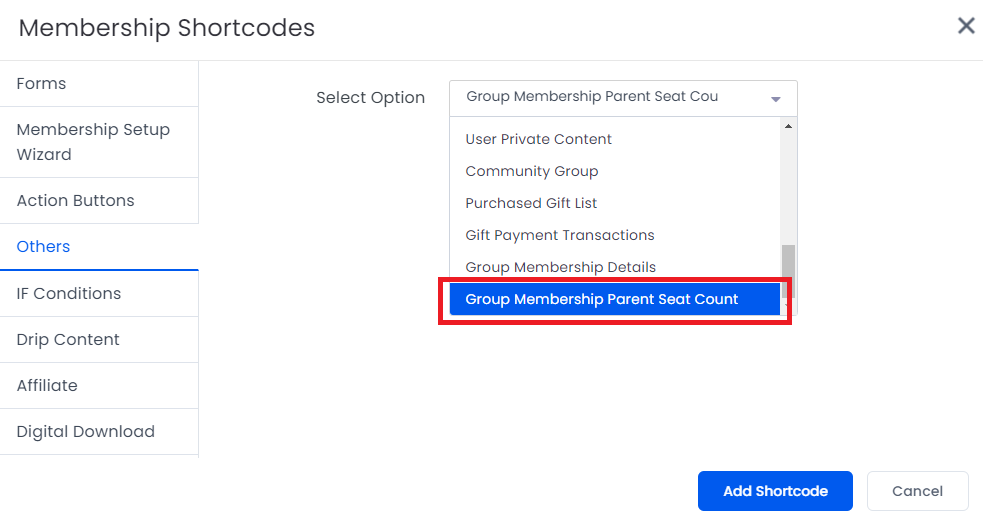
After signing up for group membership, a parent user can view their child user data with a shortcode on their page. To add a shortcode, navigate to the Admin Panel ⇾ Pages ⇾ Add/Edit page and here search for the block Membership Shortcode.
Here, click on the Others tab, and here, at the dropdown, one can select the option Group Membership Details and add the shortcode.
This shortcode displays the data of the child user invitation code and the added child users list. It also allows the Delete button, as it serves as a management tool for parents to oversee their child’s accounts.
It allows parents to remove inactive or unnecessary child accounts from their subscription. Importantly, the functionality of this button does not impact the billing structure.
Also, when the max invitations are made for any parent users, then anytime if any one child user is removed or closes their account, the parent member has the right to invite a new child user.
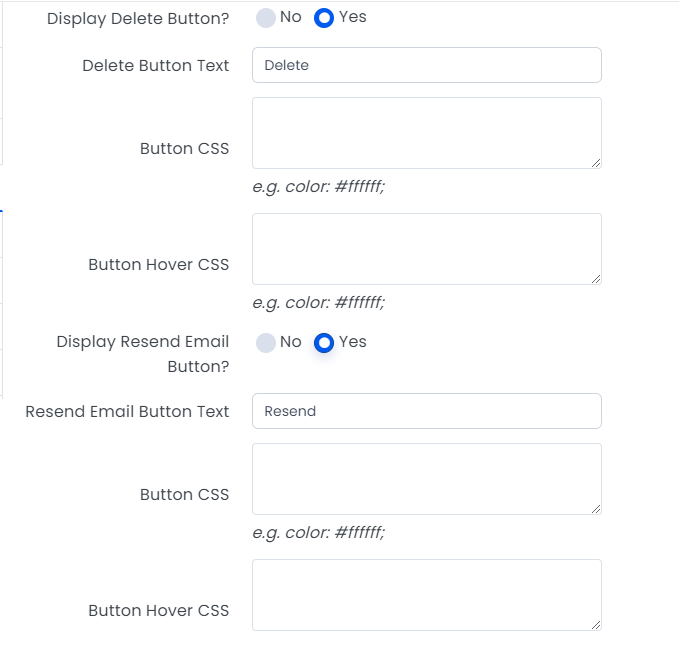
To change the labels of the listing tables screen, the shortcode has options like the following screen.

For enabling/disabling buttons and changing button text and also for applying custom CSS to buttons, the shortcode provides the options to enable/disable specific buttons, like in the following screenshot.
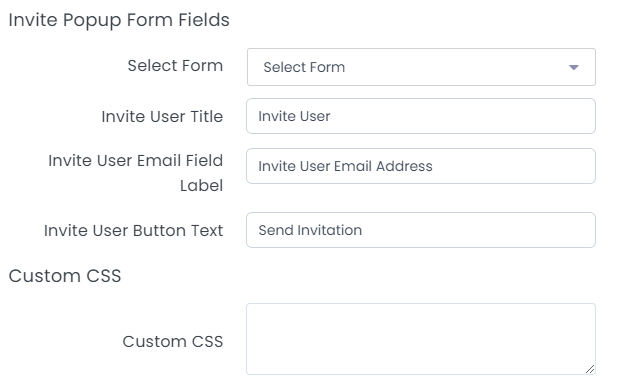
For changing the labels of the invite popup field and also to change the form style, shortcodes have the option of selecting a form to change the style and input field to change the values of the invite popup fields, like in the following screen.
Parent users invite their child users by clicking on the ‘Invite’ button. The invite button opens a popup where you input your invitee user email ID, and if you want to invite more than one user, then you can add the emails of more than one user, separated by a comma.
If you want to change your invite code or you want to refresh your invite code, then it can be refreshed from the ‘Refresh Invite Code’ button in your invitation code list. Using this shortcode, it also displays to parent users all child users’ lists in the ‘Child Users List’ table. Also, the parent user can delete its child user from this table.
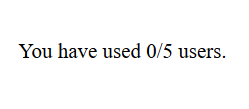
If you want to display only the parent user seat counter, then there is also an option available in ‘Membership Shortcode.’
After adding this shortcode on your page, it will add the following line to your page, like the following screenshot.
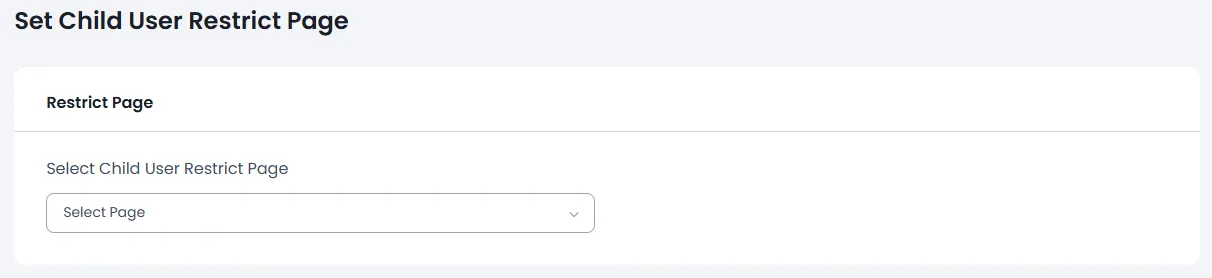
Restrict Child User Page
By default, all content access rules that are applied to the parent user are automatically added to its child users. If the parent user wants to restrict any page for the child user, then it can be restricted from ARMember ⇾ General Settings ⇾ Set Child User Restrict Page option. Please see the screen below.
Email Notifications For Group Membership
ARMember allows you to enable and configure email notification for different activities. To configure email for group membership activities, please go to ARMember ⇾ Email Notification. Click on Add New Response you will get a popup open to configure email notification where you have options of all group membership activities in Message To Be Sent input, as you can see in the following image.
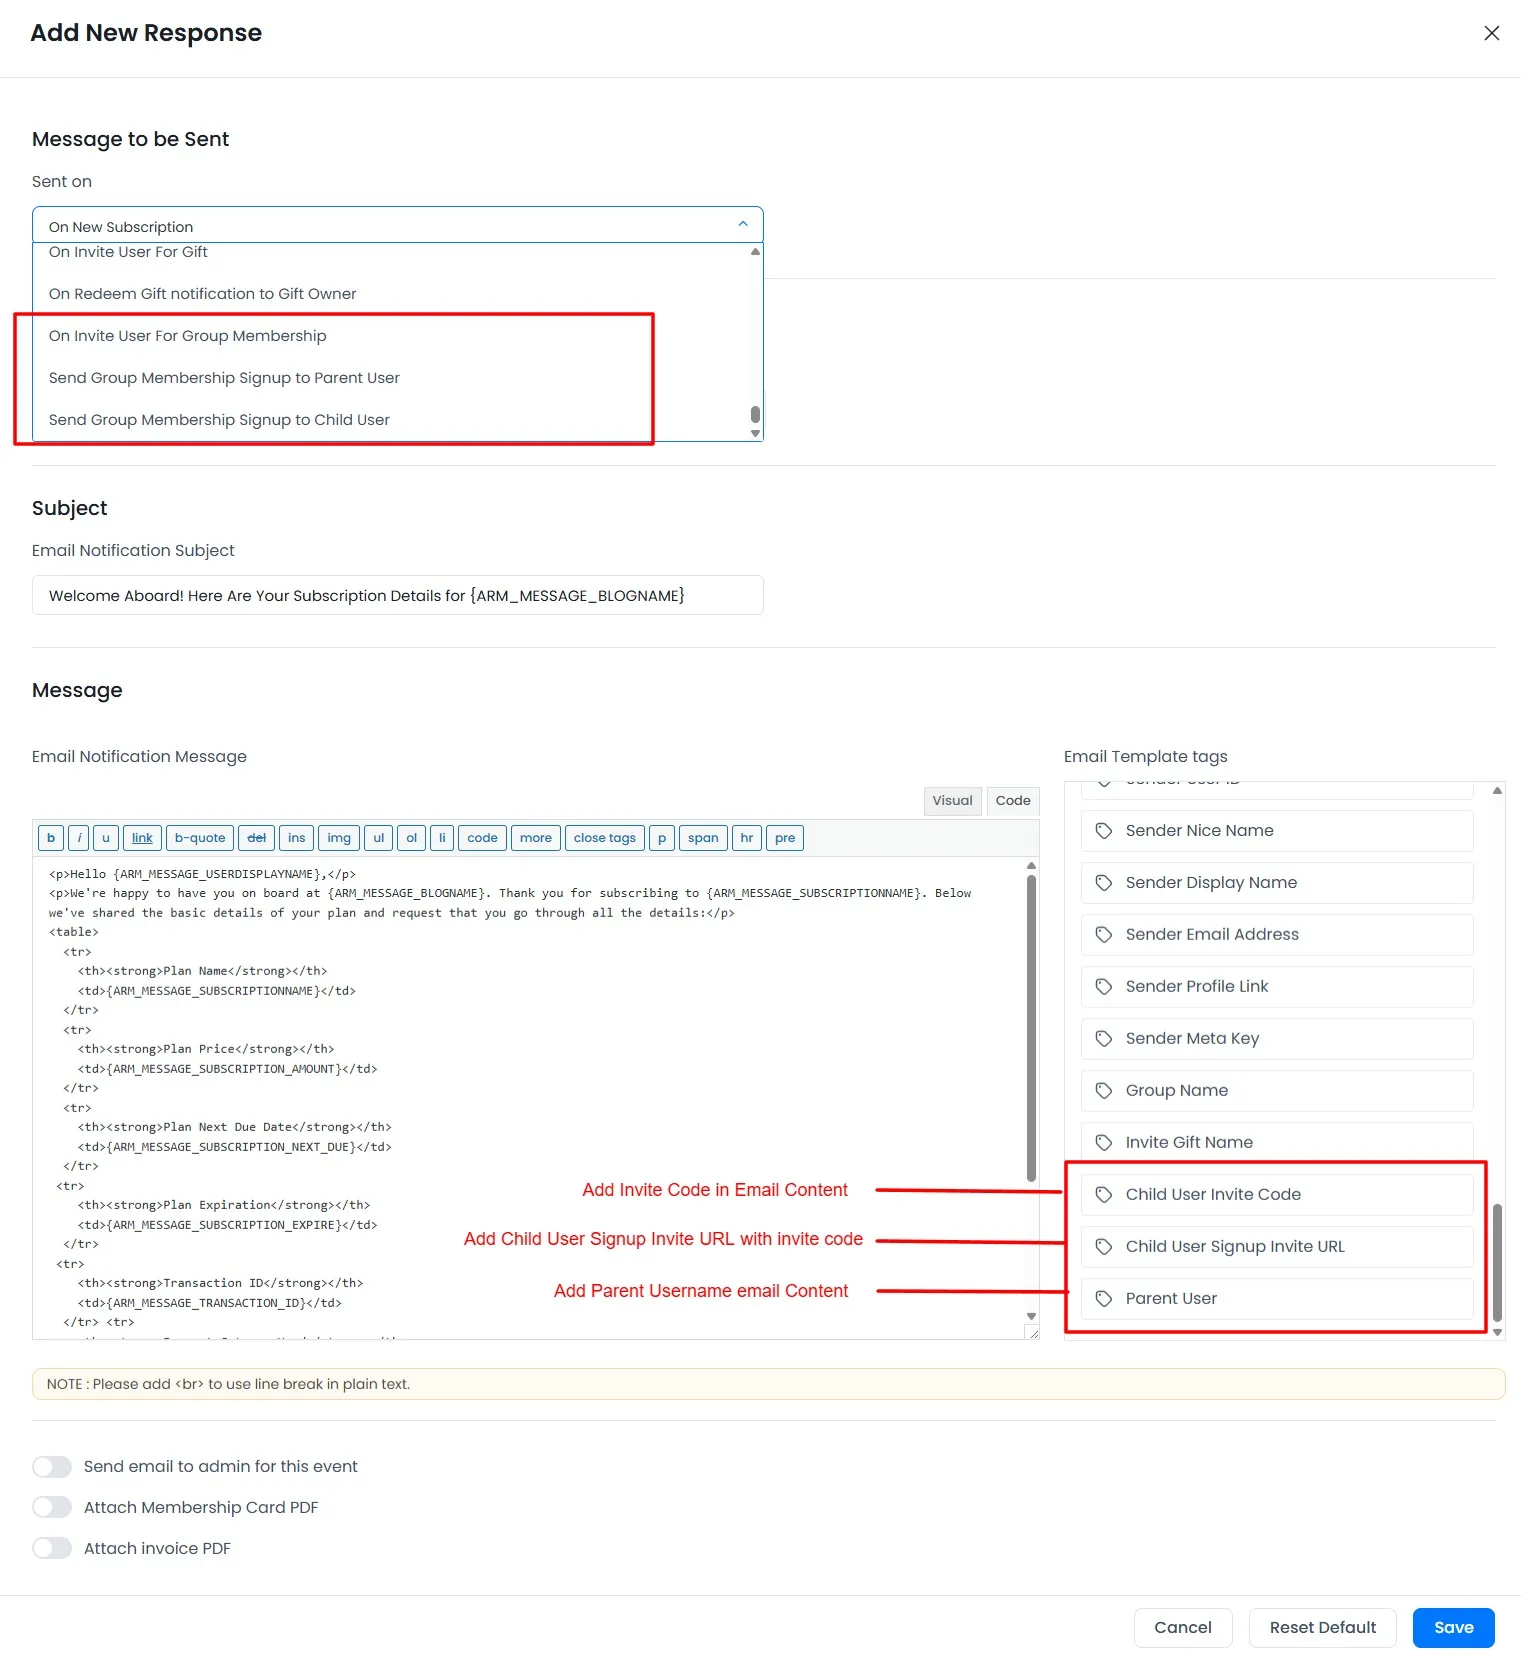
- On Invite User For Group Membership
- Send Group Membership Signup to Parent User
- Send Group Membership Signup to Child User
This event will trigger when group membership is purchased for the user to invite the users. You can set individual events for each plan or multiple plans.
This event will trigger when the child user signs up and will notify their parent user. You can set individual events for each plan or multiple plans.
This event will be notified to the child user when the child user signs up successfully. You can set an individual event for each plan or multiple plans.
Email Template Tags For Group Membership
- {ARM_GM_INVITE_COUPON_CODE}
- {ARM_GM_INVITE_PAGE}
- {ARM_GM_PARENT_USER_USERNAME}
This email template tag is used to display the invite code when the parent user invites any child user.
This email template tag is used to display the invite code when a parent user invites any child user.
This email template tag is used to display the parent user’s username when the child user receives notification of a successful signup as a child user.
Common Messages For Group Membership
- Child User Invite Code Label
- Child User Invite Code Empty Error
- Child User Invite Code Used Error
- Child User Invite Email Available Error
- Child User Invite Code Available Error
- Child User Invitation Success Message
- Child User Delete Message
- Child User Resend Email Success Message
- Child User Refresh Invite Code Message
Here you can change the invite code popup label.
Here you can change the invite code textbox error message.
Here you can change the “invite code already used” error message.
Here you can change the “invite code already used” error message.
Here you can change the invite code availability error message.
Here you can change the child user’s successfully invited message.
Here you can change the child user delete message.
Here you can change the child user resend email successfully message.
Here you can change the child user refresh invite code successfully message.

Umbrella/Group Membership Shortcodes
[arm_group_child_member_list]
Place this shortcode to display the group member’s child user on your page.
| Possible Arguments: | ||
|---|---|---|
arm_gm_membership_field_username |
Username Field label name | |
arm_gm_membership_field_email |
Group membership child list email column label | |
arm_gm_membership_field_name |
Group membership child list Name column label | |
arm_gm_membership_field_status |
Group membership child list invitation column label | |
arm_gm_membership_field_action |
Group membership child list Action button column label | |
display_delete_button |
Show delete button or not (true or false) | |
delete_button_text |
Show delete button label | |
delete_button_css |
Show delete button CSS | |
delete_button_hover_css |
Show delete button hover CSS | |
display_resend_email_button |
Show resent invitation button (true or false) | |
resend_email_button_text |
Show resent invitation button text label | |
resend_email_button_css |
Show resent invitation button CSS | |
resend_email_button_hover_css |
Show resent invitation button hover CSS | |
display_refresh_invite_code_button |
Show resent invitation code refresh button (true or false) | |
per_page |
Show child member list per one page (default: 5) | |
message_no_record |
No record found message | |
arm_gm_shortcode_form_id |
No register form ID (e.g., 101) | |
popup_title |
Invitation Popup Label | |
popup_field_label |
Invitation Field Label | |
popup_button_text |
Popup submit button Label | |
custom_css |
Popup form Custom CSS | |
[arm_gm_users_list_count]
Shows group member users’ seat count.