


Your website was built to get clients. Now it needs to serve them.
As your coaching business grows, a simple website can immediately become limiting. You may need memberships, online courses, protected content, private resources, recurring payments and a dedicated space for your students.
WordPress gives you the foundation. ARMember gives you the membership tools to turn that foundation into a business coaching website your students can actually use.
Let’s build it step by step.
TL;DR: The best way to build your business coaching website without any tech burn is using WordPress with ARMember. WordPress gives you the platform, and ARMember + Online Courses Addon gives the complete set of features to create your own online course with zero coding.
Your Coaching Business Has Outgrown Your Website. Now what?
Maybe your website started with a simple goal: help potential clients find you and book your coaching services. But as your business grows, the job of your website changes.
Now you may be selling coaching memberships, delivering online courses, sharing private resources, accepting recurring payments and giving clients a place to access everything they’ve bought.
That can quickly turn a simple website into a collection of disconnected tools and manual tasks.
WordPress gives you the flexibility to build the experience on your own website. ARMember brings the membership, content access, courses, payments and member management tools together.
One more thing we’d like to add is if you’re thinking of using LMS platforms such as Kajabi or Podia because they feel simple and easy to set up. Then yes, they are…but at first only.
These LMS platforms can become restrictive, expensive and hard to leave as your business grows.
So no need to send your clients from one platform to another, and pay high transaction fees when you can build a WordPress centralized coaching experience where students can:
- Sign up for your coaching membership
- Make one time or recurring payments
- Log in to their member account
- Access courses and lessons
- Receive content on a schedule
- Download private resources
- Connect with other members
- Access content based on their membership
And you can manage those experiences from your WordPress dashboard.
Ready to turn your website into something your coaching business can actually run on? Let’s start with the foundation.
Step 1: Get WordPress Ready for Your Coaching Business

First of all, pick a reliable hosting, install WordPress and set up the basic pages your coaching business needs.
Remember you don’t need to perfect every page. Just get your website ready for the membership functionality you’ll add next.
Start with Reliable WordPress Hosting
The hosting you’re gonna choose will affect your website’s speed, uptime and overall experience. And since clients can access their accounts, courses and resources at any time, choose a WordPress host that can reliably handle a membership based WordPress website.
Look for:
- Reliable uptime
- Good loading speeds
- WordPress optimized hosting
- SSL support
- Regular backups
- Responsive customer support
Set up your essential pages
At minimum, try to create:
- Home to introduce your coaching business
- About to establish credibility and share your way to teaching
- Coaching Programs to explain your offers
- Membership/Pricing to show available plans
- Contact for general inquiries
- Login for existing members
You can build and set the rest of your website as your coaching business grows. After WordPress is ready, it’s time to turn it into a membership powered coaching website.
Step 2: Install ARMember and Set Up Your Membership System
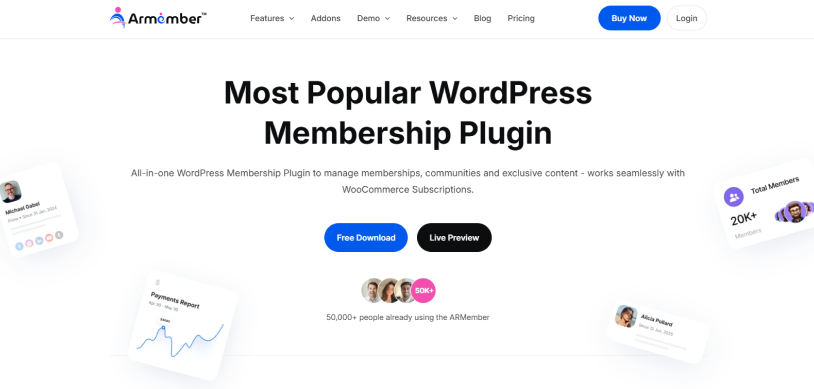
This is exactly where your simple WordPress site starts turning into a business coaching website.
Just install ARMember on your WordPress website. Then set up the core membership settings you’ll use to manage registrations, member accounts, content access and payments.
Thus here’s how it all starts:
- Download ARMember WordPress membership plugin from its official website
- Log in to your WordPress dashboard
- Go to Plugins → Add Plugin
- Upload and install the ARMember plugin’s zip file
- Activate ARMember
- Enter your license information if you’re using the premium version
After it is activated, ARMember gives you the tools to start building your membership system without having to assemble separate membership functionality yourself.
Configure your member experience by setting up the essential pieces your clients will interact with:
- Registration
- Login
- Member account
- Profile
- Password management
- Membership details
- Logout
Think of this as creating the front door to your coaching business. Your website attracts the client. Your member area is where the actual coaching experience begins.
Next, create the membership plans that clients can purchase.
Step 3: Create Your Business Coaching Membership Plans
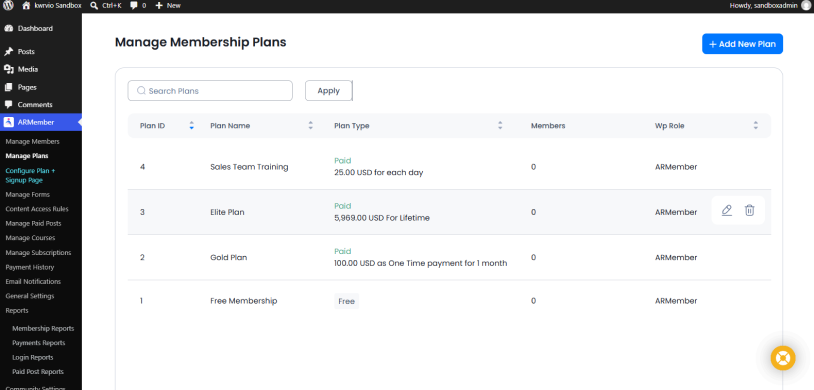
Now’s time to turn your coaching offers into something clients can buy and access directly from your business coaching website.
For instance you could create:
- Business Coaching Starter
- Business Coaching Pro
- Business Coaching VIP
Thanks to ARMember, you can create an unlimited number of membership plans, set pricing, subscription options, and control what members can access with each plan.
The important part isn’t creating as many plans as possible. Each plan should represent a clear coaching offer and give members a clear reason to choose it.
After your membership subscription plans are ready, you can start filling them with the coaching knowledge your clients are paying for.
Step 4: Turn Your Coaching Knowledge Into Online Courses
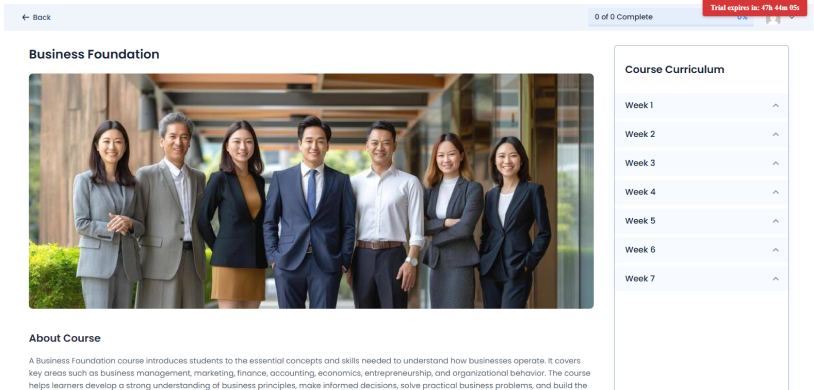
Your expertise is your product. Your website should make it easy for members to consume it.
With the ARMember Online Courses Addon, you can turn your coaching framework into structured online courses with sections, lessons, quizzes and certificates.
To set up your Online Courses Addon:
- Make sure you have the ARMember Enterprise plan. If not, you can always get it separately.
- Go to your WordPress Dashboard → Plugins → Add Plugin → Upload Plugin.
- Choose the downloaded zip file of Online Courses Addon, and hit Install Now, followed by Activate plugin.
Now you’ve to configure it from inside the ARMember to create your first online course:
- Go to ARMember → Add-ons, and Activate the Online Courses Addon.
- Next head back to ARMember → General Settings → Course Settings to set basic rules.
- Now go to the newly added Manage Courses.
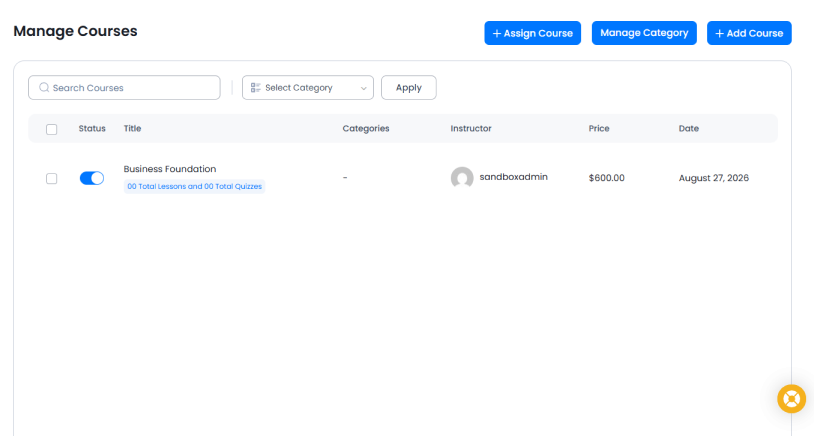
- Create a new course, add lessons and attach media like direct video uploads, audio or HTML files.
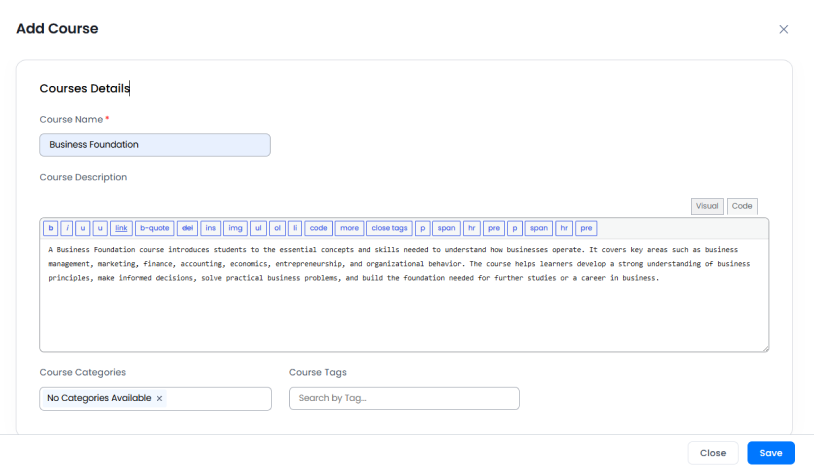
- Set up your pricing and course instructor.
- Lastly, make sure to save your course.
For example lets say a 12 week business coaching program could be organized into:
- Week 1: Business Foundation
- Week 2: Define Your Offer
- Week 3: Understand Your Audience
- Week 4: Build Your Marketing Strategy
- Week 5: Generate Leads
- Week 6: Improve Conversions
You can add text, video or audio lessons and organize them into a clear learning path. But giving members access isn’t the same as giving everyone access. And that’s exactly where content restriction comes in.
Step 5: Protect Your Coaching Content and Resources
Your coaching content is what your members are paying for. Thus once you’ve created your courses, lessons, videos, workbooks and other resources, the next step is making sure the right people can access the right content.
ARMember’s Content Restriction feature lets you control access to your coaching content based on membership plans and member status. For example you could offer:
- Business Coaching Starter → Access to foundational courses and selected resources
- Business Coaching Pro → Access to all courses, premium resources and member-only content
- Business Coaching VIP → Access to premium content, exclusive resources, and private coaching materials
The goal isn’t to hide everything behind a paywall but to make sure every member gets exactly what they signed up for.
Protect Your Coaching Content with Access Rules
Before creating your access rules, map out what each membership plan should include.
You may want to protect:
- Entire courses
- Individual lessons
- Pages and posts
- Videos
- Audio content
- Workbooks
- Downloadable resources
- Private coaching materials
- Member-only sections
ARMember allows you to set content access rules for your content from the Content Access Rules page, and connect them with your membership plans with just a simple tick.
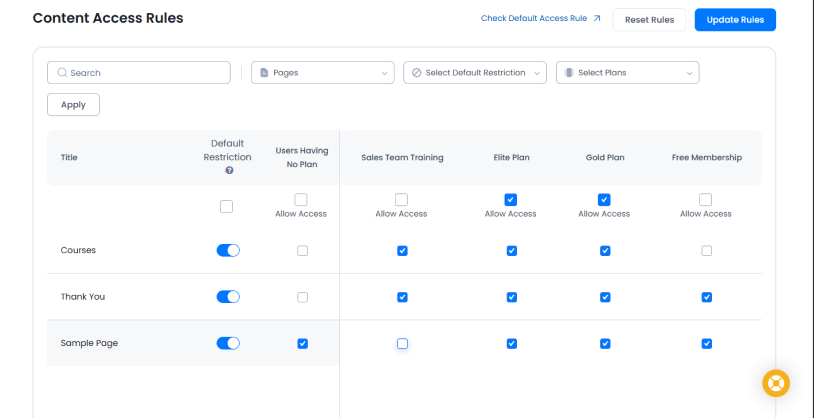
For example your Business Coaching Starter members could access your Business Foundation course, while Pro members could also access your advanced marketing and sales courses.
This keeps your offers organized and makes it easier for members to understand what they’re getting.
Protect Your Downloadable Resources Too
Coaching businesses mostly offer much more than courses.
You may have:
- Business planning templates
- Goal setting worksheets
- Marketing checklists
- Strategy frameworks
- Client workbooks
- PDF guides
- Private recordings
- Bonus resources
If these resources are part of your paid coaching experience, don’t leave them sitting publicly on your website. ARMember’s Digital Download Addon can help you provide protected downloads to the members who are entitled to access them.
To set up your Digital Download Addon:
- Make sure you have the ARMember Professional plan or higher. If not, you can always get it separately.
- Go to your WordPress Dashboard → Plugins → Add Plugin → Upload Plugin.
- Choose the downloaded zip file of Digital Download Addon, and hit Install Now, followed by Activate plugin.
Now you’ve to set it up from inside the ARMember to create your first virtual product which can be downloaded by your students:
- Go to ARMember → Add-ons, and Activate the Digital Download Addon.
- Head to Manage Downloads, and Add Download Item
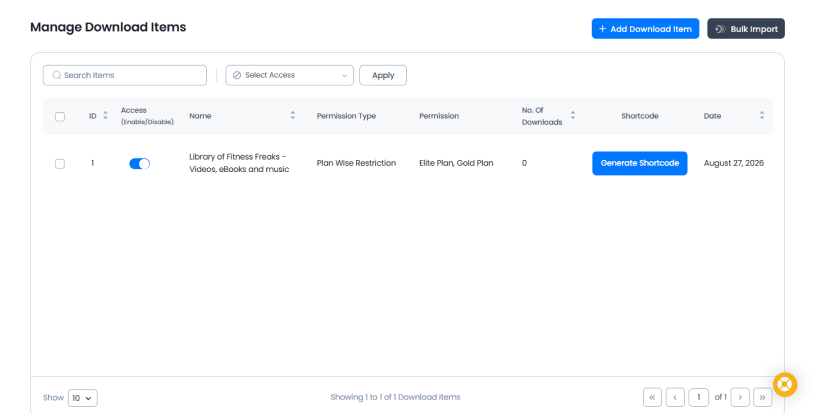
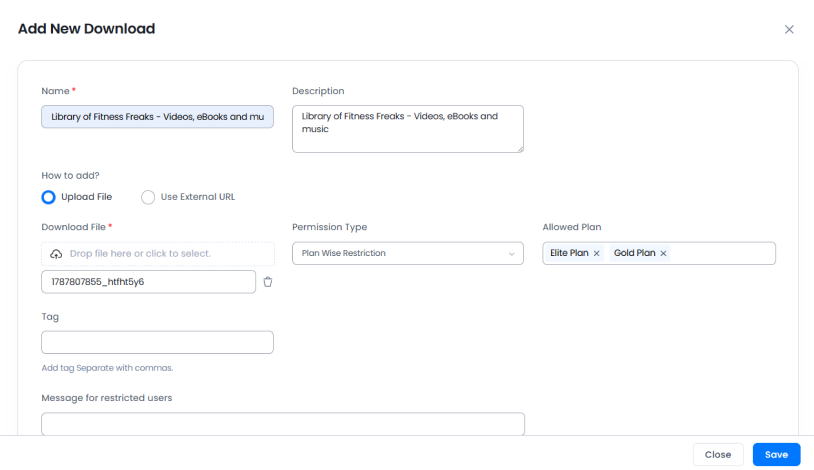
3. Inside the Add New Download panel, you can add your resource’s name, and description. Then upload the file or give an external URL. After that, set your access rules from permission type and save.
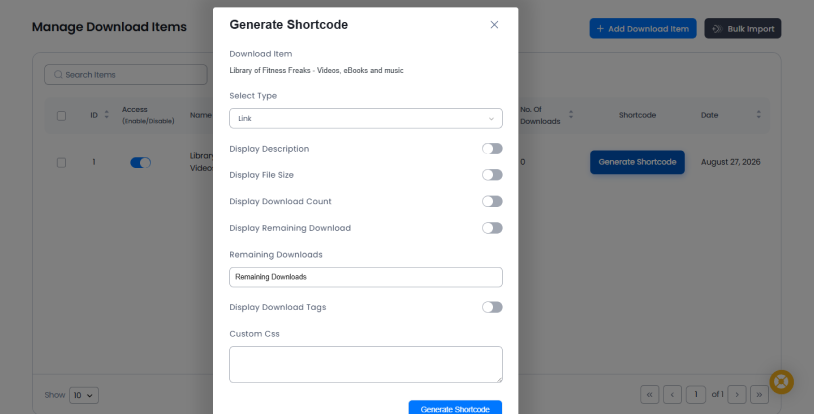
4. Lastly, you’ll get a shortcode to place the download button on any page or post.
This will help you turn your website into a central resource library rather than repeatedly emailing files to individual clients.
Release Content When Members Are Ready
You don’t always want members to receive everything on their first day.
A 12-week coaching program, for example, could release content gradually:
- Week 1: Business Foundation
- Week 2: Define Your Offer
- Week 3: Understand Your Audience
- Week 4: Build Your Marketing Strategy
- Week 5: Generate Leads
- Week 6: Improve Conversions
ARMember’s Drip Content functionality lets you schedule when members can access content.
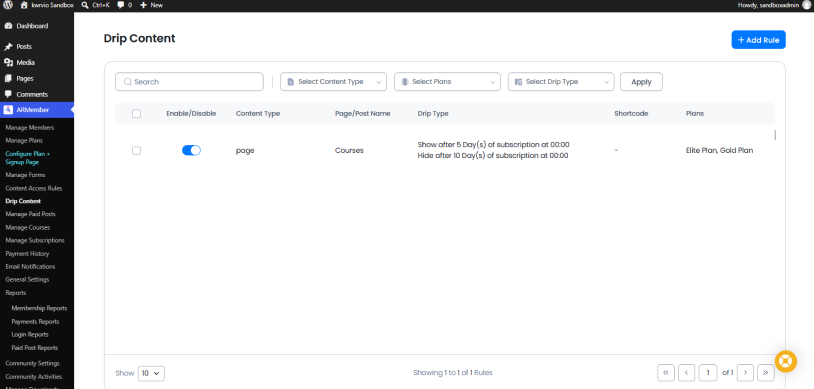
This gives your coaching program a structure instead of presenting members with a huge library and leaving them wondering where to start. And once you’ve decided who gets access to what, there’s one more important piece to put in place: how they pay for it.
decided who gets access to what, there’s one more important piece to put in place: how they pay for it.
Step 6: Set Up Payments and Let Clients Join Automatically
A coaching membership should never make you manually create an account every time someone joins.
The experience you want is simple:
Choose a plan → Register → Pay → Get access.
ARMember brings these steps together so your clients can join your coaching program directly from your WordPress website. You can even offer one time memberships, recurring subscriptions, or different plans for different levels of access.
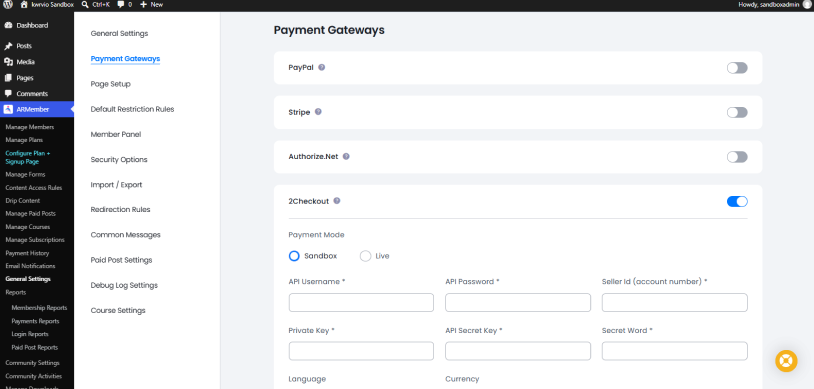
Best of all, ARMember supports 22+ payment gateway for secure local and global transactions including PayPal, Stripe, Authorize.net, Razorpay, Mollie, Square, Paddle, Skrill, PayUmoney, and a lot more.
Simply go to ARMember →General Settings → Payment Gateways and configure the payment method you want to use.
Before launching, check:
- Currency
- Payment mode
- One-time or recurring billing
- Membership activation
- Successful payment behavior
- Failed payment behavior
- Customer notifications
Let membership access happen automatically
This is where your website starts saving you time. A visitor chooses a membership plan and completes the payment. ARMember can then handle the membership registration and access according to the rules you’ve configured.
- You don’t have to manually create the member account.
- You don’t have to manually send course links.
- You don’t have to keep checking a spreadsheet to see who paid.
The system handles access based on the membership plan.
That’s the difference between selling a coaching program through a website and building a website that actually runs your coaching program.
Last but not the least, clients can join automatically, giving them somewhere useful to go after they log in.
Step 7: Build the Member Area Your Coaching Clients Actually Need
Your member area should always feel like your client’s home base.
After logging in, they should immediately understand where to find their courses, membership information, resources and other parts of their coaching program.
ARMember offers member account and profile functionality that you can use to build this experience.
Give Members the Essentials
Your member area should make the most important actions easy to find:
- View membership details
- Access purchased courses
- View and update their profile
- Manage account information
- Change their password
- Access private content
- Find coaching resources
- Log out securely
You don’t need to overwhelm members with dozens of menu items. Just give them the things they actually came for.
Make the First Login Useful
Think about what happens immediately after someone joins. Don’t simply send them to an empty account page. Give them a clear starting point.
For example:
- Complete your profile
- Start the Business Foundation course
- Download your Getting Started Workbook
- Visit the member community
- Explore your coaching resources
This answers the most important question a new member has:
“What do I do now?”
Build the member area around the coaching experience
Your public website and member area have different jobs. Your public website needs to convince visitors to become clients. Your member area needs to help those clients use what they purchased.
So once someone logs in, lower the distractions and make the important things easy to find.
Put their courses, resources, community, account information and other member only experiences within a few clicks. Your website should feel less like a collection of WordPress pages and more like one connected coaching environment.
And courses aren’t the only thing your members need.
Step 8: Add Private Coaching Resources and Client-Only Content
Courses teach your framework. Resources help members put that framework into practice. That’s exactly why a powerful business coaching website shouldn’t stop at videos and lessons.
Think about everything you currently send to clients manually:
- A workbook
- A strategy template
- A checklist
- A private recording
- A planning document
- A bonus guide
- A coaching worksheet
So rather than sending those resources one by one, just give members a central place to find them.
Create a Private Resource Library
You could organize your resources into categories such as:
Business Foundations
- Business planning workbook
- Goal setting template
- Business model worksheet
Marketing
- Marketing strategy template
- Content planning worksheet
- Lead generation checklist
Sales
- Offer positioning worksheet
- Sales call framework
- Conversion checklist
Client Resources
- Session preparation guide
- Progress tracker
- Coaching worksheets
Then use ARMember’s content restriction features to make those resources available only to the members who should have access.
Remember, you’re not simply charging more for a different label. You’re giving higher tier members access to a deeper coaching experience.
Make Your Resources Part of the Program
Don’t treat your downloads as a random collection of PDFs. Connect them to your courses.
- If a member finishes a lesson about defining their target audience, give them the worksheet they need to complete that exercise.
- If they reach your marketing module, provide the marketing planning template.
- If they’re working through a business planning lesson, give them the corresponding workbook.
Now your website isn’t just delivering information. It’s helping members do the work. And when your members are doing that work together, the experience becomes even more valuable.
Step 9: Give Members a Place to Connect
Coaching isn’t always about consuming content alone. Sometimes the most valuable part of the experience is being surrounded by people working toward similar goals.
Members may want to:
- Ask questions
- Share progress
- Celebrate wins
- Discuss challenges
- Exchange ideas
- Find accountability
- Learn from other members
If community is part of your coaching offer, ARMember’s Social Community Addon can help you create a member-only space within your WordPress website.
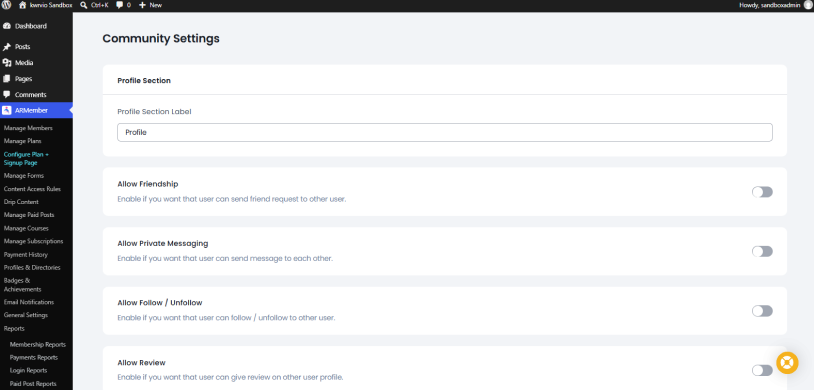
Create a Community Around Your Coaching Program
Think about the conversations your members naturally want to have.
You could create spaces for:
- Introductions
- Weekly wins
- Business questions
- Marketing discussions
- Accountability
- Announcements
The structure should reflect your coaching program rather than simply creating a community because you think you need one.
Connect Community Access with Membership
Your community should be part of the membership experience, not another system you have to manage separately.
For example:
- Starter members: Access to the general community.
- Pro members: Access to the general community plus advanced discussion spaces.
- VIP members: Access to premium community spaces.
This lets your membership structure determine the experience each client receives.
And because your members are already using the same website for their courses, resources and account, they don’t have to constantly jump between different platforms.
Now you’ve built the major parts of the experience.
The next question is: how much of it can run without you?
Step 10: Automate the Client Journey
The best business coaching website is the one that removes the most repetitive work from your day. Think about what happens when someone becomes a client:
- They register
- They pay
- Their membership activates
- They receive their account information
- They access their content
- They start their course
- They download their resources
- They receive new content
- They continue their membership
All in all, you shouldn’t have to manually trigger every one of those actions.
Connect the Pieces of Your Coaching Website
Your membership plans can become the foundation for the entire member experience thanks to the ARMember WordPress membership plugin.
Here’ s what a typical journey could look like this:
Visitor chooses a coaching plan
↓
Completes registration and payment
↓
Member account is created
↓
Membership becomes active
↓
Protected content becomes available
↓
Member accesses courses and resources
↓
New content becomes available according to your schedule
↓
Member receives relevant notifications
↓
Member continues through the coaching program
You configure the rules once, then let your WordPress coaching website handle the repetitive parts.
Automate Content Delivery
If your coaching program follows a timeline, use content dripping to release lessons and resources gradually. This turns your content library into a structured program.
Rather than giving a new member 40 lessons and saying:
“Start wherever you want.”
you can guide them through a clear path:
Start here → Complete this → Apply it → Move to the next step.
That feels much more like coaching.
Automate Member Communication
ARMember’s Notification functionality lets you send automatic messages via Email, SMS and WhatsApp for different membership activities.
Review your automated messages before launch and customize them so they sound like your business.
After all, a new member shouldn’t receive a cold, generic message that feels like it came from a plugin. They should feel like they’ve just joined your coaching program.
Automate the administration, not the relationship. There’s an important difference here.
Automation should always remove the repetitive administrative work so you can spend more time doing what clients actually pay you for: coaching them.
After you’ve automated the pieces that can be automated, there’s only one thing left to do before inviting real clients in.
Test everything.
Step 11: Test Everything Before You Launch
Your website can look perfect from the WordPress dashboard and still deliver a frustrating experience to a first time member. So don’t launch just because you’ve finished setting up your WordPress + ARMember.
Become your own first customer. Create a test account and go through the complete experience exactly as a new member would.
Start From the Beginning
Visit your business coaching website as someone who has never seen it before.
Can you immediately understand:
- Who is the coaching program for?
- What problem does it solve?
- What will you get as a member?
- How much does it cost?
- What should you do next?
If those answers aren’t obvious, fix the public facing pages before launch.
Test Registration and Payment
Create a test membership and check:
- Does the registration form work?
- Does the payment gateway work?
- Is the membership activated?
- Is the member account created?
- Are the correct emails sent?
Test your access rules
Log out, and try:
- Opening a protected course
- Accessing a private page
- Downloading a protected resource
- Visiting your member-only community
Furthermore, log in using different membership plans. Just make sure each member can access exactly what their plan allows.
Test the Course Experience
Open your online course as a real member and check:
- Course information
- Sections
- Lessons
- Videos
- Audio
- Quizzes
- Progress tracking
- Certificates
- Preview lessons
- Dripped content
Test whether the whole learning journey makes sense.
Test the Member Area
Ask yourself:
If I were a new member, would I know what to do next?
Check the navigation, account pages, course access, resources, community, and other member-only areas.
Also, if you have to explain where everything is, your member area probably needs simplifying.
Test on Mobile
Your clients may watch a lesson from their phone, download a workbook from a tablet, or check their account between coaching sessions.
Open the complete experience on:
- Desktop
- Tablet
- Mobile
Check your forms, navigation, courses, videos, buttons, account pages, and checkout.
Finally, test the experience as a real customer This is the most important test.
Don’t ask:
“Does my website work?”
Ask:
“Can a new client join, pay, find their program, understand what to do next, and get value from it without asking me for help?”
If the answer is yes, you’re ready. If the answer is no, fix the friction before you launch.
Your Business Coaching Website Is Ready. What’s Next?
Finally! You’ve created a place where your coaching business can attract clients, sell memberships, deliver courses, protect premium content, provide private resources, manage members, and build an ongoing client experience.
The pieces now work together:
WordPress gives you the foundation. ARMember brings your memberships, registration, member management, access control, and payments together.
- Online Courses turn your expertise into structured learning experiences.
- Content Restriction makes sure premium content reaches the right members.
- Drip Content lets you deliver your coaching program at the right pace.
- Digital Downloads gives members access to their private resources.
- Social Community gives your clients a place to connect and learn together.
- And your membership plans tie the whole experience together.
But building the website is only the beginning. The real value comes from what you put inside it.
Take your coaching framework. Turn it into a clear program. Give members the courses, resources, exercises, and community they need to put that knowledge into practice.
Then make their next step obvious every time they log in. Because a great business coaching website shouldn’t leave clients wondering:
“What am I supposed to do now?”
It should make the answer clear.
Learn. Apply. Track your progress. Keep moving forward.
That’s what turns a WordPress website into a business coaching website your clients actually want to use.
Related articles:

Share this post


