
When you first start building your membership website, it can be tempting to give your paying customers all new content right away.
After all, instant gratification is, well, gratifying. Just like in a buffet, you want to load up your plate but does that help? No, right. You are unable to get through everything and end up being full just after some dishes.
Now, a similar thing would happen to your users. They would love the big wave of content but won’t be able to swim it.
When you set out to create a membership site that charges customers on a monthly basis, you need to avoid giving access to content in bulk.
If you do, your customers will have no reason to return to your site month after month, and you’ll lose out on opportunities to retain your audience, much less your consistent income stream. Further, it would keep getting tougher for you to plan upcoming content and sustain your content based membership.
That’s why utilising the concept of content dripping (the release of members-only content at regular intervals) is such an important concept for membership website owners to understand.
On doing this, the members who enjoy your released content, will keep coming back month after month to access fresh Content. There are other concerns like content theft as well in a piece of content for which this feature is very crucial.
With the ARMember Pro Plugin, you get the feature of Drip Content as an add-on! Let us understand and explore it.
Understanding Drip Content and Reasons for Using the Drip Feature
You must have come across online course content wherein every week a new module is launched. Or would have seen YouTubers who release the content on a specific day or after certain days of the last release.
Imagine you are offering a 3-month course, thus, the members must retain at least for 3 months, right. Now, what if you offer all the content together, they access it in a month and never come back to your Website? Or worse, what if they’re a competitor who joined the membership to know what you’re offering, had a look at it for a couple of days, and then started asking you for a refund, giving some random excuses. Here, there is a chance you will lose your content as well as members.
Drip Content is a great way that allows you to design a content schedule. The Drip Campaign helps you to delay release of content for members and keep them engaged for longer. This method would help you retain members and keep them engaged with your Website as they will have to keep logging whenever your content releases.
With ARMember, it is not tough to set up Drip Content Strategy. You just need to have the ARMember Pro Plugin set up with your WordPress Membership Website.
Steps to Setup Drip Content on Your Site with ARMember
In a very few short steps, you will restrict your content for members and start providing premium content. Here is a guide to drip content campaigns which you can follow along step-by-step.
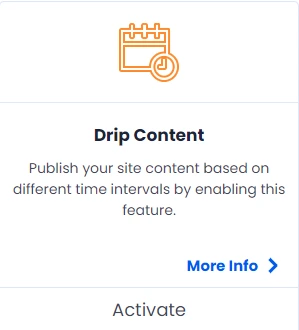
Step-1: Activate and Configure the Drip Content Add-on
Go to ARMember and click on the option of Add-ons on the left hand side panel. In the add-ons list, look out for Drip Content. Activate and Configure it to set-up drip-feed content.
Step-2: Set a New Rule to Create Drip Schedule
On configuring the Drip Content add-on, the Drip Content Page would open up. This page lists all the drip rules you set wherein you can enable disable any of them at any time. Let us create a New Rule to deliver content. Click on the tab of New Rule available in the right hand top corner. The following Dialogue Box will appear on doing so.
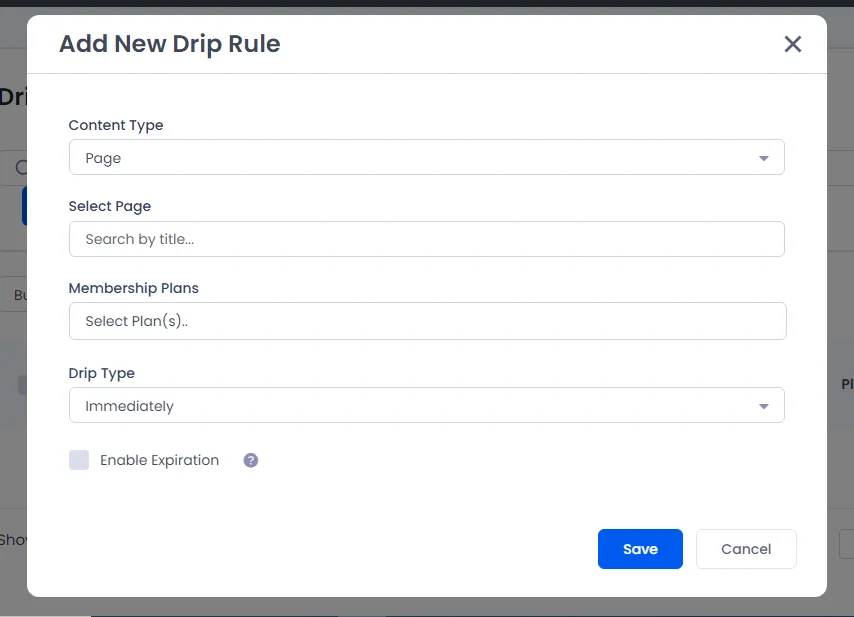
Step-3: Understanding the New Drip Rule Fields for Membership Site
There are various fields that you need to fill up for adding a New Drip rule. Let us understand each field one by one to set it up in a way you would like to drip.
Content Type
On WordPress, you work with many types of Valuable Content like Posts, Page, Project, and even Videos. Herein, you choose for which kind of Content you want to set up the drip rule and schedule content.
Select the Project/Page/Post
In the next field, you can search your published posts/page/project based on your previous selection. Here you can also select multiple page/posts/projects if you want to drip the content for your membership site wholly.
Choose the Membership Plan
In the next field, you choose the membership plan for which you want to start releasing content and the group for which you want to apply the Drip Rule.
Drip Type
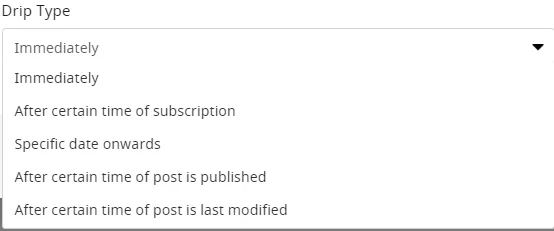
The next field is the most important one. Scheduling Content without choosing the right Drip Type would make it useless. Now, you have five options to choose from which can also be applicable to new pieces of content in future.
1) Immediately:
This kind of Drip Rule gives access to content pieces as soon as a member purchases your membership plan. Thus, they get content immediately on payment of membership.
2) After Certain Time of Subscription:
In this Drip Rule, the content is made available to members after some time of their subscription purchase. You can set up the number of days and the time after which the users can access this dropped content.
3) Specific Date Onwards:
This type will help you set a date for every user. The members, new or old, will be able to access the content on a specific date. You just have to set a date. Drip Content also allows setting up a date for expiring content. You can set an expiration date if required and leave it blank if you do not want any expiration date.
4) After Certain Time of Post is Published:
As the name suggests, this rule would make the post visible to users after a specific number of days of creating a content from your end . You can set the number of days and the time after which the members can consume the content.
5) After certain days of Post is Modified:
Similar to the previous option, this will be visible to members after certain set days of modification of post from your end.
After setting all these fields, save the rule.
On the rules page, you can enable and disable any rules supporting drip content as per your requirement. There is a scope to edit or delete any rule at any moment.
Step-4: Custom Content Dripping on WordPress
While choosing the Content Type, you must have seen the option of Custom Content Dripping. This means that you can customise which members can get access to an entire post and which members can only see a section of the post.
For instance, you go to a Magazine Website. You can access two pages but to get access to the entire content you need to subscribe. A similar kind of feature can be applied to your posts as well. You give access to entire content to premium members and provide only a paragraph to non-paid users. This will help you give them a preview of your best content and capture their attention to subscribe.
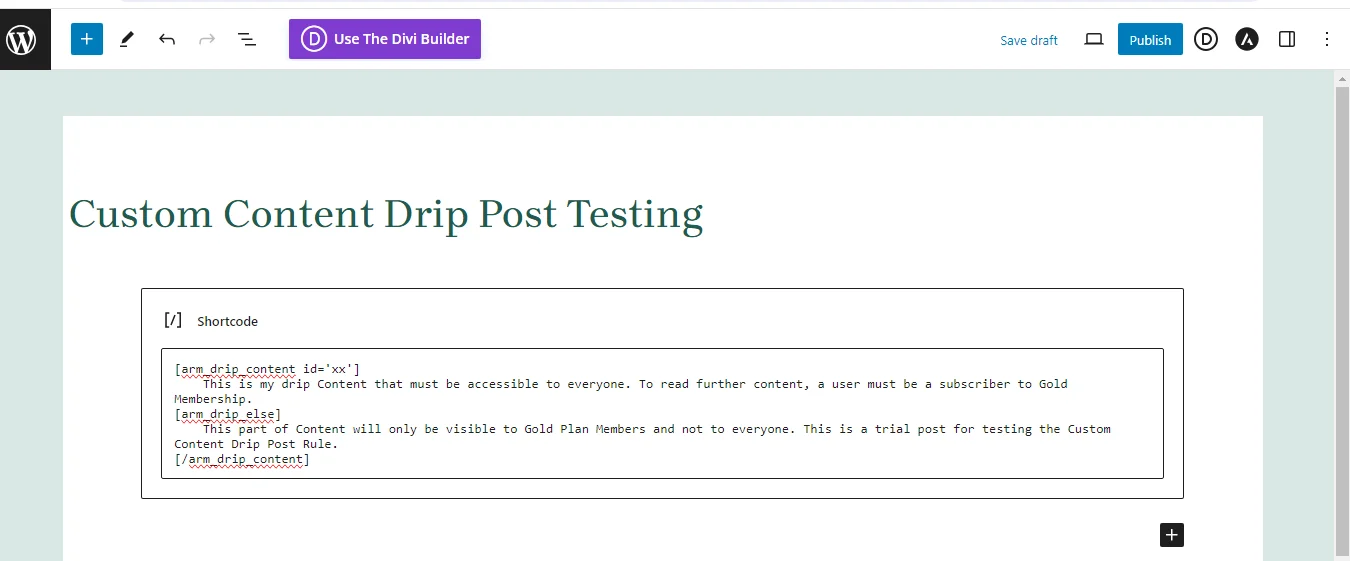
Add a New Rule, and select the option of Custom Content in the Content Type. On doing so, you will be able to see a Short Code in a green box. Copy that short code. Further, choose the membership plan and drip type for the post. Save it and let us go ahead.
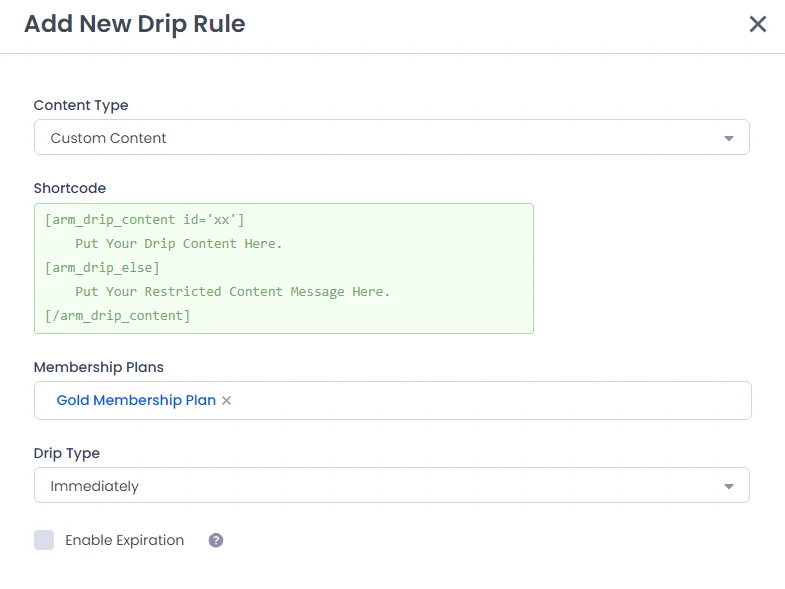
- Now, create a new post or go to an existing post for which you want to use the custom content drip type
- Click on the ‘+’ icon and choose the option of short code on the new post or page.
- Paste the short code that you copied while setting the drip rule.
- As the short code clearly suggests, Put the Drip Content, that is the Content you want to restrict between the first two shortcode brackets.
- The Content that you want to be visible for all users must be put in the next designated portion.
- Now, this post can be fully accessed only by Gold Plan members as we have set the rule for them in the previous step. For all other members, only the content that you add between the last two bracket codes will be visible.
- Publish the post and check from the front end by logging in as a Gold Plan member and then by logging in as Free Plan or any other Plan member.
Step: 5 Check the Default Restriction Rules after creating Drip Content
Drip Content can be a powerful tool if you set it right.
Go to the General Settings Option and select the option of Default Restriction Rules. On scrolling down, you will see the default restriction rules for Drip Content.
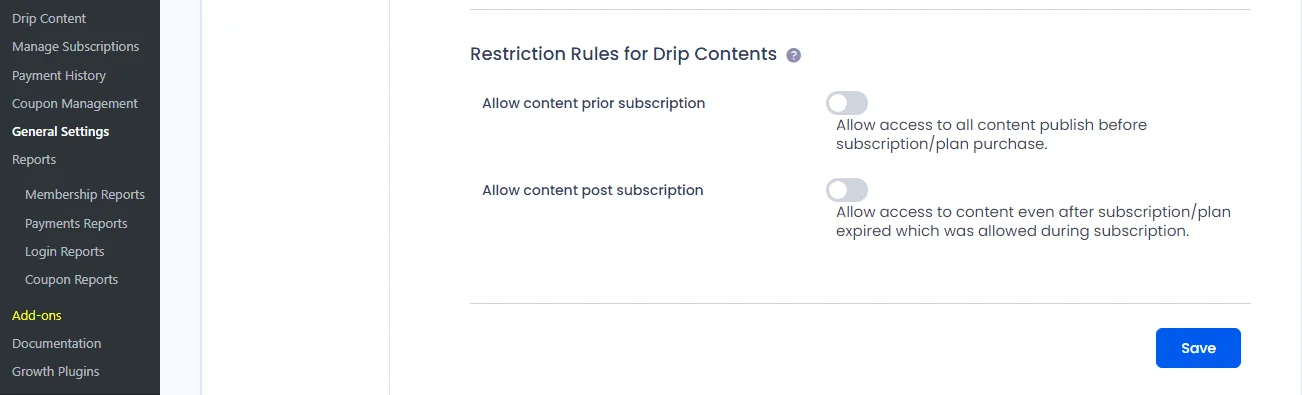
There are two rules to check here. The first one is whether you would provide access to all the old content published on your website to a newly subscribed user or member.
The next option is whether you would allow access to the content after a member’s subscription has ended. The content which was released and given access to during their subscription period.
You need to think whether you can allow these options or not as it will give quite a wide access to your content.
Start your Own Journey by Using Drip Content Feature of ARMember
I am sure you very well understand the importance of Drip Content Feature and want to drip various types of content. It is a marketing and sales feature both. This will help you protect your Content and keep your audience hooked to get new content.
It will also give you time to come up with your next content. As a site owner, maintaining scheduled drip content and setting drip notifications for members will keep you on your toes. Members will access content at their own pace while you take the time for content creation.
FAQs for setting up Drip Content in WordPress
1) How to Check whether the Drip Rule is applied or not on WordPress Site?
You can check the front-end of your Website to see whether the rule is applied or if you have made any error. Check it as a free plan member and other different plan members to verify the application of the rule.
2) Can I set a date range to deliver drip content?
When you set an expiration date which is available at the bottom of the Add New Rule pop-up, the content will be available in a specific date range as per your choice, simple!
3) What is the Difference between User Private Content and Drip Content Feature of ARMember
Drip Content Feature is a continuous process which will be applicable to all users new and old, as per the rule you set and will be automatically applied to new members as well. While in User Private Content, you select a group of users for which you specifically post something.

Share this post