Managing content access for membership sites shouldn’t be a big trouble in WordPress. ARMember makes it extremely easy to help you build a paywall that works for you. For this, different restricted content access methods exist as built-on options or add-ons.
In this article, we want to explain them in more detail so that you can assess which of them you can benefit from the most.
TL;DR: With ARMember, you can apply default access rules for consistency, restrict full content types for scalability, sell individual posts with Pay Per Post, use partial content locking to boost conversions, and block URLs for advanced security.
Method 1. Default Access Rules

Before describing more specific restriction methods available in ARMember, it’s worth setting up your default access rules in ARMember via Content Access rules.
You’ll keep adding new pages, posts, lessons, or resources over time and you need to ensure they are protected by the same rules. ARMember lets you automatically apply access rules the moment content is created.
All this helps your paywall to stay consistent and nothing accidentally becomes publicly accessible.
These rules are applied automatically to all newly created content:
- New Pages (landing pages or premium content pages)
- New Posts for blogs with member-only articles
- New Categories to structure restricted content
- New Navigation Menus
- New Custom Post Types (for content from third-party plugins)
- New Custom Taxonomies (adds control over grouped or tagged content).
You can assign one or multiple membership plans to each of these by default.
Moreover, if you’re using Drip Content, ARMember also lets you define how access behaves over time, especially around subscription start and end. There are slightly different ways to control access: view docs.
Let’s now take a closer look at other methods available.
Method 2. Restrict Entire Content Types (Custom Post Types)
You already know how easy it is to restrict specific WordPress pages or posts with ARMember.
However, if you are looking to lock entire sections of your site based on content type sourced from other WordPress plugins you use, this is a way to go.
In addition to restricting content page by page, ARMember lets you control access at a content structure level, including Custom Post Types (created by other plugins you use).
This is especially useful if your site isn’t just “posts and pages,” but includes, for example:
- LMS lessons (from course plugins), for example, LMS sites with tiered courses (Beginner vs Pro plans)
- Portfolio items (photographers, designers) when you need to offer premium galleries or closed access.
- Listings (directories, real estate, job boards created by specified WordPress plugins using their custom post types).
How it works:
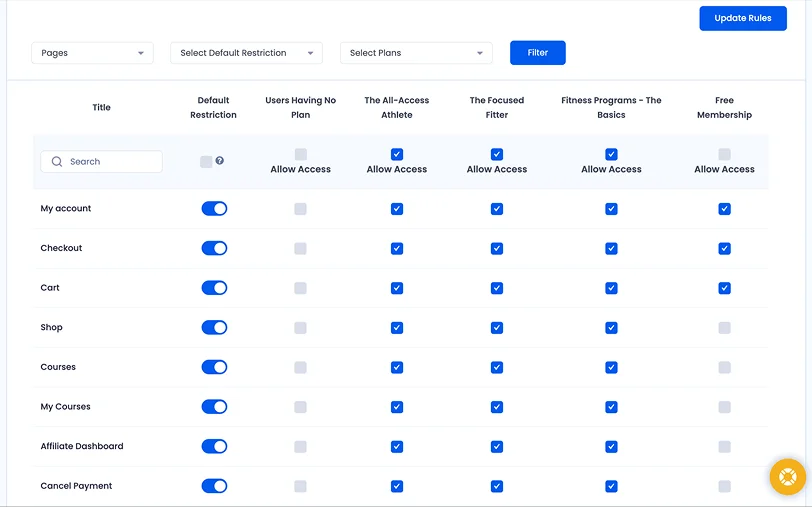
Inside ARMember → Content Restriction, you’ll see a full list of Pages, Posts and more – Custom Post Types (automatically detected) among them.
Using this content access & restriction table, you can actually:
- Assign access to specific membership plans
- Bulk-enable or disable entire content groups
Alternatively, you can go to specific custom post types (normally accessible through the third-party plugin menu), open any individual item (e.g., a lesson or portfolio entry) and use the ARMember Access Rules panel. From there, you can select which membership plans can access that specific item.
This method gives you scalable control in cases like:
- Add 100 new lessons – but they follow the same restriction logic
- No need to manually gate each new piece of content.
Method 3. Sell Content Individually (Pay Per Post)
Some of you may offer a mixed monetization (subscriptions + one-off purchases) or even sell only specific pieces of content easily added to a WordPress page. Not all users want a subscription. Some just want one article, one template, or one lesson.
So, the pay-per-post method is something you can use to sell content to users who don’t need a whole membership, just buy what they want.
With ARMember, you need to use the Pay Per Post add-on for this.
What makes it different? It allows you to:
- Turn specific posts (or custom post types) into standalone paid products.
- Let users unlock content with a one-time payment or recurring subscription per item.
All you need to do is to place a customized ARMember shortcode to that page you want to sell individually.
This is how it works:
- Activate Pay Per Post addon.
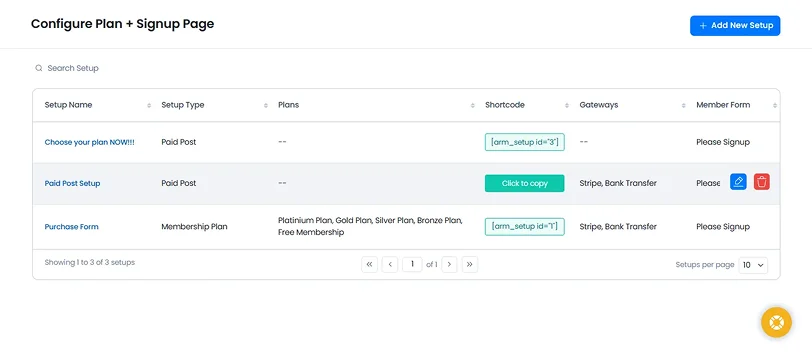
- Go to: ARMember → Configure Plan + Signup Page.
- Click Add New Setup.
- With a dedicated wizard, you can configure:
- Payment options.
- Signup form.
- Access rules.
- Once done, you’ll get a shortcode like:
[arm_setup id="{SETUP_ID}"].
Simply add it to your paid post page, and that’s all! Now it becomes a purchase gateway.
When to use it best:
- Downloadable assets (templates, presets, code snippets).
- Individual lessons within a larger course.
- Exclusive research content and blog posts.
Method 4. Tease Content with Partial Restrictions
This is a great content restriction method if you are thinking of improving conversion optimization, freemium models, and SEO-friendly paywalls.
It basically allows you to show enough to hook the user, then lock the rest.
Normally, you need to fully hide content after the paywall, but with this method, you can selectively reveal parts of it using ARMember’s restriction shortcode. Actually, this can be one of the most powerful tools for increasing conversions.
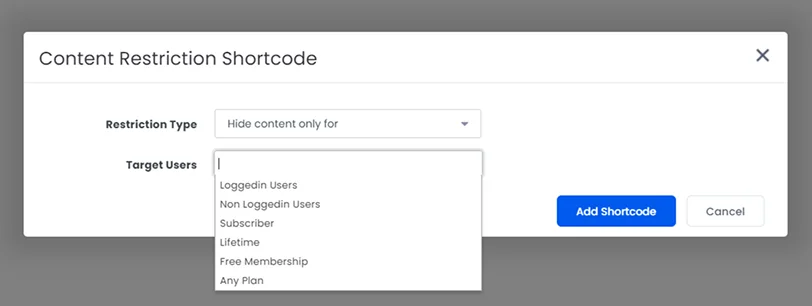
How to make it work for your membership site? Use the Restrict Content block or shortcode from ARMember.
Wrap specific parts of your content using:[arm_restrict_content plan="registered," type="show"] + Premium content + [armelse] + Teaser or upgrade message + [/arm_restrict_content]
This allows you to control who sees it (logged-in users, non-users, specific plans) and what happens (show or hide content).
Example use cases:
- Show article intro – lock the rest (blogs with premium insights)
- Display preview of a course lesson (educational platforms with preview lessons)
- Offer upgrade CTA inside the content (Membership sites offering “free tier + paid unlocks”).
Note that website admins always see full content, so testing should be done using a non-admin account.
Method 5. Restrict Access by URL
In addition to restricting content inside pages, you block access to entire URL patterns.
This method applies when you need advanced control, hidden sections, and backend protection. It allows you to block access at the URL level before content even loads. This method is less visible but extremely powerful.
Consider cases like:
- Private resource libraries.
- Member-only dashboards or tools.
- Protecting URLs not linked in navigation.
- Blocking access to filtered or parameter-based pages.
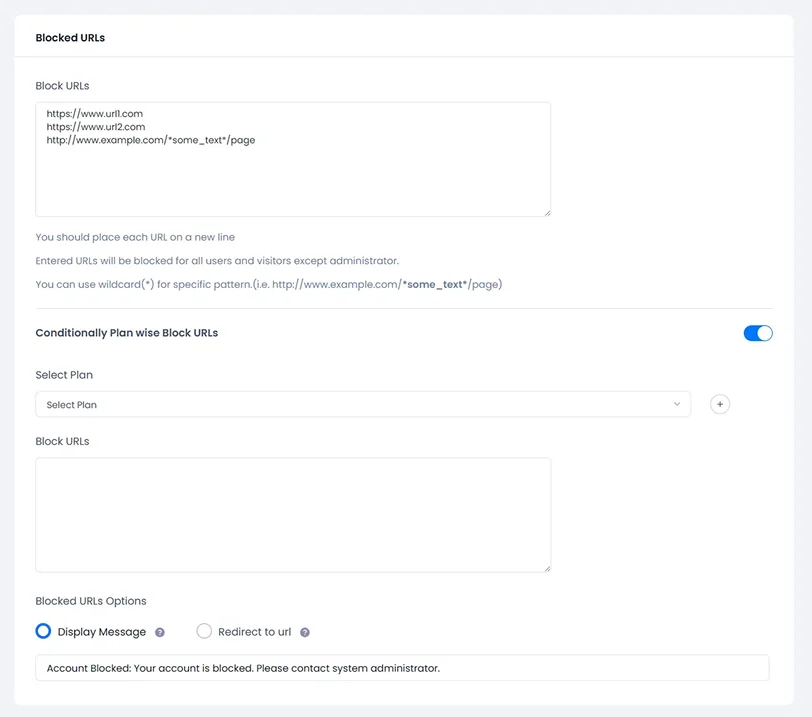
To check it out, go to ARMember → General Settings → Security Options → Block URLs.
Here, you can:
- Block specific URLs.
- Use wildcard patterns like:
- http://example.com/*premium*/
You also choose what happens next:
- Show a custom message
- OR redirect users to another page. (e.g., pricing page)
When to use this content restriction approach:
- You want to add an extra security layer to your membership site.
- Prevents direct URL access. (even if links are shared).
- Works well for hidden or unlisted content.
Conclusion: Many methods to restrict your content with ARMember
So, if you need to choose one or even combine different methods on your membership site, it’s easy to do with ARMember:
- Custom Post Types – structure and organize gated content
- Partial Restrictions – convert visitors into members
- Pay Per Post – monetize individual high-value WordPress posts
- URL Blocking – secure everything behind the scenes
- Default Rules – apply once for all selected content types in WordPress.
Thus, you can build more flexibility for different user types and even multiple revenue streams; in any case, better control over user experience is guaranteed.
Related posts:
- Restrict Content in WordPress Easily with ARMember
- How to Attract More Members Using Social Groups on Your Site
- 6 of the Impeccable Online Courses Selling Platforms in 2026
FAQs
What are custom post types in WordPress?
Custom Post Types are content types that go beyond default posts and pages. These are used to organize specialized content like courses, portfolios or listings.
How do you restrict Custom Post Types in WordPress?
You can easily restrict custom post types in WordPress using ARMember. This WordPress membership plugin lets you assign access rules to specific content types with zero coding.
What are the post types?
In WordPress, post types are simply different ways to organize and show content structured under the wp_posts table. Here are some of the default types:
- Posts – Blog entries
- Pages – Static info
- Attachments – media
- Revision – Saved edits
- Menus & Custom post types
Can you monetize Custom Post Types in WordPress?
Yes, indeed. You can monetize Custom Post Type in WordPress by restricting access via membership plans or subscriptions. You can also sell individual content using a pay-per-post model with ARMember.

Share this post