



If you want to show members’ profiles and members directories in WordPress, your wait ends here, this is one of the most sustainable ways to build a thriving and interactive community.
Membership website, coaching group, business association, community platform or private membership network – no matter what you’re running, giving your members their own WordPress member profile pages and searchable member directory can improve user experience.
A membership plugin is all it takes for letting your users discover other members, view public profiles, connect with people who share similar interests and build a stronger sense of community.
So, let’s create a fully functional WordPress member directory where your members can showcase their profiles and visitors can easily find the right members through searchable listings.
In this WordPress member directory tutorial, you’ll learn how to create and show WordPress member profiles and directories using ARMember – step by step.
TL;DR: Creating a WordPress member directory and member profiles is easy with ARMember’s built-in Social Feature module. Simply activate the addon, customize profile and directory templates, configure search and filters and publish them using shortcodes, all without writing a single line of code.
When Do You Need a WordPress Member Directory?
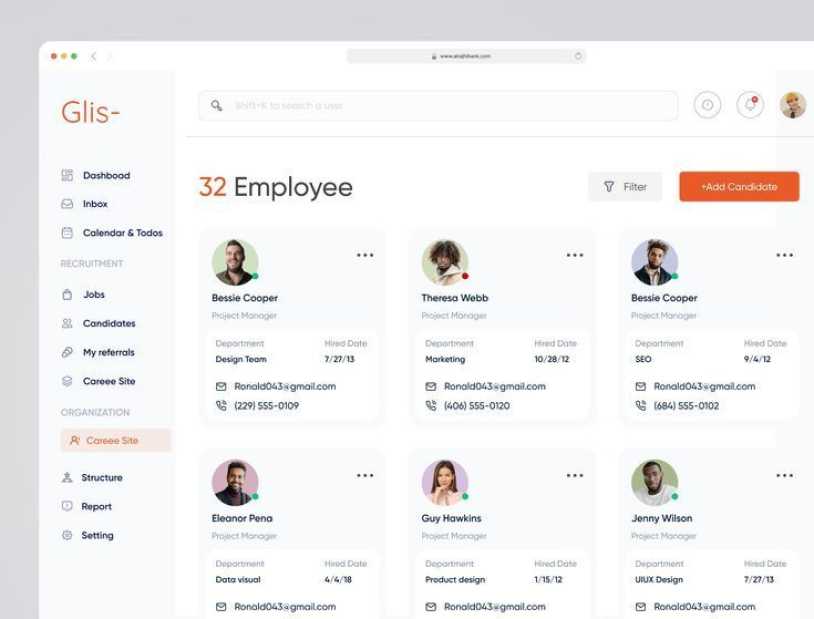
If you also think creating and showing member directories means just listing names on a screen, then you really need a wake up call. It’s 2026, and thus building a WordPress member directory is about creating a dynamic space where your members can connect, network and grow together.
So if you’re still stuck with the old-school question – Whether your WordPress membership site needs this feature or not?
Here are the top reasons businesses build WordPress member directories:
- Professional Business Associations: If you run a local chamber of commerce, a trade association or corporate network, your members join to get noticed, and a searchable member directory accomplishes exactly that. Local businesses, freelancers and consultants get to show their expertise, and everyday visitors find the exact service provider.
- Online Communities and Social Forums: For niche hobby groups, alumni networks or fan clubs, community is everything. A public or private directory allows like-minded people to find each other based on shared interests, locations or backgrounds.
- Coaching Programs: If you offer online courses, group coaching or fitness training, adding WordPress members directory and profiles lets your student find a study buddy and stay connected with peer mentors.
- Service Marketplaces: Managing a database of certified tutors, medical professionals, or creative designers, creating and showing WordPress members directory acts as a marketplace. Visitors can filter members, making it incredibly easy to find the right expert.
- Private Clubs or Alumni Networks: Running a school alumni, non-profit or exclusive private clubs? Then adding a members directory and profiles allows old friends, pals and colleagues to reconnect, network for jobs and coordinate events.
Why Use ARMember for WordPress Member Profiles and Directories?
ARMember makes building a WordPress member directory and members profile feel less like a technical setup, and more like a ready-to-go system that just works out of the box.
No custom code. No need to juggle multiple plugins.
This is an all-in-one WordPress membership plugin that get everything in one place, so be it:
- Member profiles management
- Social and community features
- Built-in payment gateways
- Automatic notifications
- Directory layouts
- Advanced content access control
- Content dripping
- Unlimited membership plan with flexible pricing
- Built-in form builder
- Seamless BuddyPress and BuddyBoss integrations.
ARMember is designed to handle both – simple communities and membership platforms platforms, thus you’re never gonna slow down.
What makes it even more useful is the flexibility. You can decide exactly what each member profile shows, control who appears in the directory and even restrict visibility based on membership plans. That means your free members, premium users or specific groups can all have different levels of access without extra complex setup for you.
And the best part is it’s not just about displaying profiles – it’s about organizing your complete community in a structured way where members can actually discover each other, connect and engage as per their shared interests or roles.
So, if your goal is to build professional and user-friendly WordPress members profiles and directory, ARMember gives you a reliable way to do it without technical headaches.
Creating WordPress Member Profile and Directory Without Coding
Next, we’re jumping into the practical setup of a WordPress member directory where members can showcase profiles and be discovered easily.
Step 1: Install, Activate and Set Up ARMember
Installing, activating and setting up ARMember barely takes more than 10 minutes. Here’s how to set it up:
- First download ARMember Pro from its official website.
- Go to the WordPress Dashboard → Plugins → Add Plugin.
- Now upload the zip file of ARMember and hit the “Install Now” button, followed by “Activate”.
After activation, the ARMember logo will appear on the admin menu bar. Click on it to redirect straight to its smart setup wizard. Although you can skip it, we suggest otherwise because setting up your membership site first is way too easy this way, even if you’re a beginner or non techie.
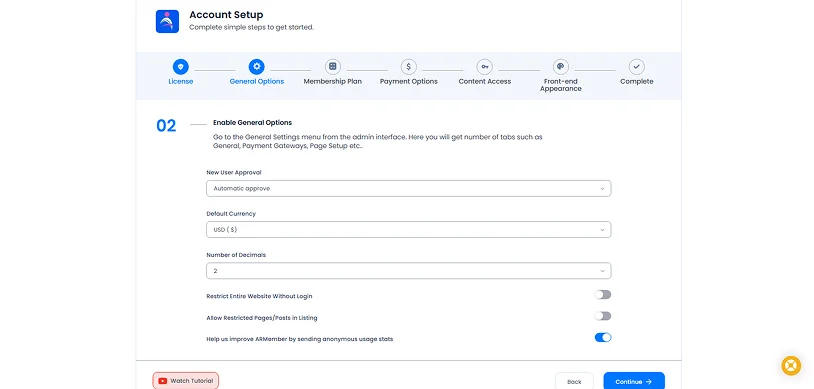
The ARMember setup wizard will speed up the workflow for creating
- Business License
- General Options
- Membership Plan
- Payment Options
- Content Access
- Front-end appearance
You can revisit and change these settings at any time.
Step 2: Enable the Social Feature Module
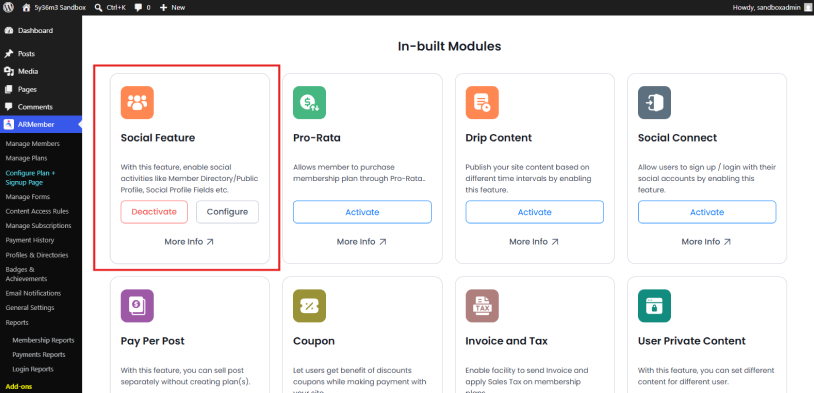
Next, because WordPress member profiles and directories work as social features in WordPress, you’ll need to activate ARMember’s Social Feature Addon – one of the 60+ built-in addons available with ARMember.
- Go to ARMember → Add-ons page
- Look for the “Social Feature” addon inside the In-Built Modules Section
- Click Activate to enable it
Once activated, ARMember will automatically add a new section called Profiles & Directories in your ARMember dashboard menu. This is where all the profile and directory settings will be managed going forward.
Either click on the “Configure” inside Social feature addon or head straight to “Profile & Directories”.
Step 3: Create and Customize Member Profile Templates
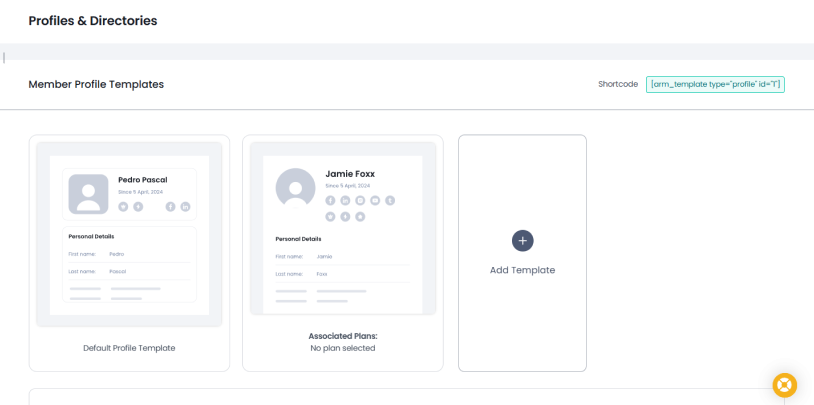
Inside Profiles & Directories page, you can create, edit or preview:
- Member Profile Templates
- Member Profile URL
- Members Directory Templates
- Membership Card Templates
Thus first we’ll be creating a WordPress member profile using ARMember.
By default, a member profile template is created. You can either edit it, or make a new one. To keep things simple, we’ll be creating a new WordPress member profile. Simply follow the steps below:
- Go to ARMember → Profiles & Directories from your WordPress dashboard.
- Under the Member Profile Templates section, click Add Template.
- Select profile template from the available pre-built profile layouts and click Next to open the live editor.
- Now you can easily customize how each member profile will look on your site.
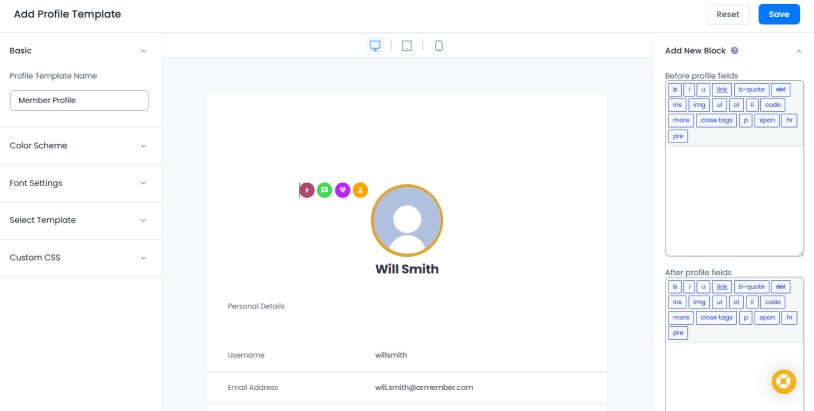
From your left side, you can customize:
- Basic: Enter profile template name.
- Color Scheme: Select color combination or make a custom one.
- Font Settings: Change font for title, sub title, and content.
- Select Template: Option to change template from here also.
- Custom CSS: Design colors, typography and fonts to match your website branding using code (Only if you’re tech-savvy developer; otherwise ARMember’s default styling options are more than enough).
From your right side, you can set:
- Add New Block: Add specific HTML before/after profile fields listing section.
- Profile Fields: Choose the profile field details such as bio, email, social links, website, or more you wanna show in profile.
- Social Profile Fields: Decide which social profile to show on WordPress member’s profile out of 14 social media platforms including Facebook, X, LinkedIn, VK, Instagram, Pinterest, YouTube, TikTok, etc.
- Membership Plans: Select which membership plan users will see this specific profile layout when they view their account.
- Other Settings: Toggle on to show member badges, joining date, cover image, admin user, and more.
After you’re satisfied with the design, click Save on the top right corner.
Step 4: Create and Configure Member Directory Templates (Search, Filters, Sorting)
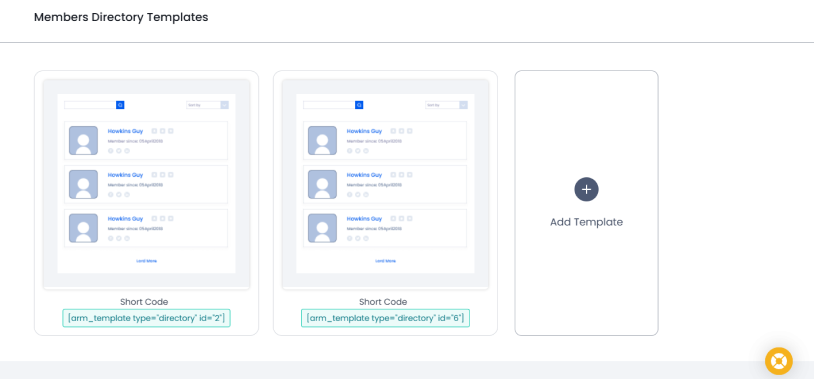
Now then….your WordPress member profiles are ready, next it’s time to build the member directory where all members will appear in a searchable format.
This is the section your members can browse and discover, filter other members based on different criteria (set by you) such as name, membership plan or profile details.
Follow these steps to create your WordPress member directory using ARMember.
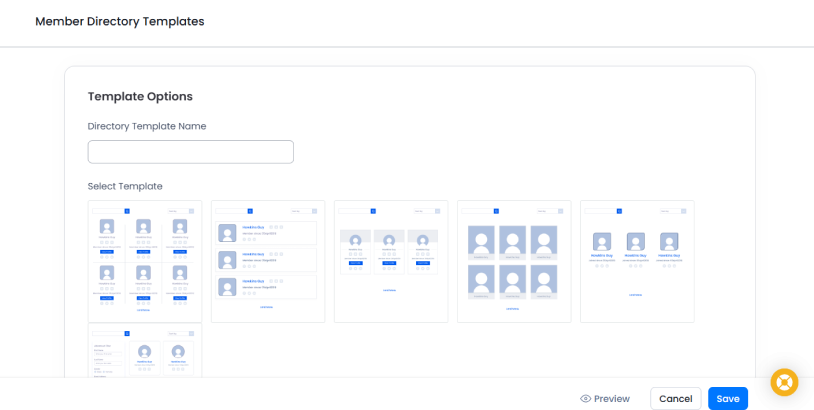
- Go to ARMember → Profiles & Directories from your WordPress dashboard.
- Now, scroll down to the Members Directory Templates section.
- Click Add Template to start creating a new directory layout.
- Select the available directory template from the pre-designed directory styles (grid or list layouts).
Now scroll down to configure how your member directory behaves and looks on the front end:
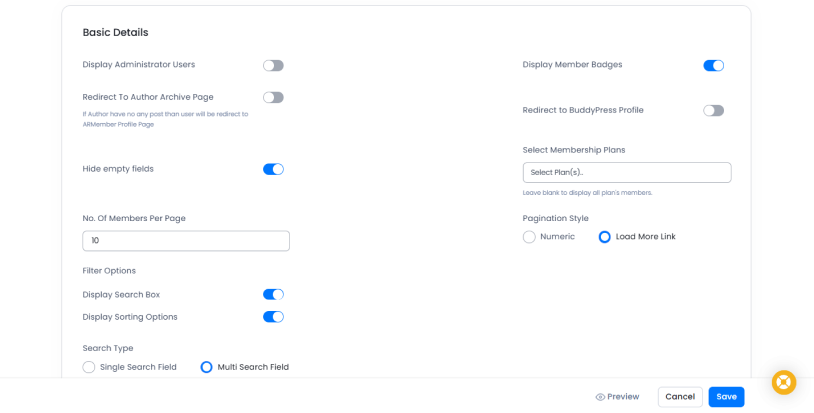
- Basic Details (Directory Template Name, Display Member Badges, Hide Empty Fields and more)
- Pagination
- Filtering Options
- Sorting Options
- Styling Options
After everything is configured, click Save on the top right corner.
This shortcode will be used later to publish your full WordPress member directory on any page of your website.
Step 4: Create and Configure Member Directory Templates (Search, Filters, Sorting)
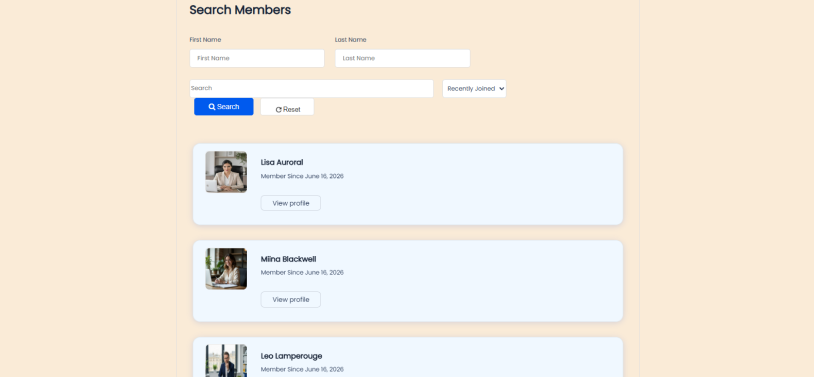
At last, to showing WordPress member directory and profiles to your members or visitors, simply add the generated shortcode on a WordPress page by following these simple steps:
- Go to Pages ➔ Add New Page in WordPress.
- Name your page (eg.: “Member Directory”).
- If using the default block editor, add a Shortcode block or search for Membership Shortcodes.
- Paste your exact member directory or profile shortcode.
That’s it! Now you can display member profiles and directory in your WordPress site.
Concluding: How to Display Member Profiles and Directories in WordPress?
Displaying WordPress member profiles and directories effectively turns a simple WordPress site into an interactive community. By leveraging ARMember, you can easily automate member management, add gamification elements and maintain total control over your member’s engagement.
Ready to build a thriving and highly customized member community? Start designing your professional WordPress member directories and profiles today!
Related articles:

Share this post


