


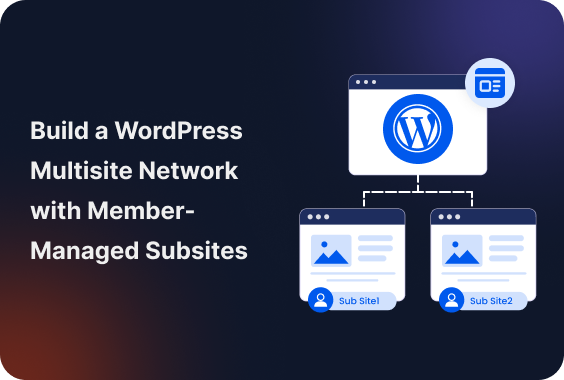
If you are looking to build a membership platform where your subscribers manage their own websites independently, WordPress Multisite is powerful enough to support this scenario.
However, WordPress Multisite is just a technical foundation. ARMember and its dedicated add-on combined with the Multisite network are the tools to help you build the entire process. Let’s explore how.
When Are Member-Managed Subsites Used?
Normally, when your members simply need to access your premium content or private community, your default ARMember setup is enough. However, member-managed subsites are often a way to go when you want each member to have their own page inside your platform, which they can use for various purposes.
In very broad strokes, you’ll need this architecture when you want to turn your membership website into B2B (business-to-business), so that you don’t just provide services to end users, but to other businesses.
For example, you can build a website builder service and offer your members to launch their own websites with their own name, services, photos, etc. For example, coaches, trainers, teachers, photographers, or any other businesses that need a simple page with simple tools.
As a website administrator, you will be managing the underlying WordPress installation. However, each member will manage their own website and clients. With the help of ARMember monetization tools, you can charge a recurring subscription, one-time payments, or offer various plans and levels of services.
Another popular example is allowing members to launch their own niche blogs or online publications (WordPress is probably the best for this, and multisite amplifies your opportunities).
For example, you create a travel publishing platform. To be able to run their own blogs about particular destinations, outdoor activities, or local attractions, each publisher will need to pay for your services.
To sum up on the main categories when member-managed subsites can be used:
- Create a website builder for specific industries.
- Power franchises and local businesses with branch websites for each.
- Create a niche blogging platform.
- Give WordPress capabilities to artists and photographers who want portfolio websites.
So, the basic difference between a normal membership website and the one with member-managed subsites is that the latter is quite often aimed at businesses that provide their own services and earn money.
How ARMember Helps You Build This Type Of Platform
WordPress Multisite is what gives you the technical foundation for running multiple domains inside your website. But it’s far from a complete membership business model.
Registering customers, selling subscriptions, defining membership plans, and connecting those plans to the number of websites each member can create is the territory of another plugin. For our tutorial, ARMember is a great solution.
ARMember helps you run a complete WordPress membership website. Its Member Network Site extension connects those membership capabilities with WordPress Multisite.
With this extension connected to ARMember, you can:
- Enable members to create their own subsites.
- Limit the number of websites each member can create (based on the plan).
- Give members a frontend interface to view and manage their websites.
As an owner, you can for sure view, activate, deactivate, or delete member-created subsites.
What You Need Before Getting Started
Before configuring ARMember, make sure you have the following:
- A WordPress Multisite network (you need an existing WordPress installation with multisite enabled).
- Hosting with support for WordPress Multisite and subdomains.
- The ARMember plugin (Enterprise plan).
- The ARMember Member Network Site add-on.
- A membership plan structure (decide how many websites each membership level should allow).
How To Create A Network On WordPress
We suppose that you already have the WordPress multisite network configured. Without this, you can’t use the ARMember add-on for enabling member-created websites on your site.
WordPress multisite is built into WordPress – you don’t need an extra plugin to enable it. But you need to activate and configure it in your WordPress installation.
If you haven’t done that yet, these are the steps you need to understand:
- With your hosting provider, check if it supports WordPress Multisite and subdomains.
- Enable multisite on your WordPress – follow WordPress’s setup instructions. It might require a technical setup of editing a configuration file or asking your hosting provider for help.
- Choose how website addresses of your members will look. Select subdomains if you want addresses like anna.yoursite.com and mike.yoursite.com. The member chooses the subsite name when creating their website through ARMember’s frontend form. The name becomes part of the subsite.
- Ask your hosting provider to configure the domain settings and security certificates for each subdomain to guarantee proper work.
- Follow the instructions in your WordPress dashboard and log in again.
- To manage your network, open My Sites > Network Admin to see all websites in the network.
You as an admin are the only person who decides which themes and plugins are available across the network. This is where much of the functionality and design options members can use on their individual websites come from.
That doesn’t mean all your members’ subsites should look the same!
For example:
- Themes: a network admin installs themes, and members can then choose from the themes you’ve allowed.
- Plugins: you can make installed plugins available on all subsites or only selected ones.
- Features: plugins equal features, so you can allow usage of booking forms, ecommerce, portfolios and more.
So, if you’re creating a service for photographers, for example, you could provide portfolio themes and gallery plugins.
Members don’t get access to install any theme or plugin they want – you control what’s available and their permissions as well.
Configure The ARMember Member Network Site Add-On
When the network is ready, it’s time to connect it to ARMember.
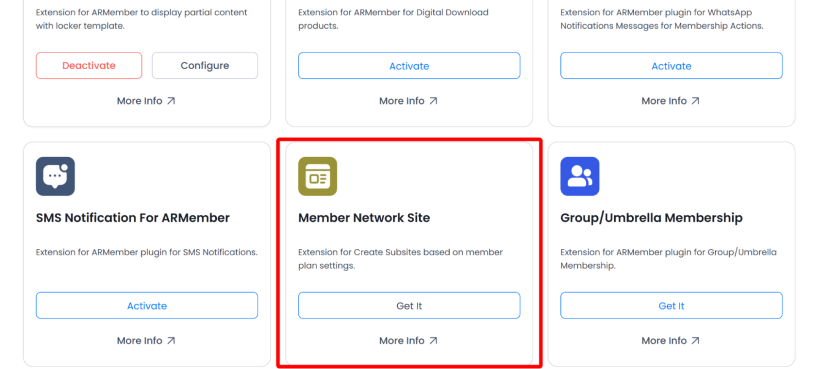
1. Activate the Member Network Site
Activate the add-on from your Addons menu. Or, log in to your ARMember account and download the Member Network Site add-on first. Then upload it and activate it on your WP.
2. Manage Subsites
In your WP, find the new Manage Subsites menu.
Now, you need to manage website creation permissions for each membership plan. Follow the steps below:
- Go to ARMember > Manage Plans.
- Create a new membership plan or click Edit for any existing one.
- Find Multisite Settings in the plan configuration.
- Enable “Allow members to create subsite(s) for this plan”?
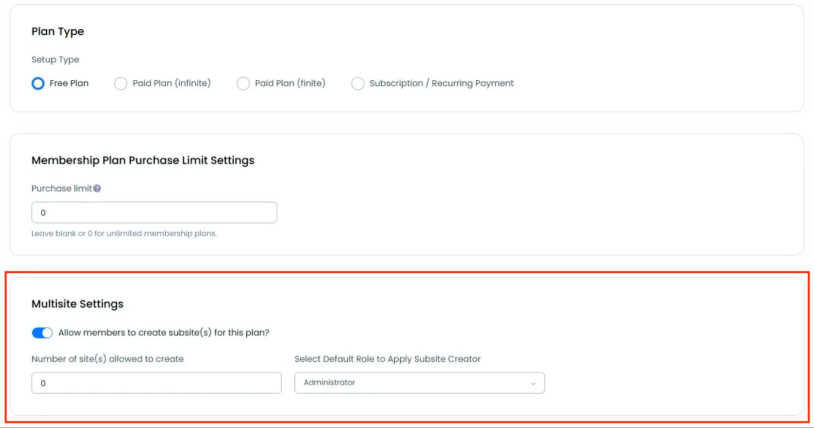
- Set the Number of site(s) allowed to create.
- Choose the Default Role to Apply Subsite Creator. This is important and defines WordPress permissions assigned to the subsite creator.
3. Save the Plan
Lastly, don’t forget to save the plan.
For any membership plan where a user-managed subsite is possible, the steps should be repeated, while disabled for the others.
Here, you may also select the outcomes for times when members upgrade, downgrade, cancel, or suspend their subscriptions. For example, you can deactivate affected subsites when the plans change or when a subscription is suspended or removed.
Add A Website Creation Form To The Frontend
As for how members will register on your site and build their own websites, you definitely don’t want it to be a manual process.
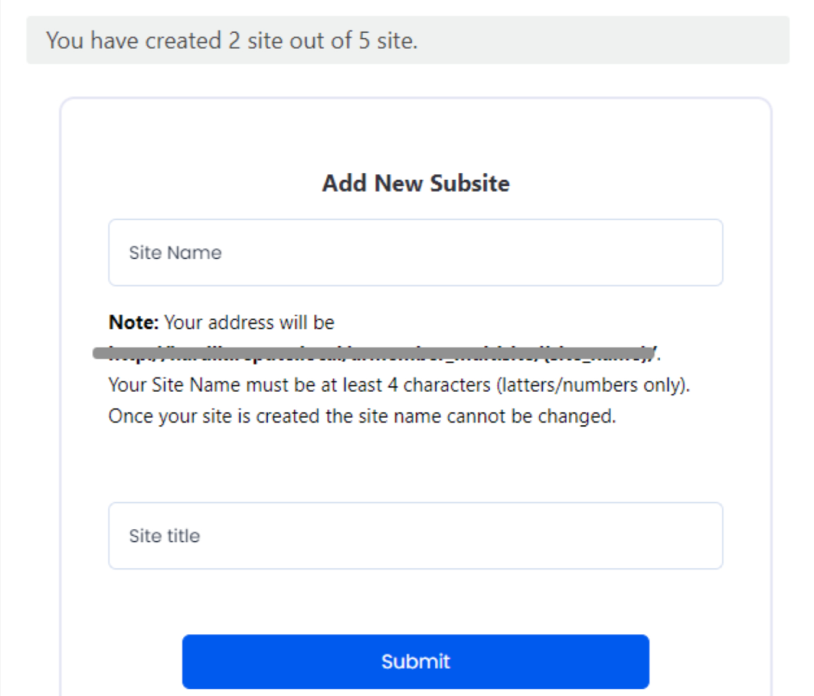
ARMember allows eligible members to create their own sites from a page on your website that you dedicate for the user registration.
ARMember’s add-on provides the [arm_site_creation] shortcode for this purpose.
Create a page with a name you want (e.g. Create a website), then insert the shortcode into the page content:
[arm_site_creation]
Publish the page and check if it displays the creation form.
If you want, you can edit the form’s title, field labels, and more. Find the possible parameters in the docs. For example:
[arm_site_creation form_id=”101″ arm_multisite_form_title=”Create your website” site_name=”Website address” site_title=”Website title” enable_note_belt=”true” site_limit_message=”You’ve reached your website limit.” submit_button_text=”Create website”]
Note – 101 is just an example of an ID.
Having submitted the form, the add-on creates a subsite within your WordPress network, and your member can now manage it!
Let Members Manage Their Websites
So, we’re talking about member-managed subsites, which means members need a way to see which websites they’ve created and manage them.
Use the [arm_manage_subsite] shortcode for this.
Create another WordPress page (e.g. My websites), insert that shortcode above, and publish the page and test it with a member account.
The management interface lets members view their subsites and perform the actions supported by the ARMember add-on (activating, deactivating, or deleting their websites).
You can customize the table title, the number of records displayed per page, and the messages shown when no websites are available.
Just pop links to those two pages into your member dashboard or main menu so your customers can spot them easily. Once that’s done, eligible members can jump right in and build or manage their own sites.
Manage Member Websites From WordPress
Your instruments are pretty simple: you can view member-created websites and use the available actions to activate, deactivate, or delete them. Here are the key tools:
| What you can control | How it works |
| Website creation permissions | Enable or disable subsite creation for membership plans. |
| Number of websites | Set how many subsites a member can create under a plan. |
| Default WordPress role | Permissions for the subsite creator. |
| Website overview | View subsites. |
| Website status | Activate or deactivate individual subsites. |
| Website removal | Delete subsites. |
| Member-facing management | Website pages where members can manage their own subsites |
| Subscription-related behavior | Control website creation through membership plans. |
Concluding: How To Build A WordPress Multisite Network With Member-Managed Subsites
Building a network with member-managed subsites is a pretty attractive advantage if you want to serve B2B. Create blogging platforms, subscription services, or provide a website builder for experts from various industries.
Your network configuration, available themes and plugins, WordPress roles, and other permissions still matter for your network configuration.
With WordPress and ARMember, the entire process requires having a multisite network enabled in your default settings + the Member Network Site extension. What you’ll create is a network of separate websites, each with its own content and site-specific data!
Related articles:

Share this post


