

Every successful membership site starts with one simple action: a user signing up.
Now it may look like a small part of your website, but it plays a big role in how your membership platform grows.
Every registration form decides two things:
- How easily new users can join
- How well you can manage them afterward
A poorly designed process can create incomplete profiles, spam accounts or frustrated users who never return.
And that’s why having a structured and well-planned registration workflow is essential for any membership website.
ARMember is loaded with pro-level features for a smooth and professional onboarding experience that starts strong. Think custom data collection, instant membership plan links, and tons more, which I’ll explore one by one.
Stick around to see how easy it is to manage new user registrations with ARMember and turn casual sign-ups into dedicated members.
Let’s DIVE IN!
TL;DR: Managing new user registrations becomes easier with ARMember. From creating custom signup forms and connecting users to membership plans to approving accounts, sending welcome emails and tracking members, ARMember allows you to make a smooth and secure onboarding experience for your members.
Start with a Smooth and Simple Registration Experience
Your registration form is the first real interaction a user has with your membership site!
So if the registration process feels confusing, slow or asks for too much information, many visitors abandon the signup before even becoming members.
That’s why a smooth WordPress user registration experience matters.
The easier it is for users to sign up, the more likely they are to complete the process and start engaging with your content.
Create a Registration Form in ARMember
After installing and activating ARMember, you can create flexible and user friendly registration forms right from your WordPress dashboard.
No more relying on the default WordPress signup system or form plugins. ARMember lets you design custom forms tailored to your membership site and model.
The amazing part is ARMember already creates a basic signup form automatically the moment you get it. But if you don’t like it, simply make a new one.
You can create a signup form that collects the basic information needed to register users on your site. Simply go to ARMember → Manage Forms in your WordPress dashboard. From here, click “Add New Form” and choose a Registration Form template.
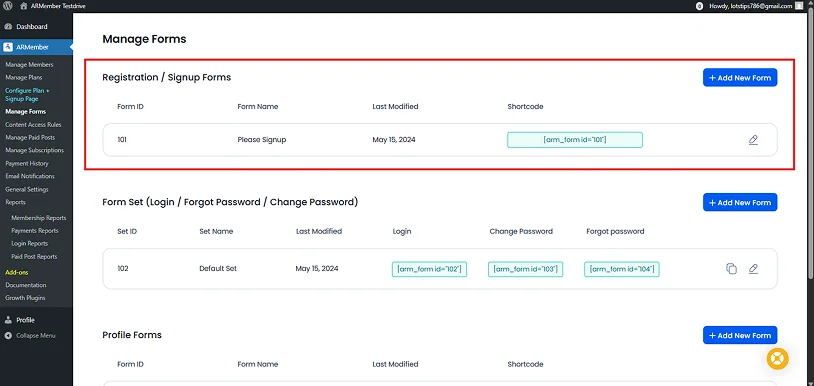
If you want to customize anything in your existing registration form, simply click on the pencil icon “Edit” button. After that, all it will take is a simple drag and drop. I’ll cover more on how to customize your user registration form in the 2nd section.
Add Registration Forms Anywhere
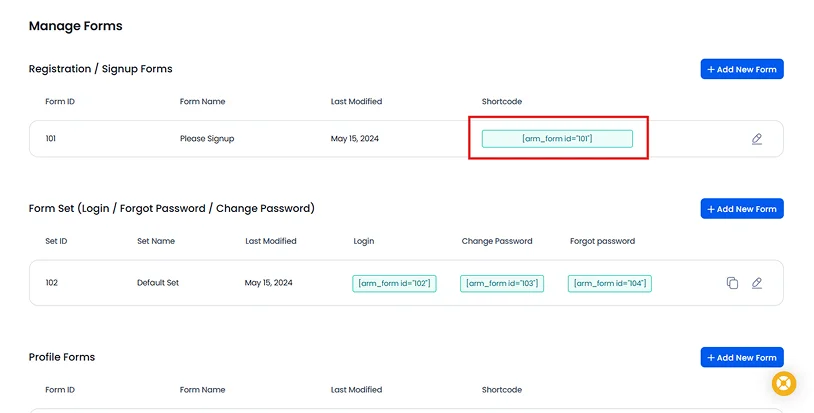
Copy the generated shortcode, add it to any page where you want the registration form to appear.
Once published, visitors can use this form to create an account and join your membership platform.
And the best part is you can ACTUALLY add your user registration form anywhere you want, even inside the web page.
Collect the Right Information & Customize With Style
After your user registration form is in place, the next step is deciding what information you want to collect from new members.
Here’s a fact: For collecting members info, you can decide your form fields even before creating the custom registration form.
Yes, when you were creating your first custom user registration form by heading over to ARMember → Manage Forms → Add New Forms.
Inside the “Add New Form” popup model, simply:
- Enter your Form Name
- Form Fields
- Clone from existing forms
- Select Template
Now if you have already gone with “Clone with existing form”, then it’s alright. But if you have picked the template as we suggested earlier in section 1, you can see an option of “Select Meta Fields”.
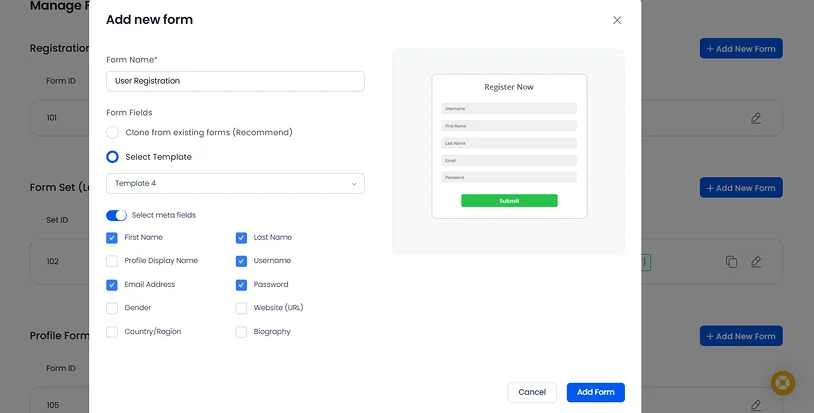
Simply toggle on the “Select Meta Fields” and now you’ll find all the basic default form fields and choose right away. Once done, hit that Add Form and continue.
Customize Your Registration Form with Flexible Fields
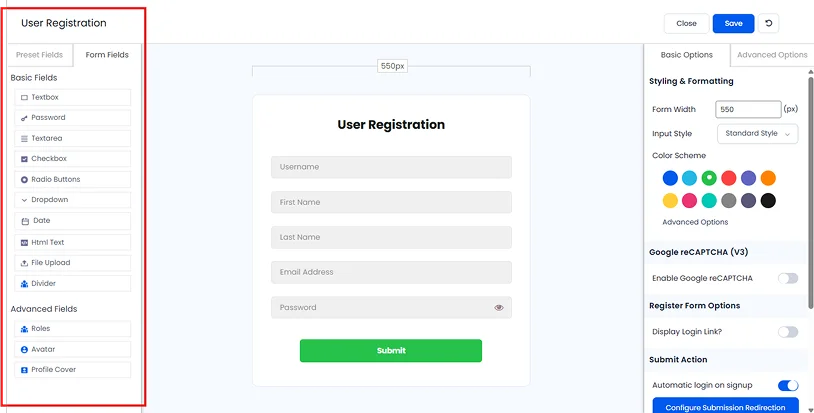
ARMember gives you a ton of preset fields and form fields that you can add using a simple drag-and-drop form builder. This allows you to design forms that match your exact registration requirements.
Some commonly used registration fields include:
- Name and email address
- Username and password
- Phone number
- Country or location
- Dropdown selections
- Checkboxes for preferences or interests
- Profile cover
And the list goes on and on…
For instance, you run an online course platform and want to collect information such as a user’s skill level or learning goals. Or if you manage a professional community, you may want details such as job role or industry.
And for exactly this reason, ARMember has additional fields to help you better understand who your members are and create a more personalized experience later.
Adding custom fields in your user registration form can help you:
- Segment members based on interests or categories.
- Personalize onboarding emails and content recommendations.
- Understand your audience demographics
- Maintain more complete member profiles.
Customize Your Registration Form with Style
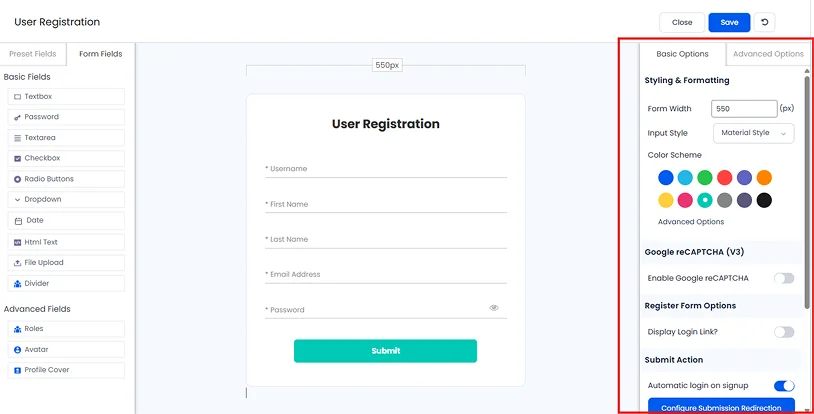
After you’ve gathered the right information from new users, it’s time to style your user registration form.
A well-designed registration experience should feel quick and effortless for users. Small improvements can significantly increase completed signups.
Thus, you must:
- Use clear field labels and instructions.
- Keep the form layout clean and easy to scan.
- Avoid unnecessary steps before account creation.
- Make sure the form works smoothly on all smart phones.
With ARMember, you don’t have to worry about any of this. All registration templates in ARMember are made for professional onboarding experience. Best of all, if you don’t like any style, ARMember lets you customise it.
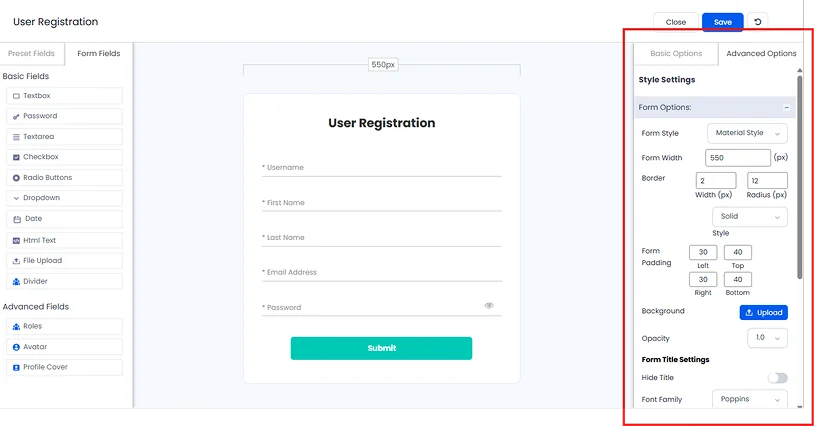
ARMember’s in-built form builder has an extensive set of advanced styling options just like any other form builder plugin such as:
- Form Options
- Color Options
- Input Field Options
- Label Options
- Submit Button Options
- Custom CSS
Simple user registration optimizations make it easier for visitors to complete their user registrations and become members. And when the signup process is simple and intuitive, it starts building a positive experience for new members from the very beginning.
Connect Registrations to Membership Plans
Collecting user information is only part of the registration process. The next important step is connecting those registrations to the right membership plan.
In a membership website, it’s obvious users never join just to create an account. They register to get access to something: premium content, online courses, exclusive communities or special resources.
That’s why every WordPress user registration should be linked to each membership plan.
Link Your Registration Form to a Plan
ARMember lets you associate a specific membership plan with a specific registration form. Thus when users complete the signup process, they can either:
- Automatically join a selected membership plan.
- Choose a plan during registration.
- Be assigned to a free or trial plan.
Simply head over to ARMember → Configure Plan + Signup Page. Next, click on the “Add New Setup”.
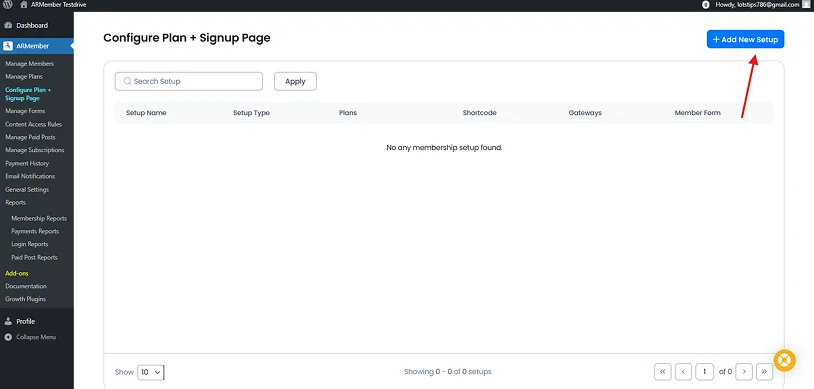
Here, you just have to go with the flow.
- First name your setup, choose the setup type and the plan for which you wanna assign that specific registration form.
- Next is the payment gateway. If you offer paid memberships, the good news is ARMember can be integrated with over 21+ payment gateways.
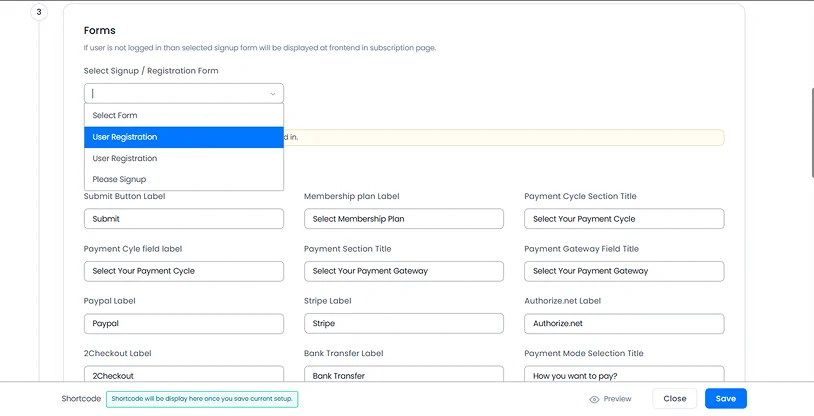
- After that comes the important step 3. Here, you have to choose your specific user registration form from the drop down menu.
- Once done, the next two steps are simply for signup steps and styling.
At the end, hit that Save button. And that’s all!
This makes the members’ onboarding process much smoother for both users and administrators.
Let’s say, a free membership site can automatically assign their users to a free plan after registration. And a course platform can allow users to select the course plan they want while signing up. The same way, a premium membership site can connect the registration form to a paid subscription plan.
By linking registrations to membership plans, you remove extra steps and make sure every new member immediately gets access to the correct content.
Once registrations are connected to membership plans, the next step is guiding new users right after signup by creating a helpful and engaging Thank You page.
Turn Your Thank You Page into a Member Onboarding Hub
Your Thank You page is the first real chance to guide new members and set the tone for their complete experience. Done the correct way, and it can boost engagement, lower confusion and make your users feel welcomed right away.
Thus here’s how to transform it into a true onboarding hub with ARMember:
Configure Form Redirection
When creating or editing a registration form in ARMember, go to the Form Settings. Now simply head over to “Actions After Submission”.
Here, select the Redirection option and enter the URL of your custom Thank You page. And that’s it!
This will make sure every new member lands exactly where you want them after signing up.
Create Plan-Specific Thank You Pages
Different membership levels may need different messages.
Thus try something like this:
- Free members : Quick tips, getting started guide or trial offers.
- Paid members : Premium content access, onboarding videos or exclusive resources.
ARMember allows you to assign a unique Thank You page to each plan, making every user feel personally welcomed.
With ARMember, every element, from registration forms to Thank You pages, can be fully customized. Thus you can create a professional and engaging onboarding experience that feels personal.
Send a Welcome Email That Actually Helps New Members
A welcome email is your first chance to make a new member feel valued and guide them on how to get started. After all, simply just saying “Thank you for signing up” is too mainstream.
You can send a welcome email with more than just a simple “Thank You”, and provide real help and set real expectations.
Start by personalizing the email. And to do that, simply head over to ARMember→ Email Notifications.
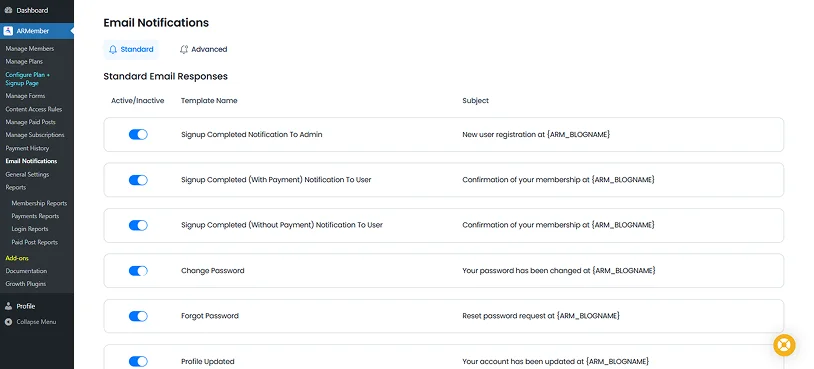
Here, you can set notification for every member action. Right now let’s focus on registration so look for:
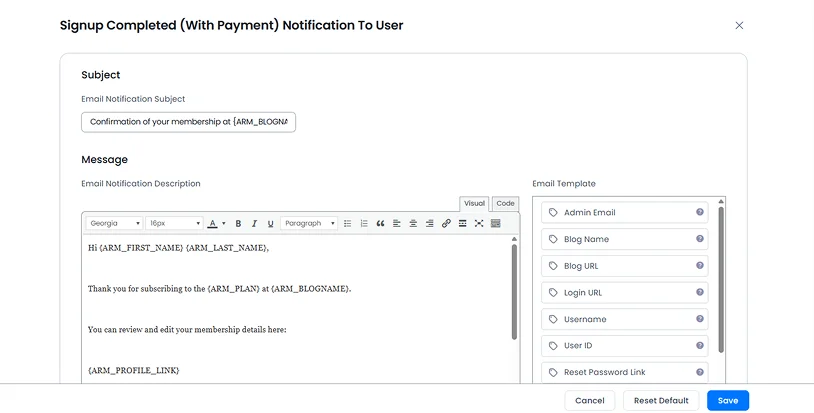
- Signup Completed (With Payment) Notification To User
- Signup Completed (Without Payment) Notification To User
Simply click on the edit icon and now, you can easily change your welcome email‘s subject and message. The best part? You can add the member’s name and the membership plan they signed up for, and even more details using a simple placeholder.
Next, give clear next steps so users know exactly what to do:
- Link to their dashboard or members-only content.
- Include getting started guides or tutorials.
- Provide contact info for support if they have questions.
Finally, make it simple and scannable. Use short sentences and clear headings so users can quickly find the info they need.
ARMember automates welcome emails and customize them for different membership plans. This makes sure every new member gets a helpful, professional and friendly start.
Approve and Review New User Registrations
Managing new users carefully helps keep your membership site secure, organized and professional.
That’s why ARMember lets you review and approve registrations before granting full access. This makes sure only genuine users join your community.
And this is how it works:
When a user signs up, their account can be set to pending approval. This gives you the chance to:
- Check details like email, username, or custom form fields.
- Prevent spam or fake accounts from entering your site.
- Assign the right membership plan before they get full access.
You can set this in the ARMember Dashboard under the General Settings → User Approval section. Here you can choose whether you want:
- Automatic approval.
- Email verified approval.
- Or, manual approved by admin (You).
Expert Tip: Going with manual approval is especially useful if your site offers premium content, courses or exclusive communities. It keeps your members’ experience safe and professional from day one. But, if you own a large community, approving each and each member can be exhausting so simply go with Automatic or email verified approval.
Track and Manage Your Members from the ARMember Dashboard
ARMember gives you a centralized and easy-to-go dashboard to track and manage all your members with zero hassle. From subscriptions to payments, you can oversee everything in one place, keeping your membership site organized.
If you head over to “Manage Members”, you can see the list of all members, even included those who registered before installing ARMember.
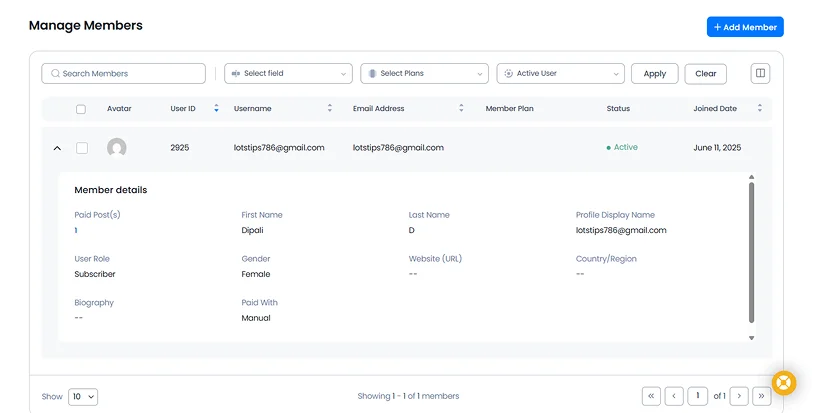
And the best part is you can quickly find members by name, username, email, gender or membership plan. Plus, you can even filter them by status such as Active, Inactive, Pending or Terminated.
And for changing anything, simply just hover over a member to edit their profile, change status, manage plans or delete accounts.
ARMember also lets you keep an eye on every member’s activities, registrations and payments. It gives you full analytics report on:
- Membership
- Payments
- Login Requests
- Paid Post
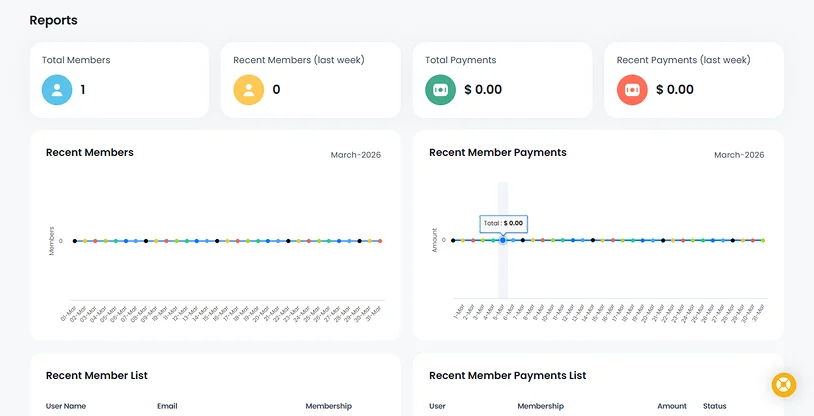
On top of it, you can see charts for member growth daily, weekly, or monthly, and check payments, transaction IDs, and upcoming subscriptions. Activity logs let you monitor logins, IP addresses and session times.
Best of all, if you use the Conversion Tracking Addon, you can even track plan purchases, cancellations and refunds in Google Analytics 4. ARMember also includes dashboard widgets that give a quick snapshot of total members, recent signups and payment summaries.
Final Thoughts
In a nutshell, ARMember lets you manage your user registrations easily, from start to end. You can give your members a professional, personalized and seamless experience from the very first signup.
Whether you run a free membership site, a course platform or a premium subscription, ARMember gives you the tools to turn signups into loyal members.
Related articles:

Share this post