


ARMember is a WordPress membership plugin with recurring payments, one-time purchases, and per-post sales. Actually, it’s designed to meet any needs of membership sites on WordPress that want to sell content and access in all ways possible, including with free trials.
In today’s tutorial, however, we want to closely look at one specific task – setting up recurring membership payments for the subscription-like billing. What settings does it offer? What does it take to build such a checkout? Let’s discover it right away with a real example.
TL;DR: Setting up recurring membership payments in WordPress is way easier using ARMember. It lets you create subscription-based membership plans with flexible billing cycles, free trials, automatic renewals, cancellation rules, grace periods and failed payment handling.
What’s Required In ARMember

Some of the key settings in ARMember should already be in place or planned to speed up the recurring billing creation process for your membership site.
So, what should you have ready?
1. ARMember Installed And Activated
Complete the initial setup wizard of the ARMember plugin providers to generate the essential membership pages, registration forms, login forms, and default membership settings.
2. Membership Structure Planned
Decide what type of recurring memberships you want to offer. You should also know your pricing, trial offers, and renewal terms before creating the plan.
3. Protected Content Prepared
Have your member-only content, courses, downloads, pages, posts, or other resources ready so you can connect them to the membership plan after it is created.
4. Content Access Rules Planned
Determine which membership levels should have access to which content and whether you want to use content dripping, upgrade paths, or restricted member areas.
5. Payment Gateway Configured
Set up and connect your preferred payment gateway under ARMember → General Settings → Payment Gateways.
It’s important to verify that your chosen payment gateway supports recurring subscriptions and the billing intervals you plan to offer (yes, some gateways have limitations).
6. Email Notifications Configured
Review your membership emails or customize templates in ARMember.
Once these items are prepared, you’re ready to create your recurring membership plan and configure its billing cycles, renewal settings, trial periods, and subscription rules.
Set Up A Recurring Membership Plan In ARMember
ARMember lets you create a variety of plans with any charging model. In this part, we’re fully covering the main topic of our tutorial – setting up recurring billing for a chosen plan and chosen payment gateway.
Before you create one – do check if your payment gateway set in ARMember payment settings supports the billing interval you create. For example, Authorize.Net requires a minimum billing interval of 7 days for daily or weekly subscriptions. Now, let’s jump to the steps.
Step 1. Create A New Membership Plan
- Go to ARMember → Manage Plans.
- Click ‘Add New Plan’.
- Enter your membership plan name.
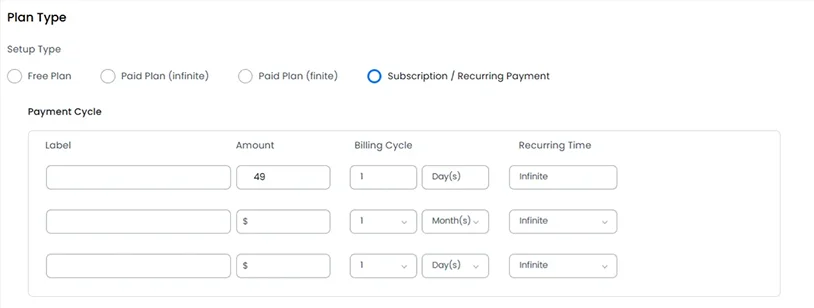
- Under Plan Type, select Subscription / Recurring Payment.
This is where you enable automatic recurring billing and subscription management.
Step 2. Configure Pricing
Set the subscription price for your membership plan, for example:
- Monthly – $19/month
- Quarterly – $49 every 3 months
- Annual – $199/year
Step 3: Add Billing Cycles
The great news is that you can apply multiple billing options within the same membership plan.
- Go to ‘Payment Cycle’.
- Add one or more billing cycles.
- Set the duration for each cycle in: Days, Months, Years
This way, you allow members to choose their preferred billing cycle when they are purchasing a plan.
You might want to let your future members know this – once a member selects a billing cycle, they cannot switch to another cycle until their current one is ended.
Step 4. Set The Number Of Membership Renewals
In the Recurring Time setting, choose how many times the subscription should renew choosing from:
- Fixed number of renewals (e.g., 12 payments)
- Infinite (continues until cancelled)
Infinite usually works pretty well.
Step 5. Optionally Add A Trial Period
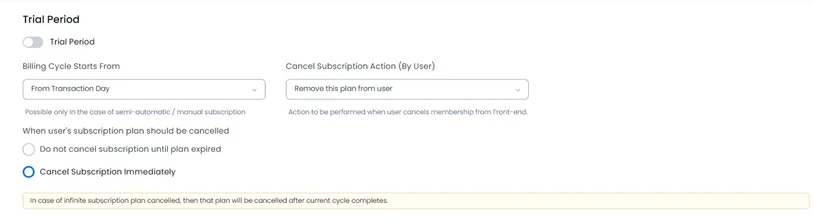
If you want to offer a trial before members subscribe, here are your steps:
- Enable Trial Period.
- Enter Trial Amount (e.g., $0 or $1) and Trial Length (days, months, or years)
But bear in mind the limitation: if you already have a site running with ARMember, existing members who already have a plan will not receive the trial period when purchasing another plan.
Step 6. Choose The Beginning Of The Billing
Note that this feature is available only for semi-automatic / manual subscriptions. Use Billing Cycle Starts From to determine when recurring billing begins:
- Transaction date
- Specific day of the month (1st-31st)
Step 7: Designate Subscription Cancellation Rules
Get your system prepared for cancellations as well. Find the Cancel Subscription Action (By User) rule and decide what happens when a member cancels.
1) Remove this plan from user
The member loses access when cancellation takes effect.
2) Give access to X plan
The member is automatically moved to another membership plan you choose from the list. You can also choose ‘Cancel immediately’ or ‘Keep access until the current billing period expires’.
For subscriptions with Infinite Recurring Time, if you select ‘Keep access until expiration’, the cancellation action occurs after the current billing cycle ends.
Step 8. Select ‘End-Of-Term Actions’
And when the subscription ends? What should be done in your WordPress membership plugin with recurring payments? With ARMember, the settings are pretty similar to cancellation rules:
- Remove the membership plan (‘Remove this plan from user’)
- Move the user to another membership plan (Give access to X plan).
For instance, this way, you can move expired members to a free plan automatically.
Step 9. Optionally Create A Grace Period
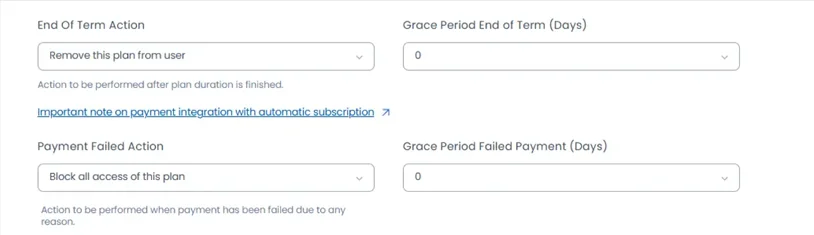
The Grace Period End of Term menu allows you to set days to give members extra time after their subscription expires so that they have additional time to renew (for failed payments, too – more after this part).
Let’s illustrate it with an example:
- Subscription expires: December 10
- Grace Period: 5 days
As a result, membership remains active until December 15 and end-of-term actions occur on December 15.
Step 10. Configure Failed Payment Handling
To specify actions if a payment can’t go through, set your preferences via the Payment Failed Action – choose what happens if a recurring payment fails.
– Remove Plan (the member will lose access).
– Assign another plan (move the member to a different membership level (commonly a free plan).
Failed payment actions may apply for automatic payment failures that remain unpaid, when a semi-automatic renewal is not completed by the next renewal date, or when the payment gateway returns a failed payment response.
Moreover, you can use the Grace Period Failed Payment to give members additional time to resolve payment issues.
For such cases, if a payment fails:
- ARMember extends the renewal deadline by the specified number of days.
- The member can make a successful payment during that period.
If a payment is not successful even within this period, the failed-payment action you set runs.
Step 11. Optionally Apply Upgrade And Downgrade Rules
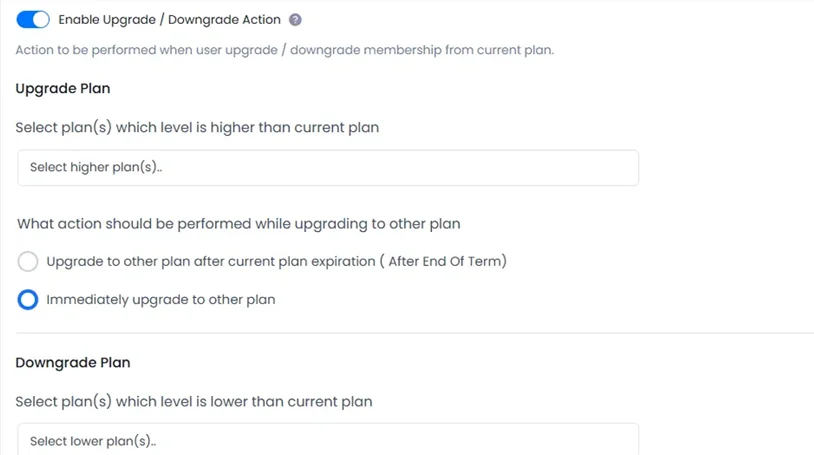
Allow your members to switch between plans and decide how it should work.
For upgrade / downgrade rules, the same logic actions apply:
- Upgrade / downgrade immediately
- Upgrade / downgrade after current subscription ends
Moreover, if your site uses the features of the Pro-rata addon (it’s activated on your site), ARMember can calculate upgrade charges based on time or plan cost differences.
Upgrading and downgrading actions are not available when the Multiple Membership module by ARMember is enabled.
To get your recurring membership plan live so clients can actually buy it, you need to use ARMember’s Configure Plan + Signup Page wizard. With your settings applied, it will generate a shortcode you can paste to the needed page within your preferred editor (Elementor, Gutenberg, etc.)
Example of the ARMember WordPress Membership Plugin with Recurring Payments Setup
Let’s create a working example of the recurring subscription setup with ARMember to show you the flexibility of the WordPress recurring payments plugin and to visualize all the settings we’ve just revised. In the example, it’s not that complex at all as it might seem from the first sight.
This example setup creates a fully automated recurring membership payments plan with renewals, trials, cancellation handling, failed payment protection, and plan transitions.
So, here is our premium subscription-based membership example:
- Plan Type: Subscription / Recurring Payment
- Billing Cycles: Monthly: $19/month and Annual: $199/year
- Recurring Time: Infinite
- Trial Period: 14 days free
- Cancellation: Keep access until current billing cycle ends
- End-of-Term Action: Move user to Free Membership
- Failed Payment Action: Move user to Free Membership
- Expiration Grace Period: 7 days
- Failed Payment Grace Period: 5 days
Concluding: How To Use WordPress Membership Plugin With Recurring Payments?
ARMember connects with over 22 payment gateways, so you can probably link your favorite payment provider for recurring billing without third-party tools.
One quick heads-up, though: even though ARMember is ready to go, the ability to handle recurring billing ultimately comes down to your chosen payment gateway.
Some payment methods don’t support recurring subscriptions at all, or even have specific rules about billing intervals.
To sum up that process, follow these steps:
- Check if your payment gateway supports recurring subscriptions and the billing cycles you need.
- Add this gateway to ARMember.
- Create and configure your recurring membership plan in ARMember.
- Enable sandbox (test mode) in your plugin payment gateway and perform several test subscriptions. After that, test if the subscription is created successfully and if the member is assigned to the correct membership plan and billing cycle.
Related articles:

Share this post