
Creating a login and registration page in WordPress always begins with understanding exactly what your users are coming to your site for.
For example, maybe you run a store and want customers to log in to see their past purchases or wish-list items. Or perhaps you’re selling subscriptions and need a way for users to access premium content. Maybe your site is a forum or a community where people log in to post comments and interact with others. You may sell services and want customers to log in and view their upcoming appointments. And sometimes, you might need to just enable some sort of commenting.
So the key thing is – start with narrowing down your request, because a login and registration page is never just a standalone feature. It’s part of your bigger business environment.
The type of site you have and the goal you want to achieve with user accounts should guide exactly how you build it.
In this tutorial, we’re explaining how to create a login page WordPress to offer content purchases, including subscriptions.
By the end of this guide, you’ll have:
- A user registration page for new subscribers to sign up.
- A login page where existing members access their accounts.
- A secure system for managing subscriptions and payments.
- Restricted pages for your premium or paid content.
How to Create a Login Page in WordPress for Selling Content
When you sell content subscriptions, courses, or even one-time access to content, you need a way for customers to sign up, log in, and manage their accounts. To cover even more cases, your customers should be able to:
- Access online courses
- Read premium blog posts
- Access digital downloads
- Access other kinds of gated content.
This tutorial is designed exactly for creating proper login and registration pages in WordPress for these needs.
Such login pages in WordPress will be a gateway for your subscribers to access paid content, renew their plans, and stay engaged in many other ways.
To create a login page in WordPress, we’ll be using the ARMember plugin, a powerful and user-friendly WordPress membership solution that lets any business, entrepreneur or hobbyist sell content or digital products.
In addition to creating paid content, restricting it, and connecting payment gateways to automate the access process, you will be able to create and customize login pages in WP.
Install and Activate ARMember & Run a Setup Wizard
Let’s begin with installing the plugin. To do that, you should already have the plugin file of your choice – free or premium – choose which one suits your needs at the moment.
Start by installing the ARMember plugin from your WordPress dashboard (Plugins → Add New → Upload → Install → Activate).
Once you activate it, the plugin launches a setup wizard that walks you through all the key steps for configuring memberships and login WordPress page functionality.
Without this basic setup, it’s too early to create your users’ login and registration pages.
Step 1: Set Up Member Registration Approval Options
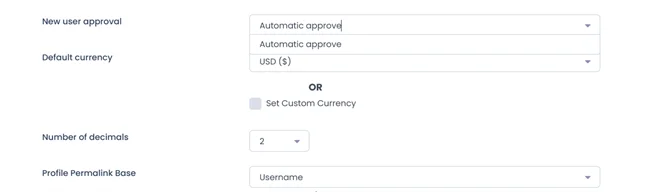
One of the related steps is to decide how new subscribers can register:
- Automatic approval (gives your users instant access after payment)
- Manual approval – if you want to view and verify new members first by hand
- Email verification – to confirm legitimate signups
You’ll find these options in the initial setup wizard or later under ARMember → General Settings → New User Approval.
Step 2: Choose Payment Method for User Registration
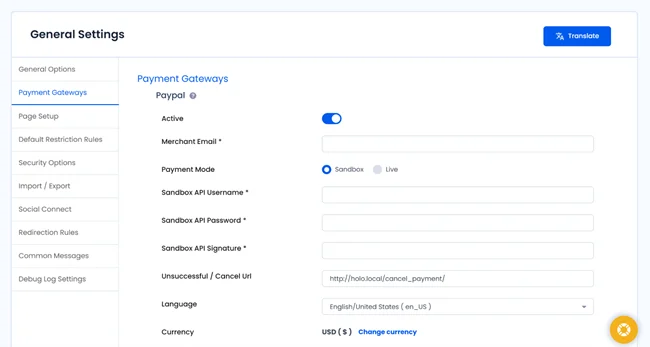
Since you’re selling subscriptions, you’ll want to choose your site’s currency and set up payment gateways.
ARMember supports PayPal and bank transfers even in the free version, but you can upgrade for Stripe, Authorize.net, and other gateways for your login page WordPress.
You can manage this under ARMember → General Settings → Payment Gateways.
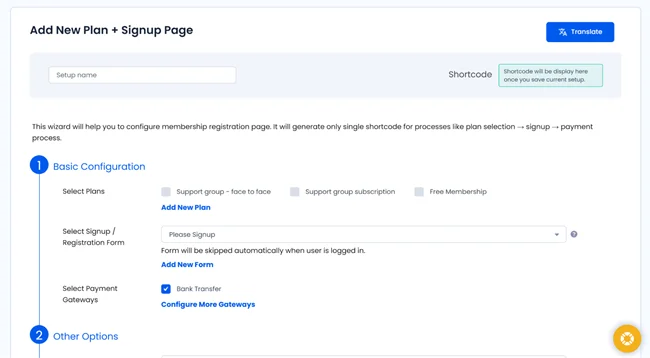
Step 3: Create Subscription (Membership) Plans
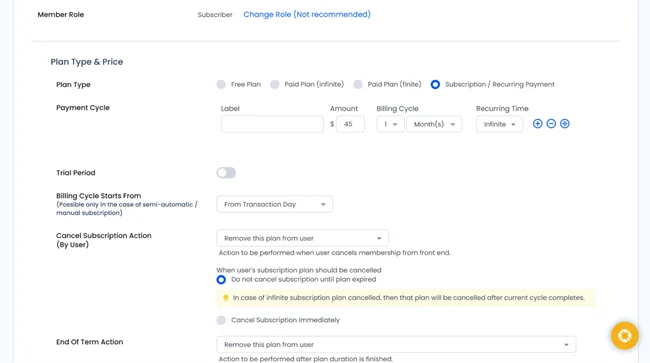
Now it’s time to define your actual subscription plans, which are the products you’ll sell. You will have multiple settings to give your plans true flexibility.
Go to ARMember → Manage Plans → Add New Plan and choose:
- Free, one-time, or recurring
- Billing cycle (e.g., monthly, yearly)
- Plan name and description (e.g., Premium Access, Monthly Insider Plan).
From there, you will access a table, where you can also assign which content each plan will unlock.
Step 4: Restrict Premium Content
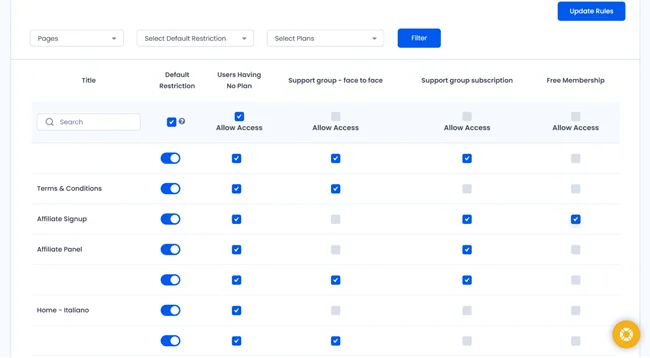
Gated content with paywall requires understanding what your users can and can’t access based on the plan they paid for. To ensure only subscribers can access your paid material, set up content restriction rules.
From ARMember → Content Access Rules, you can choose exactly which posts, pages, or categories in WordPress are available to each membership plan. Of course, those pages should already exist on your site.
It’s cool when a membership plugin gives you the ability to let free users see teasers while paid subscribers get full access.
Step 5: Create and Customize Login & Registration Pages
So, the basic and necessary login page WordPress setup is done, ARMember actually then automatically generates essential membership pages, including those we need for our WordPress user registration tutorial:
- Login page
- Registration (signup page) page
- Member profile page
It’s easy to find these when you go to ARMember → General Settings → Page Setup. Each page comes with a shortcode you can copy and insert anywhere on your site.
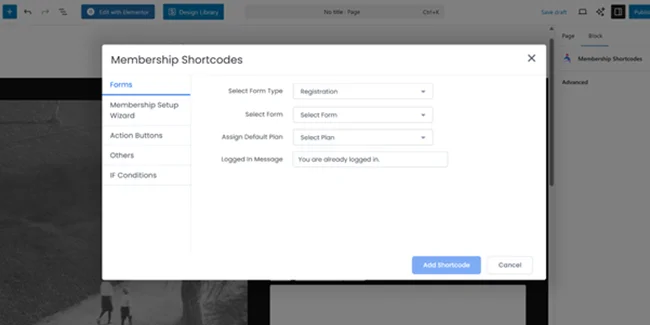
For example, to add your login form to a custom page, simply paste the ARMember shortcode into a new page in WordPress.
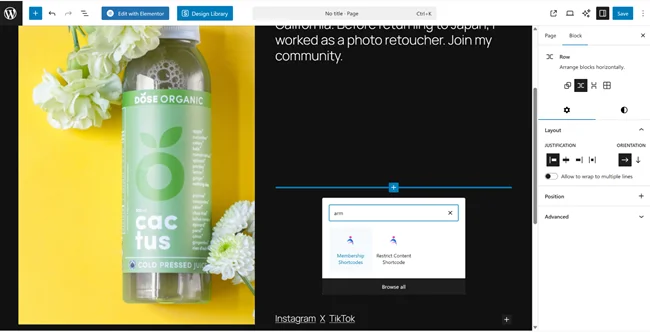
Choose an ARMember block and paste it to the needed page. Select more settings, e.g., which exactly form you want to place – for registration, or login.
If your site uses Elementor, Divi, Bricks, or the WordPress block editor, ARMember still gives you all the tools you need – you can also insert ARMember forms/widgets directly and style them however you like.

For that, you can use an advanced forms customizer that helps you choose style settings.
Step 6: Customize the Design of Your Login Forms
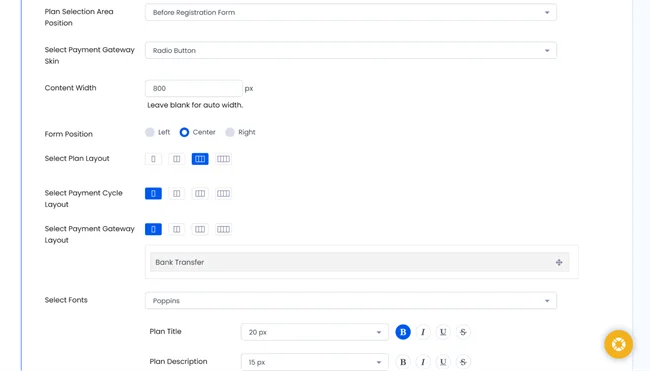
Default style not enough? So, your WordPress registration pages should match the style of the WordPress theme you are choosing: go to ARMember → General Settings → Frontend Font Settings.
Here in, you can customize form colors, fonts, button styles, and more for your member login and registration forms.
It’s also easy to edit the wording of your registration or login messages to create more branded user experience.
Step 7: Test Your User Registration Flow

Before going live, test everything as if you were a customer:
- Register a new account
- Purchase a subscription plan
- Log in and access restricted content
Make sure the process is exactly as you planned, from registration to login to accessing premium content.
Finally, Why Choose ARMember for WordPress User Registration
Login page WordPress? Easy. Besides login and registration pages for customers who will use your premium content, ARMember offers tons of features that make running a subscription and premium content site like course selling business easier:
- Automated renewals and recurring billing.
- Drip content release.
- Role based content access.
- Customizable member dashboards.
- Advanced security and spam protection.
- Exportable member data for reports.
- Multiple social community and affiliate settings.
- Automated communications with users via WhatsApp and more.
Creating dedicated login and registration pages in WordPress is essential when you’re selling content subscriptions. With ARMember, you can handle everything – from payment collection to user management – in one powerful user registration plugin.
FAQs
How do I create a login page in WordPress?
You can create a login page in WordPress using the ARMember plugin. First you have to install and activate it and then it’ll automatically generate a login and signup page under ARMember → General Settings → Page Setup. Lastly, you can place the provided shortcode on any web page to display your login form.
How does an ARMember WordPress login page work?
The ARMember login page allows registered users or members to access their accounts and unlock the premium content. Further, It connects directly with your membership plans to. Thus only the paid or approved members can log in and access restricted exclusive content.
How do I create a registration page in WordPress for new users?
With ARMember, you can automatically create a registration page in WordPress for new users. ARMember is a feature rich membership plugin for WordPress that comes with built-in drag and drop form builder. Best of all, it automatically creates a registration page during setup.
Later, you can customize it by editing the form fields and inserting the registration shortcode or block on any page in WordPress.
Can I customize my WordPress login and registration forms to match my theme?
Yes, of course! You can customize your WordPress login and registration pages to match the style of your WordPress themes effortlessly . Just go to ARMember → General Settings → Frontend Font Settings. Here, you can customize form colors, fonts, button styles, and more for your member login and registration forms.
Related articles:

Share this post