


If a doctor gives you 12 medicines to eat at one go, do you think it would benefit you? No, right. Instead it is broken down to 2 medicines each for morning, afternoon, night, over a period of two days. This seems to be a more realistic and applicable way to have medicines.
Similarly, if you provide content at regular intervals to your users, it would be more digestible to them and aid you in the long run. If you are running a membership website, at some point, you will have to provide premium, new content and create a drip content schedule to show them the value. Be it an online course, digital downloads, e-books, or a workout program, it is not advisable to show your entire content in one go. You can make it available step-by-step to different membership levels, and the feature of Drip Content will help you achieve it.
Firstly, let us understand what Drip Content actually is and how it can help you.
Uncovering the Meaning of Drip Content for Membership Site
Have you accessed an online course wherein you are able to go to the next chapter only after finishing the current chapter or after appearing for a quiz?
Or you must have subscribed to a magazine for which you receive a monthly issue. Or subscribed to a Newsletter that comes weekly or twice a week on fix days.
All these are examples of Drip Content.
Drip Schedule simply means scheduling your piece of content to release at specific intervals instead of all at once, just like a TV Series or Seasons of Web Series. There are some series whose episodes launch at a specific day every week and you eagerly wait for the release. Aren’t you hooked to the show in this manner? Instead of binge-watching the entire season, you wait for that day to have access to content.
Now think of you being the Content Provider. When you give everything at once, users will access it all at once and log off from your platform. They would not have something to keep logging back. Now, when you release content gradually, the users wait to access it and log in again and again to access it. What’s more beneficial? We are sure you know the answer.

Benefits of Drip Content Strategy
Let us explore some other benefits of using the Drip Content Scheduling Method for your WordPress membership site.
1) Increased Engagement with the Platform using Content Drip
As we discussed earlier, users would log in more at regular intervals to access the content on your WordPress site. If you utilise this module with an online course, you can let users access the next chapter only after the completion of the current one and submitting an assignment. The users can access content at their own pace.
2) Restrict Content Theft
Content Theft and Duplication is rampant in the digital arena. When you provide all the premium content at once, a user would purchase the plan, login, go through all your ideas and membership content, and ask for a refund in just a day or two. In such a situation you will fall into a dilemma. You cannot deny a refund outrightly as they might spread bad word regarding your support. You cannot even save your content any more as it was you who had put it out all at once.
Opt for dripping content on your membership site gradually so the users would have to stick around a little longer to get the benefits. Further, you must look at the ways in which you can control data theft and release your content accordingly.

3) Sorted Schedule Sorted You with Drip Feed Content
When you put out all the ready content at once, after some time, you will have to ideate a completely new batch of content to keep your Website Members active. Now, this is a stressful task and you will have to do a lot in a short interval.
Instead, as a membership site owner, you can divide the ready content in a schedule to be sent to users at specific intervals or particular dates. This allows you to create the next batch of content in a longer time duration. When the schedule is sorted, you feel sorted. Drip Content is a great way to sustain your content membership for a longer time.
4) Give Fresh Content to your Members at regular intervals
At times, there are many dated facts and figures. With a schedule, there is a scope to add any such updates to keep the content fresh and relevant when the members get access to your content. Further, you can analyse the performance of your previously dropped content and how the users engaged with it. This will help you to modify the next piece by incorporating feedback and providing exceptional content to your customers.
5) Feeling of Increased Value
When you drip content over time, the users feel engaged and thus, feel the value of the membership. Think of an influencer. If they post at random intervals and are active haphazardly, you would not like to continue to follow them. On the other hand, you will be hooked with an influencer who posts content at a regular interval and keeps giving updates in their inactive period. This lets members keep returning to your site regularly.
Drip Content is the practice that creates value in the user’s mind for their time and money spent on your Website. Increased user gratification, increased reputation.
6) Active and Invested with Content on your Website
When you release content gradually and edit the next content based on user feedback, they feel that you are invested. We feel good when someone listens to us and validates our ideas. A similar thing happens to users here. They feel that you are very active and would solve any of their queries with ample support anytime.
Isn’t that the image that you want to build for your online membership site?
The Next Question that may have come to your mind is how to Drip the Content actually? Content can be a powerful tool but content without a proper thought is useless.
Well, it is very easy with the ARMember Pro WordPress Plugin as the Drip Content is an in-built add-on.

Steps to Set Up Drip Content on your Site
Let us look at how to activate the Drip Content rule and the available options using ARMember Pro.
- Go to ARMember>Add-ons>Drip Content>Activate>Configure
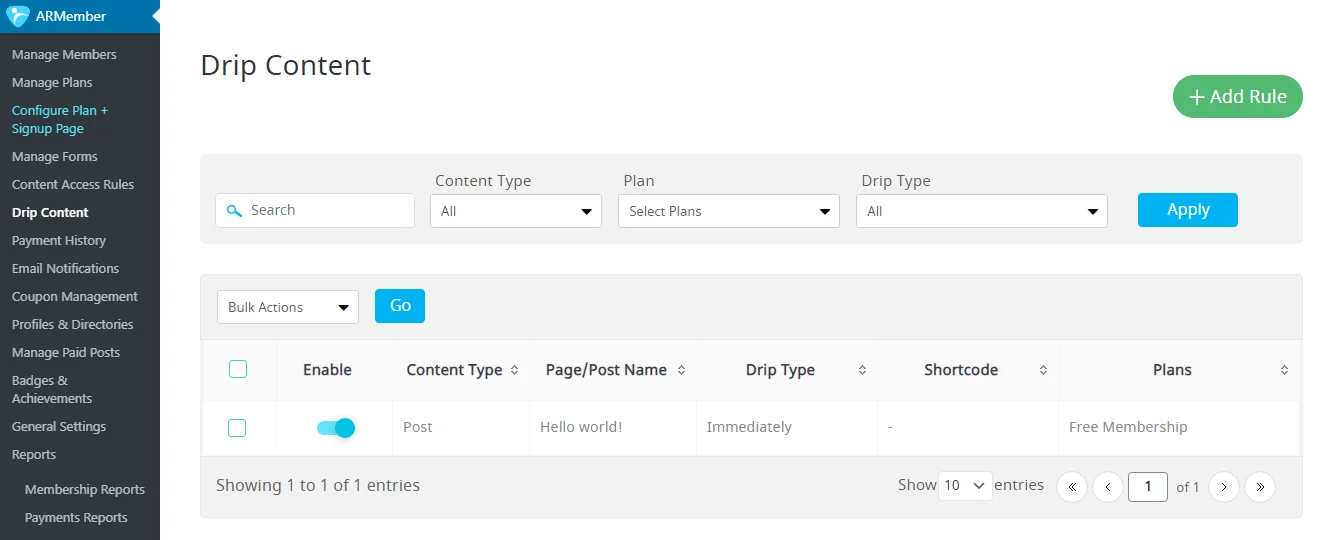
- Once you do this, you will see the option of Drip Content on the left side panel of the WordPress. Click on it to open the page of setting up the drip rules for protecting your content.
- On top of the page, you will see several drop down options from which you can select Content Type, Particular Membership Plan, and Drip Type
- Set a new rule by clicking on the green button of ‘Add Rule’
- The Content Type would give you options of choosing the type of content for which you want to apply the drip rule. You can choose from Page, Post, Products, User Posts, and Custom Content.
- The Membership Plan lets you select the plan for which you wish to apply the rule. You can customise whether the rule is applicable to all plan members or only a specific plan member and keep your content protected.
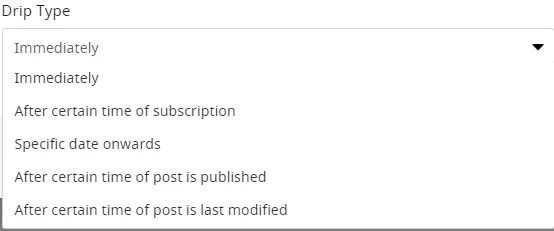
- The Drip Type is the various ways in which you can drip content for your membership. These are the conditions that are applicable while releasing new content
- 1) Immediately lets you show a specific content that members can access directly after purchasing the plan.
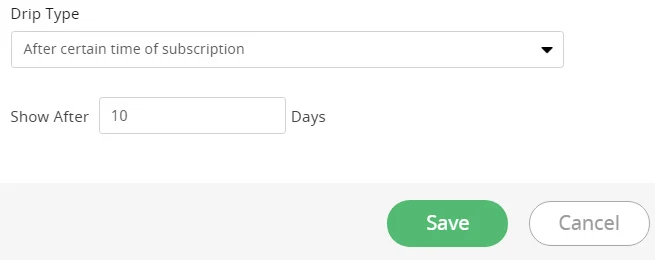
- 2) After a certain time of subscription lets you set a number of days for releasing the content wherein the users will be able to access the content after that many days of purchasing the plan.
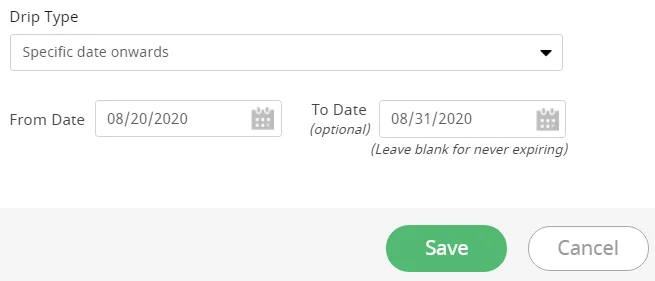
- 3) Specific Date onwards applies a specific date to get new content. From that date onwards your content will be released for members regardless of when they purchased the plan.
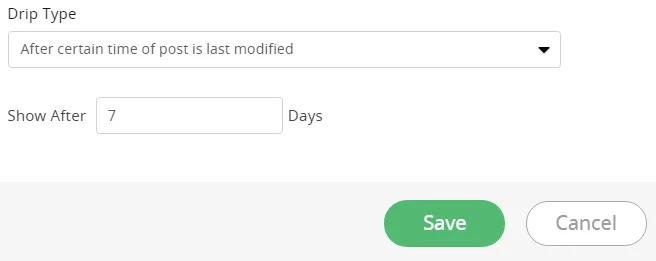
- 4) After a certain time a post is published and modified is a rule that will set a number of days. Thus, after that specific number of days of your published/modified post, the chosen plan members can access course content.
- Apply the Rule based on your requirement.
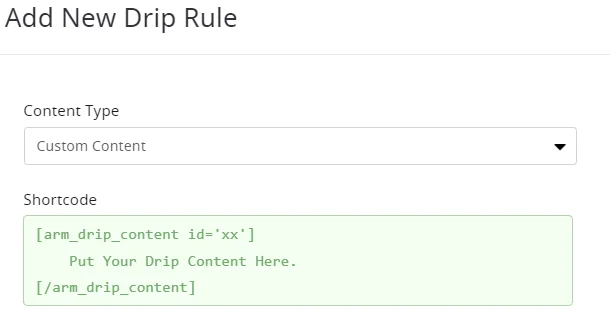
Further, the ARMember premium WordPress plugin gives you a unique option of Custom Content that lets you drip a specific content instead of the complete post or page. This can be simply done with the use of a short code. Make use of the custom content option in the Custom Type drop down.
- Further, you can go to General Settings>Redirection Rules>Choose Restricted Drip Rule Redirection
- Now, when a user who is not allowed to access any specific content, visits your site and clicks on it, where do you wish to redirect them? You can select the home page, plan a subscription page, or sign up form based on your target.
- Thus, when a restricted user clicks on the content post, they will be redirected and won’t be able to access your content.
Getting the Maximum Benefit by Dripping Content to your Members
I am sure you want to set up drip content and take maximum benefits of the feature. Sharing content on a fixed schedule will help you achieve more control over your Website and how it is accessed by the users.
It is a win-win situation for you and the users both with its ample amount of benefits.
If you are running a workout program or a nutrition plan website, it will be beneficial to give the users access gradually so that they are not overwhelmed and can take baby steps along with you.
FAQs to ace the game of Dripping Content
1) Is Using the Drip Content Schedule similar to Drip Marketing
Both have a common idea. To provide users with information at intervals. In Marketing, this model is used to persuade customers and prospects with pre-set messages using email marketing. While on a membership site, it is to keep users engaged.
2) Can I Check User Progress on Membership Websites while Dripping Content?
You can see how the users are interacting with your content and what kind of feedback they are giving. Establish a community on your membership site to understand user progress and performance.
3) Is there a surety of user retention when you use drip content?
The probability of users sticking around increases as they wait for the next content drop from your end. If the content is valuable and interesting, the user retention would definitely increase.

Share this post